I think this is an older 600 Junior? Can someone verify before I go look for parts? A bit rough but cheap. Missing (and looking) for a few parts to bring it back to life; drop tube, 12 ga sizing ring, primer pad and spring and? Thanks in advance!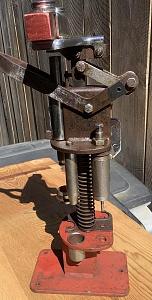

|
   
   
|


|


I think this is an older 600 Junior? Can someone verify before I go look for parts? A bit rough but cheap. Missing (and looking) for a few parts to bring it back to life; drop tube, 12 ga sizing ring, primer pad and spring and? Thanks in advance!
When you want to fool the world, tell the truth. Otto von Bismarck

Yep 600jr, when they still had steel dies too! You will need the lock ring for the sizer ring as well. Make sure you have the pre crimp starter that you want,, 8 or 6, they are no longer available. If not get the spindex plastic die conversion for crimp starting. And some extra wad guide fingers.
�You don�t practice until you get it right. You practice until you can�t get it wrong.� Jason Elam, All-Pro kicker, Denver Broncos

Looks like a MK-5. 600 Jr. in 12 gauge. Talk to the people at MEC. They have parts that should fit. Should be marking on the red base plate. Be sure to download the manual that's free online. It'll help identify missing parts by name and parts number.
BE SURE TO SAVE ALL YOUR OLDER PARTS ON THE PRESS. DONT THROW ANY AWAY.
The steel pre-crimp and final crimp are hard if not impossible to find. The original metal rings for the inside of pre-crimp that do the 6 or 8 point crimping IMHO are better than the plastic replacement parts so hold on to them and keep them in good condition.
Last edited by MOA; 06-13-2021 at 01:17 PM.
[SIGPIC][/SIGPIC]
Originally Posted by MarkK

https://www.mecoutdoors.com/Content/documents/600jr.pdf
This should help.
[SIGPIC][/SIGPIC]
Thanks for all the info guys! I�ve got her striped down and most of the heavier rust off; will sand blast the rest and re-blue/paint. With regards to other gauges (i.e., 16 and 20), will I need to buy separate sets of dies or can I get away with some of the 12 ga pieces?
When you want to fool the world, tell the truth. Otto von Bismarck


This is a perfect example of how reloading tools get left in a garage and go to pot. Glad to hear you are doing a complete refurbish. The machine is made of steel so what you are doing will yield a decent machine when done.
Hot Tip: Mount it to a piece of 3/4" Plywood or an Aluminum Plate and store it in a Cabinet when not in use, or at least keep it covered with a Plastic Trash Bag. It will stay nice longer that way.
Randy
"It's not how well you do what you know how to do,,,It's how well you do what you DON'T know how to do!"
www.buchananprecisionmachine.com
I used to leave the 20 ga deprime head, drop tube, and primer seater on mine for 12,16, and 20. Everything comes in the gage specific die kit but that was less stuff to change. I found other used 600s for cheap pretty often so have a full set now. Trying to convert a 9000 from 20 to 16 presently, going to be much more “interesting” than a 600, what was I thinking. Oh yeah, the 20 ga 9000 was free....
�You don�t practice until you get it right. You practice until you can�t get it wrong.� Jason Elam, All-Pro kicker, Denver Broncos
I initially went that route back in 1981 after getting my first 600 in 12 gauge. Bought the 10 gauge dies an then the 16 and swapped them out. A real PITA. Save yourself time, frustration, and money. Keep your eyes out for more 600 Jr's in those gauges you shoot/want.
[SIGPIC][/SIGPIC]
Unless there is a trick, it looks like I need to tap in or out the roll pin in the column to remove the wad gauge bracket. Correct?
Also, my dies are set up for 8 point crimp. What are my options for doing 6 point?
Last edited by MarkK; 06-13-2021 at 10:17 PM.
When you want to fool the world, tell the truth. Otto von Bismarck
Mark, unless you find, or come across another steel 6 point pre-crimp ring, stick with reloading 8 point crimped hulls. Don't crimp 6 point hulls with the crimp ring you have now. Your AA hulls and most target loaded factory hulls are 8 point crimps.
Your option is to order a 6 point pre-crimp die from MEC or located one from a member or Ebay maybe Amazon too.
[SIGPIC][/SIGPIC]


No, you don't have to remove the pin. It has been a few months since I did it, but I believe with the press handle down, you can pull the metal slider off and below the pin. Raise the press handle, and the wad guide/slider assembly comes out the bottom.

I bit the bullet for a 16 gauge 9000 and bought a previously owned but supposedly unused one off Fleabay for about $75 less then i could order a new one at dealer cost . All my other 9000's I've bought in used but well maintained condition . Even went so far as getting back up 9000's for the 12 and 28 gauge .
Parker's , 6.5mm's and my family in the Philippines
The refurb is coming along on my my pre ‘82 MEC 600 Jr. but it looks like I’m missing a critical part specifically, part number 73 (eject cam) on the exploded diagram. Spoke with MEC and they said it is no longer available and the same part on the newer models is not interchangeable. I guess I will need to keep my open eyes for another old 600 unless there is a work around?
Last edited by MarkK; 07-25-2021 at 11:08 PM.
When you want to fool the world, tell the truth. Otto von Bismarck
You mean part nbr. 723 correct.
Maybe one of our machinest members could make you a eject cam. You might contact MEC again to see if they would provide you with a shop drawing so you could have one fabricated.
[SIGPIC][/SIGPIC]
Actually, 73. A drawing would certainly be helpful.
Last edited by MarkK; 07-25-2021 at 11:08 PM.
When you want to fool the world, tell the truth. Otto von Bismarck


you might wanna get yourself a universal charge bar for that baby.. adjustable charge and shot dropping tool.. i have them for both of my Mec's
Any technology not understood, can seem like Magic!!!
I will love the Lord with all my heart, all my soul, and all my mind.
Yep, looking at your picture it’s not there. Give me a bit to look thru my spares, and general mec junk. I might have one.
�You don�t practice until you get it right. You practice until you can�t get it wrong.� Jason Elam, All-Pro kicker, Denver Broncos

I have to add this to the general discussion; when you’re using a “ sand- blaster” be careful to not”blow off”the sharp edges. If you are using a blast cabinet, try to use glass beads media for your clean up on your metal surfaces, it leaves a way smoother finish, and will still have a deep enough “ profile “for your paint to adhere to! Good job on refurbishing an old press which obviously has much life left in it! Just my opinions.
I firmly believe that you should only get treated by how you act, not by who or what you are!!
Sorry, I rummaged thru my two boxes but no luck. I don’t remember ever taking it off, gotta work at it to lose that! I did look at the ones on my loaders, would be reasonably easy to make one. It’s not really a high precision part, a hacksaw and file would get it done. It does have a bent offset to line up correctly.
�You don�t practice until you get it right. You practice until you can�t get it wrong.� Jason Elam, All-Pro kicker, Denver Broncos
Don't have a single stage to try it on, but would the part taken off a correct vintage single stage and laid on(under?) a piece of graph paper on the copy machine yield an accurate enough drawing to make a part from?
Just old guy ramblings.......
 Posting Permissions


| BP | Bronze Point | IMR | Improved Military Rifle | PTD | Pointed |
| BR | Bench Rest | M | Magnum | RN | Round Nose |
| BT | Boat Tail | PL | Power-Lokt | SP | Soft Point |
| C | Compressed Charge | PR | Primer | SPCL | Soft Point "Core-Lokt" |
| HP | Hollow Point | PSPCL | Pointed Soft Point "Core Lokt" | C.O.L. | Cartridge Overall Length |
| PSP | Pointed Soft Point | Spz | Spitzer Point | SBT | Spitzer Boat Tail |
| LRN | Lead Round Nose | LWC | Lead Wad Cutter | LSWC | Lead Semi Wad Cutter |
| GC | Gas Check |

 Reply With Quote
 W.R.Buchanan