Lee PrecisionReloading EverythingLoad DataMidSouth Shooters Supply
Inline FabricationTitan ReloadingWidenersRepackbox
Snyders Jerky RotoMetals2
Results 1 to 18 of 18

Thread: Printable boolit template- Did I do it right?

  1. #1
    Boolit Buddy jabilli's Avatar
    Join Date
    Sep 2010
    Posts
    168

    Printable boolit template- Did I do it right?

    So I'm looking into fiddling with paper patching.

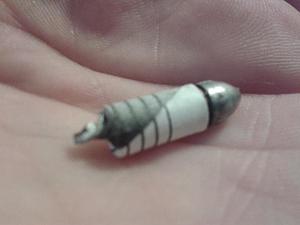
    Not sure if I did this right or not, but I made a printable PDF that fits around my .223 pretty well. Feedback please? Anyone print this out and confirm it works for them? The sizing does seem to be about right for printer paper, but I'm thinking for those who use thicker paper, it might need be enlarged slightly...Yes? If so I will whip up a bigger version.

    https://docs.google.com/file/d/0B2uU...it?usp=sharing I promise it wont send you somewhere bad.

    Click image for larger version. 

Name:	WP_000483.jpg 
Views:	41 
Size:	27.8 KB 
ID:	62458
    Attached Thumbnails Attached Thumbnails Rhombi223.jpg  
    Last edited by jabilli; 02-26-2013 at 04:59 PM.
    I believe you...but my Tommy gun don't.

  2. #2
    Boolit Buddy jabilli's Avatar
    Join Date
    Sep 2010
    Posts
    168
    Should be noted! There is a significant difference in size when you cut inside the lines, in the middle of the lines, and on the outside of the lines.

    Tried it with double wrapping as well, just cut it 2-long and wrapped. This, without any kind of glue or paste, just the paper, added .010" with my standard printer paper.
    Last edited by jabilli; 02-26-2013 at 05:19 PM.
    I believe you...but my Tommy gun don't.

  3. #3
    Boolit Buddy jabilli's Avatar
    Join Date
    Sep 2010
    Posts
    168
    No love for the .223 hm? Haha Okay how about I try a caliber that more folks might actually cast- 9mm . Being .356, I assume these also work for .38 special, .357 Magnum, and .357 Sig.

    In two different flavors- Black and White, and for those who want to be sparing with their ink- Greyscale. :-p

    https://docs.google.com/file/d/0B2uU...it?usp=sharing -Black and White

    https://docs.google.com/file/d/0B2uU...it?usp=sharing -Grey

    You'll see I marked and cut each to half-height, so there isn't a ridiculously long tail. Also get twice the patches. :-p (May or may not work for other bullet types, I assume.)

    Click image for larger version. 

Name:	WP_000489.jpg 
Views:	29 
Size:	27.2 KB 
ID:	62584Click image for larger version. 

Name:	WP_000492.jpg 
Views:	27 
Size:	27.9 KB 
ID:	62585Click image for larger version. 

Name:	WP_000497.jpg 
Views:	25 
Size:	31.9 KB 
ID:	62586Click image for larger version. 

Name:	WP_000494.jpg 
Views:	26 
Size:	44.2 KB 
ID:	62587Click image for larger version. 

Name:	WP_000495.jpg 
Views:	26 
Size:	35.9 KB 
ID:	62588Click image for larger version. 

Name:	WP_000496.jpg 
Views:	24 
Size:	40.6 KB 
ID:	62589Click image for larger version. 

Name:	WP_000488.jpg 
Views:	24 
Size:	24.8 KB 
ID:	62590

    I noticed after I submitted this that the twist is going against my rifling direction (clockwise) I remedied this by flip-flopping it around so it goes the other way.
    Last edited by jabilli; 02-27-2013 at 04:16 PM.
    I believe you...but my Tommy gun don't.

  4. #4
    Boolit Buddy jabilli's Avatar
    Join Date
    Sep 2010
    Posts
    168
    Howsabout you .30 cal shooters?

    Click image for larger version. 

Name:	WP_000498.jpg 
Views:	26 
Size:	34.4 KB 
ID:	62640 Lee CTL312-160-2R pictured left, Lee C309-120-R Right

    https://docs.google.com/file/d/0B2uU...it?usp=sharing
    Last edited by jabilli; 02-27-2013 at 09:56 PM.
    I believe you...but my Tommy gun don't.

  5. #5
    Banned


    Join Date
    Mar 2009
    Location
    29˚68’27”N, 99˚12’07”W
    Posts
    14,662
    Attachment not working. I think there's a sticky on patch templates, if not there's a good thread on it somewhere, much easier. I cut them several hundred at a time with a guillotine-type paper cutter. Painter's tape makes great guidelines for the length and angles. Might I make a plea for WET patching? MUCH easier for me and works a whole lot better on the smokeless stuff because it shrinks tight into the grooves and stays put going through the gun.

    Gear

  6. #6
    Boolit Buddy jabilli's Avatar
    Join Date
    Sep 2010
    Posts
    168
    Ah I see an error in the formatting I did- I'm guessing you clicked the first link in the .30 cal window? I went back and edited it so it should work fine now. I understand you to be very experienced in PP so if ya say go wet, I'll go wet. I saw somewhere that someone had a template for a .303, I'll look again, thanks
    I believe you...but my Tommy gun don't.

  7. #7
    In Remembrance


    Join Date
    Oct 2008
    Location
    Michigan Thumb Area
    Posts
    5,948
    Quote Originally Posted by geargnasher View Post
    Attachment not working. I think there's a sticky on patch templates, if not there's a good thread on it somewhere, much easier. I cut them several hundred at a time with a guillotine-type paper cutter. Painter's tape makes great guidelines for the length and angles. Might I make a plea for WET patching? MUCH easier for me and works a whole lot better on the smokeless stuff because it shrinks tight into the grooves and stays put going through the gun.

    Gear
    You got it right about wet patching Gear. Robert

  8. #8
    Boolit Grand Master 303Guy's Avatar
    Join Date
    Oct 2008
    Location
    New Zealand
    Posts
    9,078
    I'm the 303 template guy. Mine are curved to suit my tapered boolits and I dry wrap for now. It is hard on the fingers but does conform to the boolit grooves - but hard on the fingers to get it there. Wet patches require a slight adjustment to the size to accommodate the wet expansion which is why is shrinks tight on the core. Volume patching will require wet wrapping for sure. Oh, cutting curved patches defies volume patching right there! But one day I'll build a patch punch.
    Rest In Peace My Son (01/06/1986 - 14/01/2014)

    ''Assume everything that moves is a human before identifying as otherwise''

  9. #9
    Boolit Buddy jabilli's Avatar
    Join Date
    Sep 2010
    Posts
    168
    @303 - Wow, that must have been quite an undertaking to design the curve so that it would wrap around it just so. This design here was simple but a PITA to make, I imagine less of a PITA to do than yours- I found an image of a rhombus, then copy and pasted it in an image editor zoomed in veeery carefully so the pixels aligned. After making one row, copy, paste, copy paste, several rows. I did this rather than drawing lines for 3 reasons- 1. I don't have a protractor so I couldn't physically draw the template, then scan it in. 2. I don't know of any protractor type tools in graphic editors. 3. I figured even being very careful, I felt drawing lines whether by hand or by computer, could still leave room for missing a angle by a degree or two. I was For sizing I calculated circumference based on diameter, to give me an idea of ABOUT the size needed...then print,try, curse and swear, print, try, curse, print, try, curse until I got it just so. To my frustration, and as I expected, using thicker cotton or linen paper makes the template turn out undersized.

    I tried wetting a few pieces of cotton paper- It was nice in the sense that it didn't slip on the bullet as wound it around (as much) but I found that it was quite easy to tear the paper when wet. >< Youtube video guys made it look stretchy like taffee. :-p
    Last edited by jabilli; 02-28-2013 at 10:31 PM.
    I believe you...but my Tommy gun don't.

  10. #10
    Boolit Grand Master 303Guy's Avatar
    Join Date
    Oct 2008
    Location
    New Zealand
    Posts
    9,078
    I draw mine using CAD. I can copy with ease. The actual shape development on CAD is easy and the accuracy is absolute. But not necessary for cylindrical boolits. I'm going to continue playing with tapered boolits and curved patches but I've got to find a better way of cutting them!

    How I develop a patch shape is I measure the boolit at two points with one wrap of the paper to be used, base edge and nose diameter where the patch will end and the distance between those points. I then draw two circles using those diameters at the measured distance apart, the smaller circle directly above the larger. I then extend the tangents of those two circles to find the intersect. I then draw two circles from that intersect through the centres of the firs two circles. That forms the correct curve of the patch. I do a little dancing act to get the side angles then add an offset circle to create the patch tail or skirt. I could probably just quote nursery rhymes from this point on and no one would notice.
    Rest In Peace My Son (01/06/1986 - 14/01/2014)

    ''Assume everything that moves is a human before identifying as otherwise''

  11. #11
    Boolit Buddy
    Join Date
    Apr 2012
    Location
    Victoria, Au
    Posts
    337
    Quote Originally Posted by 303Guy View Post
    I could probably just quote nursery rhymes from this point on and no one would notice.
    You could.Whew, that is a bit steep, the process of designing...

  12. #12
    Banned
    Join Date
    Dec 2011
    Location
    E.S.E. Ohio
    Posts
    55
    Hmmm... What was that about removing doubt?? I just now looked at this. I'm obviously doing it all wrong. And, 303guy is right, My eyes were glazing a bit! If I get ambitious enough to try it, and can see it, I might understand it better. What was that bit about Mary and a lamb?

  13. #13
    Boolit Buddy
    Join Date
    Apr 2012
    Location
    Victoria, Au
    Posts
    337
    Hi Jabilli, just tried your 30 cal design to PP a Lee 0.309/170 to 0.324.
    Will report back as it happens...
    Thanks for the patch design
    Cheers

  14. #14
    Boolit Buddy jabilli's Avatar
    Join Date
    Sep 2010
    Posts
    168
    Quote Originally Posted by eljefeoz View Post
    Hi Jabilli, just tried your 30 cal design to PP a Lee 0.309/170 to 0.324.
    Will report back as it happens...
    Thanks for the patch design
    Cheers
    You're welcome- Hope it works. :-p
    I believe you...but my Tommy gun don't.

  15. #15
    Boolit Grand Master 303Guy's Avatar
    Join Date
    Oct 2008
    Location
    New Zealand
    Posts
    9,078
    Something on wrap direction - it's the unwrapping in flight that dictates direction. This happens to be the same as the same direction as the rifling. Anyway, there's more chance of the patch jettisoning quickly when wrapped in the twist direction. It'll make no difference if the patch confetti's but probably a big difference if it comes off in big pieces (I think). Me being right handed I think it's more natural to wrap for my left hand twist bores (or maybe it's just the way I do it and I'm used to it?)
    Rest In Peace My Son (01/06/1986 - 14/01/2014)

    ''Assume everything that moves is a human before identifying as otherwise''

  16. #16
    Boolit Bub Aces an Eights's Avatar
    Join Date
    Aug 2011
    Location
    New Zealand
    Posts
    54
    Quote Originally Posted by 303Guy View Post
    How I develop a patch shape is I measure the boolit at two points with one wrap of the paper to be used, base edge and nose diameter where the patch will end and the distance between those points. I then draw two circles using those diameters at the measured distance apart, the smaller circle directly above the larger. I then extend the tangents of those two circles to find the intersect. I then draw two circles from that intersect through the centres of the firs two circles.
    Sorry if I'm hi-jacking.
    303 I really like your conical idea, I'm going to try it out with a TL230-452-TC in my 1895, it should be extreme : - )

    Curious do you account for the diameters being bigger on the 2nd wrap?
    “It’s not a very big one, but at least it’s dead and it took an awful lot of killing!” - Prince Philip

  17. #17
    Boolit Grand Master 303Guy's Avatar
    Join Date
    Oct 2008
    Location
    New Zealand
    Posts
    9,078
    Curious do you account for the diameters being bigger on the 2nd wrap?
    Yes I do. That's why I measure the diameter with one wrap.
    Rest In Peace My Son (01/06/1986 - 14/01/2014)

    ''Assume everything that moves is a human before identifying as otherwise''

  18. #18
    Boolit Bub Aces an Eights's Avatar
    Join Date
    Aug 2011
    Location
    New Zealand
    Posts
    54
    Cool, given me a lot of food for thought thanks.
    “It’s not a very big one, but at least it’s dead and it took an awful lot of killing!” - Prince Philip

Posting Permissions

  • You may not post new threads
  • You may not post replies
  • You may not post attachments
  • You may not edit your posts
  •  
Abbreviations used in Reloading

BP Bronze Point IMR Improved Military Rifle PTD Pointed
BR Bench Rest M Magnum RN Round Nose
BT Boat Tail PL Power-Lokt SP Soft Point
C Compressed Charge PR Primer SPCL Soft Point "Core-Lokt"
HP Hollow Point PSPCL Pointed Soft Point "Core Lokt" C.O.L. Cartridge Overall Length
PSP Pointed Soft Point Spz Spitzer Point SBT Spitzer Boat Tail
LRN Lead Round Nose LWC Lead Wad Cutter LSWC Lead Semi Wad Cutter
GC Gas Check