Well alright then! Learned something new. Thanks a bunchOriginally Posted by TylerR

I think I need a new nozzle, my prints are looking sad today

|
   
   
|


|


Well alright then! Learned something new. Thanks a bunch
I think I need a new nozzle, my prints are looking sad today

Acetone, huh!......I woulda thought it would ruin the surface......really good to know!! On my way to buy some for my printed funnels and tubes!
BTW, I tried the .12 layer height. The down tube took an hour longer tho.....Smoother, better looking, but still a bit rough for the little .223 bullets.....acetone may be the magic cure? Cool!

Last edited by GWS; 11-04-2020 at 08:32 PM.
I think sometimes I forget we are printing with plastic in layers and layer lines happen. I swear I’m eyeballing a resin printer for drop tubes etc. however that’s a rabbit hole I really don’t want to go down.
New microswiss nozzles ordered. Wooohoooo
I don't ever forget that.....I put up with that!So glad to hear of a possible help.
I used to build model airplanes. I learned to use gap filling super glue to fill voids, improve canopies make perfectly shaped wing lights, and the secret with working with super glue is the time window. Once it sets up you have 30 minutes to an hour to shape it, sand it, and polish it.....then it's too hard to do any of those things....but within the time you can polish it just as clear as an eyeglass lens. Such might be a complimentary process for certain 3d printed products, but I thought of it when Tyler gave us this trick of his......lots of tricks out there if you know them......
I was thinking of S.glue on the inside of my funnels, but the weakness is the shape inside there. hard to shape that shape when you have a hard time getting to it....not to mention so little time...
Last edited by GWS; 11-04-2020 at 08:56 PM.

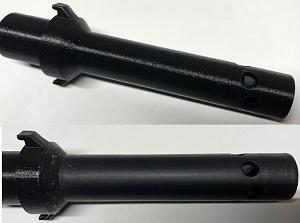
After this next print finishes, which is the 9mm die insert, I will snap a before and after pick with the acetone treatment.
On pins and needles.....
This is the shape inside my down tube funnels.....right out of the bottom of the collator.
So I'm thinking an acetone soaked cotton rag wrapped around that tool and rotated inside......might just smooth it pretty....
Something I’ve never considered and am starting to notice is I throw a p ring in the slicer and print away. Most of my parts come out a tiny bit too small so I just sand away. Something I need to do is adjust the scale size to add whatever percentage I have of the filament shrinking after the print is done. Never ever did that and am gonna try. Just watched a few YouTube videos exposing it’s a known issue. I feel dense for sure. We will see if it helps more on my needed dimensionally accuracy.
As a designer I try very hard to create parts to fit with just the right amount of tension, but every printer is different so its hard to make it perfect for all situations. In the cases where a close fit doesn't matter, I always create plenty of buffer.
I can tell you that the dimensional accuracy on my old Flashforge Creator Pro is pretty terrible. It's much better on my Ender 5.
I never really noticed until I printed the dropper die. The outside threads were a little bit too tight, inside holes were a little small etc. horizontal expansion. I look forward to testing it. I’m convinced it’s my issue. Amazing you can also correct for it. Now I need to find the shrinkage percentage for overture filament. Lol
When I was designing the insert to go into my Proximity Sensor Downtube for a .223 conversion, I was concerned about what clearance was necessary between the downtube and the insert, so it could "telescope" in tight, but not be restrictive.
So I did some research to see what manufacturers of telescoping steel tubing did, and I discovered the question was asked and answered from manufacturer to customer....and I copied what he said: He suggested the radius range be between .008" to .016"! Converting to MM that's between .2032mm to .4064mm. Look at your mm scale....that's not very much. I decided to reduce the outside radius by .3mm (the middle ground) and it worked very well....was pleased with the result on my CR-10v2...hardly any discernible give, yet it slid in fine.
The horizontal red lines show where the part ends up in the all green middle tee and top piece that twists into the base.....includes 2 diameters.
I was thinking about threading the top piece to the middle Tee but I chickened out and just superglued them together since I wasn't successful printing them as one part.
Last edited by GWS; 11-05-2020 at 01:09 AM.
Here is a pic of the die insert before and after using acetone.
Yea, that’s a huge difference. I’ll give it another go today
As a heads up I have decided to go with the 3.5mm ball bearings instead of the 4mm. They work great with the .45 version using two, so I am going to design everything else around them, instead of using two different versions. Here is a link for the ones I used.
https://www.amazon.com/gp/product/B0...?ie=UTF8&psc=1
Last edited by TylerR; 11-05-2020 at 11:02 AM.
Just ordered. You’ve clearly already tried it I assume. Wooohoooo more die printing.
Yes, the 45 and 9mm have been tested. You should not have to reprint your .45 version. Just keep it using the single 4mm for now.
I will post some video later on today of my .45 die in action.
The case I used was not expanded with my m-die, so some of them sit crooked, but this shows the feeder working flawlessly.
That’s some good timing for sure. Got mine running like a well oiled clock as well. Added the rubber o rings and that fixed lots of issues for sure. So excited!
This is with your 200gn SWC? Which height hole are you using?
It appears that it works as good as its metallic cousins.....GOOD JOB! Of course the next question is how long before you have to print another? Maybe its worthwhile for you young guys to print several....have them in the wings! For me, most likely not so important.
I've been searching the net for someway to share .scad files with my Autocad......but seems it's a lost cause. I'm getting tired and I'm not as excited as I once was to learn still another cad program......but, I haven't given up yet. Dxf's don't work, period. I kind of wanted to print your big base, but with the ability to change the outlet hole if I want or need to for big rifle cases! Guess I'll just suck it up and print one.....and if I want to take it further, use old fashioned measurements to make a .dwg file from the print.
So far the 3rd from the bottom height wise seems to be working best
 Posting Permissions


| BP | Bronze Point | IMR | Improved Military Rifle | PTD | Pointed |
| BR | Bench Rest | M | Magnum | RN | Round Nose |
| BT | Boat Tail | PL | Power-Lokt | SP | Soft Point |
| C | Compressed Charge | PR | Primer | SPCL | Soft Point "Core-Lokt" |
| HP | Hollow Point | PSPCL | Pointed Soft Point "Core Lokt" | C.O.L. | Cartridge Overall Length |
| PSP | Pointed Soft Point | Spz | Spitzer Point | SBT | Spitzer Boat Tail |
| LRN | Lead Round Nose | LWC | Lead Wad Cutter | LSWC | Lead Semi Wad Cutter |
| GC | Gas Check |

 Reply With Quote
