Looks great to me.Originally Posted by Andar


|
   
   
|


|


Looks great to me.
9mm plate worked flawlessly as well. No hangers on bullets when approaching the top like i get with the troughs / slides. I think I am liking the #5 plate with the bevel bases on this boolit over the #4.

That's a pretty cool feature. I could have used that more than once. How do you command it's exact location? So many layers up for so many layers?
I tried Cura tonight and it screwed up my printer settings so bad it started printing a hairball and I had to redo the z-offset and start over.....no clue what I did. I told you Cura and I speak different languages.I'm currently printing another .223 downtube insert with IdeaMaker to test the resetup....and am doing it at .12 instead of .2 layer height.....REAL curious to see what the difference may be.
I'll have to look at Prusa closer.....I like that feature you told us about. If the real print is as smooth as the rendition it'll be awesome!
Tyler! What's the difference between the #5 vs the #4? Just no troughs?
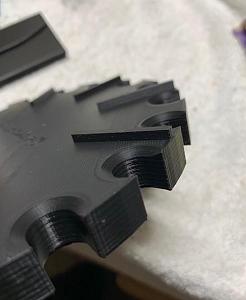
Above is a picture of the drop area of my only printed (small) AM base. I just dremeled out top and fill layers and even into the green outlet......Tyler assumed a ramp down....only the green outlet is ramped toward the hole. Remember this was first used for .45 caliber. As you saw in the .223 video, those little bullets didn't seem to mind....they just flew out of there no problem. BUT........my funneled downtube insert for .223 was too rough in the funnel and cause a backup. That's why I had to sand and polish that area to handle the speed.
What I'm wondering right now is how much difference the .12 layer setting will make in the funnel area.....THAT's why I'm printing one at the .12 layer height.....we shall soon see.
Last edited by GWS; 11-03-2020 at 10:21 PM.
I am talking about the slide plate. Not the collator plate.
So now you know......I'm a crappy mind reader.
Same question though.
Attachment 270691
This is what I posted a number of pages back when I made these plates.
OK here we go. I just posted bullet nose up slides #1-#10. These basically run from .22 cal to .50 cal, with 1mm increments. Here are the match ups I have already done.
.223 - #2
.308 - #4
9mm - #5
45acp - #7
So using .45acp as an example, the #7 plate is right in the middle (2.25mm ridge). #8 would give you 1mm less ridge, #6 1mm more ridge. On my large pistol plate I measure about 1.25mm of ridge with the #8. So those 45 semi wad cutters would probably be better with the #8. Running bevel bases? Might want to go with the #6. If your running a bevel based semi wad cutter your SOL.
Its posted. Please play around with them and see what you think.
Print should be done in about 30 min. I’ll report in the morning with pics. The feature is pretty easy to use. Use your mouse and just highlight the areas where you want a finer print on a horizontal level. YouTube has a few real good videos on how to use it. I’m still pretty new to using the slicer and am learning more every time I use it.
I will say the finer layer height.12 makes a huge difference on my prints. I plan on doing another collater bowl and make the lower layers .12 and once it get past the funnel area go back to .2 or even coarser. Actually, I’ll go .12 do the point the highest collator plate will sit then go more coarse. Any little bit where things spin and might touch each other in my mind needs to be the finest print setting...prusa can do that
Last edited by lablover; 11-03-2020 at 11:54 PM.
So the profile is the same, just the in/out position changes 1mm at a time?.....I think I see. Is this so you don't have to pull the slider out like A.M.'s in my picture last post? In the picture it's adjusted right for .223...and it's out more than a 1/4". Also it's a straight line. Obviously you put in a lot of thought on the shape of yours. I noticed with A.M.'s, there is only a very tiny sweet spot that works well....that's why I marked the exact position with a Dremel cut.
Looking forward to printing out your large model. Whether it will work for .308 brass or not. I don't have a feel for that yet....maybe it won't. If not I'll have to print out a Dillon style copy......if I live that long to figure it all out.
"Its posted. Please play around with them and see what you think." That message will even apply to me in a week or so.....just got to get the base printed first. Can't wait.....
Last edited by GWS; 11-04-2020 at 10:22 AM.
I see a big difference. I started the layer change right at the bevels on top. I like the feature and see a use for our print types. But then again.....too early to call...bwahahahahahahaa. I had to say it
Last edited by lablover; 11-04-2020 at 01:38 AM.
Yes, that is all correct. Pick the correct slide plate and insert it in all the way and lock it in place. No guess work.
Tyler, I have a question. Did you modify the drop tubes to fit the bullet feeder die? I finished my .45 die and the drop tube will not fit on the die. Unless I messed something up? My drop tube is your original from several weeks back. thanks buddy
Joe
No changes there. Do you own any DAA feed dies? The drop tube should fit on that, and my 45 feed die is the same. How far off are we talking here? Not that it matters but I assume you are using the 12mm drop tube?
also, make sure there is no lip on the top edge of the .45 die or on the inside bottom edge of the drop tube.
I'm using the 13mm drop tube. A little sanding will fix it in a hurry. Time for printer maintenance. ha
Last edited by lablover; 11-04-2020 at 05:32 PM.
You really should be using the 12mm drop tube. The 13mm tube is going to be slightly larger compared to the feed die, so there will be a slight lip where the two interface. Bullets can get caught on that lip. I really created the 13mm for 45 brass and bullet sizing of my powder coated boolits, which can get hung up in the 12mm at times.
I am getting close on my 9mm feed die, and should have it posted today or tomorrow.
Will do, I may have to do some adjustments as my 200 gr swc don’t want to drop out of the die. I’ll get it figured out. Might even be the lube grove catching on the bearing on the way out. These are coated bullets so lube groove is empty. Late night last night so I gave up. Will revisit later. Both pieces slide pretty good but once the bearing is in place not so much.
Have these been sized? What diameter are they? My testing was done with a 230gn RN powder coated with a lube groove sized to .452
Last edited by TylerR; 11-04-2020 at 06:03 PM.
Yup sized .452
Also the inside of my inside piece seems a little rough inside. I may have set up the printer wrong. And maybe the bearing hole is a little rough. I’ll give it a good look in a bit
You can try cleaning up with sandpaper and acetone to smooth it out. Especially the groove inside the die body that allows the bearing to retract. And you are using one 4mm bearing right?
Yes sir. Did a little clean up and it’s working pretty good now. I took some dry neck lube and coated the inner tube and that slicked things up in a hurry.
I’m curious as how you use the acetone. I used a tiny bit on a rag and things got gummy fast. I rinsed it off and used some fine grit to get it back to normal. I also have it working without springs or rubber washers. Pretty slick
I need to learn more about prusa before doing fine prints. Something is not set right or I missed something on this print. Printing a 12mm drop tube now off cura
I just put a little on paper towel or a cotton ball, and rub down the part. It gets rid of the printer lines and creates a smooth surface. It will get gummy as the plastic melts slightly but then hardens right back up in a minute or two. Learned that from my ABS days, but works just as well on PLA.
 Posting Permissions


| BP | Bronze Point | IMR | Improved Military Rifle | PTD | Pointed |
| BR | Bench Rest | M | Magnum | RN | Round Nose |
| BT | Boat Tail | PL | Power-Lokt | SP | Soft Point |
| C | Compressed Charge | PR | Primer | SPCL | Soft Point "Core-Lokt" |
| HP | Hollow Point | PSPCL | Pointed Soft Point "Core Lokt" | C.O.L. | Cartridge Overall Length |
| PSP | Pointed Soft Point | Spz | Spitzer Point | SBT | Spitzer Boat Tail |
| LRN | Lead Round Nose | LWC | Lead Wad Cutter | LSWC | Lead Semi Wad Cutter |
| GC | Gas Check |

 Reply With Quote