I could not make out enough in the video to give much of a suggestion on the loadmaster. Not sure if you can reshoot it from a better angle so we can see more of what is going on.Originally Posted by azlester


|
   
   
|


|


I could not make out enough in the video to give much of a suggestion on the loadmaster. Not sure if you can reshoot it from a better angle so we can see more of what is going on.
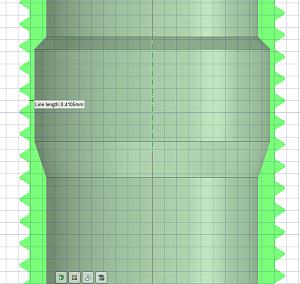
I use Cura exclusively. I was able to get a complete print by setting the layer height to .1 and the fill to 95%. When the print finished I could see through the section of the body where the recess is for the balls to retract. The root diameter of the threads is smaller than the diameter of the recess.
This question has come up a bunch. It is a slicer or nozzle size issue, not design. Take a look at this post and the ones after it.
https://castboolits.gunloads.com/sho...=1#post5262338
The wall thickness is just over .4mm in that section. The diameter of the threads is definitely not smaller then the recess. This is the design in 3d cad.
I can't believe that it's been over 2 weeks and not a single new post....
I am trying to muddle thru getting all the parts and springs set up. I ended up printing another set up strictly for cases for my Loadmaster. A friend sent me a roll of green PLA that worked great!
In hind sight I might have been better off doing one thing at a time instead of printing everything all at once... it is kind of over whelming with the pile of parts and trying to remember what is what. I have started a bag of parts that I printed and it appears that I don't need them. LOL
Yeah it's been quiet here for a while....just as well, I've been swamped at home and work. You have a bag of parts you printed that you don't need? Glad you can laugh about it. Of course any practice you get on the printer isn't wasted.....you get better right?
Green PLA for a red press? I've done some of that....mostly the other way around.....very Christmasy! What brand is the green? Being that my reloading room is full of green presses, I'm always interested in the green PLA's from different sources.
Right now I'm going backwards in time. I'm at this moment printing a large pistol brass plate for my first little collator....the AmmoMike special. I plan to use it to feed my Lee APP to deprime pistol cases and swage any military ones I collect. What color? A new Satin Red from Overture.....been wanting to see what that stuff looks like on a collator plate.
Picture is a few minutes ago:
I wonder if I'm the only one who will have printed a pistol brass feeding plate for Ammo Mike's little collator designed to use TylerR's clutch?
Speaking of green PLA, I got a message from Zyltec this morning adertising their new Military green PLA..........I'm wondering how popular that can be. Can we print and send military weapons for the Ukraine?out of PLA plastic? Riiight.....
Last edited by GWS; 05-30-2022 at 11:51 PM.
It is Creasee green PLA. More like an applegreen... very bright.
Last edited by azlester; 05-31-2022 at 11:53 AM.
That's a powerful green all right. I've been looking for a deeper neutral green....haven't found what I want yet.
I printed the clutch for the new plate today......I decided I'd risk it and print with no supports under the handle hole. By danged if it turned out better than the ones I've printed with supports......didn't think the Creality was up to that.....I was happy to be wrong. See the speeded up video at the bottom of the post.
That's a close up on the print bed, just after the print finished......not much to clean up.
On the right is the part that goes under the plate...the 45% angle is repeated on the bottom plate surface to give more frictional area. 6-32 flat head bolts go through it from the bottom, head is recessed.
On the left is the sleeve that goes on top of the plate, inside the hex columns goes 6-32 nuts. just screw the bolts in and they self tighten.
In front is the handle to make it easy to lift the plates. I use nylon nuts on the same two screws. You can tighten the screws from the bottom for more friction. The nylocks don't need to change after the first snug hand tightening. Pretty simple....all credit goes to TylerR.
Some will not like the tall clutch on a thin plate, but I'm not interested in printing a different height clutch for every plate. This size fits them all. Even the Ammo Mike little guys.
The new Satin Red from Overture?......little disappointed.....very similar to the Zyltec one. I want RED, not pinkish watered down red, nor orange-red either.
For now I'm going to stick with Zyltec's Lipstick Red.....not satin shiny but at least it's red.
Thought you guys might curious to see a (really fast) video of how my Creality SR10v2 handled the handle's circle closure. Way better than I thought it could without supports.
Last edited by GWS; 06-02-2022 at 12:56 AM.
Here's the result of the last few days of printing for AmmoMikes little collator and the APP......
Feeding .357 was the hardest.....but doable. .45acp, .40 s&w, 9mm works equally well by just changing the downtube parts. I demonstrate how easy that is at the end of the video. TylerR's APP quick change system is flat awesome. Thanks Tyler!
Looks great as always GWS. That is a really interesting collator plate you generated. what diameter are the holes on it? Seems to work extremely well.
I said 14.....it was late.....16mm........What does your large pistol brass plate meaure?
The first try I piled the cases in the back with no thought to orientation. out of about 50, one dropped top down. I discovered that its best to spread them out a bit, so the crowd doesn't hold one upright the wrong way. Second try...I just poured them in a half moon at the bottom, and there was zero upside down cases. Then I repeated that for the video.....again no bad drops.
Oh, I should mention.....Ammo Mike's stuff did not include a slider with a rectangle cut out to go with your case droptube, so I modified again the one I modified of yours where I removed the adjustable width and just made it simple wide open. Obviously that one was too big for Mike's little collator, so I had to cobble your design to his plain slider. Harder for me than for you, for sure.
The .stl's files I can supply you, but probably only would benefit those with AmmoMike collators (not part of your system)......I just wanted to make mine useful......where as you gave your first one away....
Last edited by GWS; 06-04-2022 at 07:35 PM.
you are correct as usual GWS (mostly). The large pistol brass plate has 15mm slots. I think it just looks weird to me on the very small AM collator. Love the way you have it handling the 357 brass.
Yeah when it was printing I thought I made a mistake they looked so big.....I even got the blue one down from my Pro 2000 and brought it into the printer room to compare. They were the same. A millimeter off (15 versus 16) is only 1/2 millimeter off on each side....chock that up to printer resolution and layer height. My plates are usually done at .2 mm high. That little one for the APP was done at .12. Probably won't do that on future ones.
I'm happy with it.....you know I have a lazy streak....the more I can get out of major work doing caliber changes the better I like it.
BTW, you noticed I just have some clear tube coming up out of your downtube, so that the long tube just slides over. It's important if anyone does that, to chamfer the top inside edge of said tube, or cases will hang. I just use the case chamfer tool on my Trim Mate to do that...takes a few seconds with it motorized.
I did print out all your little inserts and adapters, but couldn't find the right combination.....may be my printer resolution, or maybe I printed the wrong ones. (I did modify the 357 pistol downtube months ago to stop the twoforone performance I kept getting. We talked about that once but you still have the one where the notch is just sliced down the middle and can allow a sideways throw once in a great while)
Lee ought to pay you for the great favor you did them improving their little magic tool.
Last edited by GWS; 06-05-2022 at 01:14 AM.
If you wouldn't mind sending me the .357 tube I will post it.
Well I just spent 2 days trying to get 124gr 9mm bullets to fall nose up reliably... was getting 4 or 5 that were going nose down out of 25 or so. It was driving me crazy...playing with the angle (not a good idea because if you have that angle too small the bullets slide out of the plate and start falling out all over the place! Last night I dreamed about it and BAM!!!! I forgot all about the adjustment screw on the back of the slider plate! A few turns of the screw and I am 100% nose up on both 124gr round nose cast/powdercoated and the 124 gr truncated cone cast/powder coated into the bullet feeding die on the Loadmaster!! WOOOHOOOOO LOL
Sometimes getting old you forget the easiest little things that make a huge difference!


That thing is screaming. When I tried feeding 357 cases I had to run in "granny gear" or else cases would not have dropped completely and I would have jams. Any suggestions what I should do to be able to run faster?
Sent from my SM-N981U using Tapatalk
Big holes mean they have more time to drop even at a decent speed. So, assuming you are collating with TylerR's regular sized collator, first, use the Large pistol case plate, then also assuming you're using the brass feeding slider/adjuster and the adapter screwed into it from the bottom.....using the parts below.... either adjust that adjuster part fully open to allow the biggest hole, or make a non-adjustable fully open one like I did. In the picture, starting with the little square part and going clockwise is the the hole size adjuster, the adjustable slide, the angled adapter that screws to the bottom of the slide.....or just use the simplified wide open non-adjustable slide, modified from the original+ the angled adapter.
The reason I modded/added a permanently wide open one, was because I have a dedicated press to load pistol only, and they all do better fully open.......I use adjustable ones for rifle brass collating on another press. I'll send the source for the non-adjustable one to TylerR, in case any of you want it for simplicity for a dedicated pistol case feeding collator. And again, same need for the APP pistol case feed.
Last edited by GWS; 06-07-2022 at 12:17 AM.
All I did was use the adjustable and left the opening wide open. Just for the very same reason on pistol brass...I even super glued it in place. I printed another one with the adjustable cover for the rifle brass
That's why I show both in the illustration. That works, just not as simple and clean. Even so, on both the collators I use for pistol cases, the Pro 2000, used for loading, or the APP used for depriming, I used 9 volt wall warts for power on both mine, to slow them down some and that gives the cheaper speed control I originally used on that little JGY370 powered A.M. unit a slower and smoother range. That collator was put together before Tyler discovered that relays were helpful.
We've tried several motors and speed controls on this project.....if what you are using is too fast, the simplest fix is a lower voltage power supply. Easier than buying more motors ans speed controls. (remember my last video of pistol brass feeding using TylerR's collator.....bigger motor at hyperspeed.
Last edited by GWS; 06-07-2022 at 12:05 PM.
I used the JGY370 motor with 6 rpm.... plenty of torque and is more then fast enough for me. I was more concerned about being able to throw in a bunch of bullets and have it work then I was about about how fast it was. The friend that told me about Tyler's set up used a 10 rpm motor and said he rarely went faster then 6 rpm.
Thanks for that.
I had made a custom 38/357 plate awhile back. Holes are just under 14 mm. I had also made the plate thicker (@ 14mm as well).
Before I saw your reply, I spent some time last night watching your video again. I got to thinking I might have the angle set too steep, so I reduced that and opened the slider all the way. I fed a couple hundred cases (both 38 Spl and 357 Mag) without a single jam while running at near full speed on the Greartisan 10 RPM motor.
Now to try and figure out how to feed bullets (nose down) without jamming. Steeper angle seems to be necessary there to keep the base down bullets on the ledge, but then sometimes they don't drop fast enough. Finding what I would call the sweet spot, where nose down drop without issue and base down ride on past, has been a challenge. SWC bullets seem to be the worst, possibly because of the difference in diameter where the nose of the bullet and the body of the bullet meet.
Sent from my SM-N981U using Tapatalk
Last edited by ranger391xt; 06-07-2022 at 10:57 AM.
 Posting Permissions


| BP | Bronze Point | IMR | Improved Military Rifle | PTD | Pointed |
| BR | Bench Rest | M | Magnum | RN | Round Nose |
| BT | Boat Tail | PL | Power-Lokt | SP | Soft Point |
| C | Compressed Charge | PR | Primer | SPCL | Soft Point "Core-Lokt" |
| HP | Hollow Point | PSPCL | Pointed Soft Point "Core Lokt" | C.O.L. | Cartridge Overall Length |
| PSP | Pointed Soft Point | Spz | Spitzer Point | SBT | Spitzer Boat Tail |
| LRN | Lead Round Nose | LWC | Lead Wad Cutter | LSWC | Lead Semi Wad Cutter |
| GC | Gas Check |

 Reply With Quote


