I am getting the same dia for all the feed dies. 16.46.mmOriginally Posted by Charlie_Sweden


|
   
   
|
|


I am getting the same dia for all the feed dies. 16.46.mm
Okay, thanks for checking, I'll continue investigating on my end.
That looks like a nice solution to solve the powder measure/bullet drop conflict. Does that mean one would NOT have to get the DAA Extra short Dillon Powder bar to run a bullet feeder and a powder check? https://www.doublealpha.biz/us/daa-e...lon-powder-bar
First off, huge thanks to TylerR, GWS, and all of the other contributors to this project! I'm in awe of your ingenuity and design skills! Purchased my 1st 3D printer to make this project (and many more I'm sure) and have some (probably very basic) electronics questions after trying to find answers in this thread:
1. How crucial is having a 12v power supply running at 6A as suggested in the project user manual, or can one use a lower amperage power supply? I purchased the suggested Dayton motor rated at 1.3A and this speed controller from Amazon https://www.amazon.com/gp/product/B0...?ie=UTF8&psc=1. I found a 12v 2A power brick in my pile of old electronics- would that suffice or would it be underpowered for this application?
2. This speed controller can run in two directions, and has a built in 3-position switch. https://www.amazon.com/gp/product/B0...5OP416LP&psc=1. Could I run one of these to add the functionality of clearing a jam in the collator, or would it not be compatible with the motor? And since it has an integrated switch, would that eliminate the need for the relay? Or is the relay needed since we are adding a proximity sensor to the circuit?
3. I purchased a proximity sensor for the project, and the wires from the sensor are quite long. Will I need the JST connectors&wires if the existing sensor wires are long enough? This is the sensor I purchased if this helps: https://www.amazon.com/gp/product/B0...?ie=UTF8&psc=1. I'd love to avoid the extra soldering and complexity of more wires if not crucial to the function.
As you can see, my electronics understanding is very limited! Besides soldering I'm pretty lacking, and I am finding the electronics portion of the project to be the most daunting aspect.
Thanks for any insights!

I'll let TylerR answer most of your questions as you will most likely use his parts, but on #3, the sensor you bought is "NO" which means the sensor is Normally Open (circuit off) and turns on only when tripped. That one is Not what you want.
You want a sensor that is NC. IOW's with the separate powder switch turn on, the motor runs (circuit closed) all the time, until it senses a bullet or case stopped in front of it...which opens the circuit, turning the motor off.
I cut off my sensor leads to fit, then solder them or wire nut them to the other wiring as in Tyler's schematic.
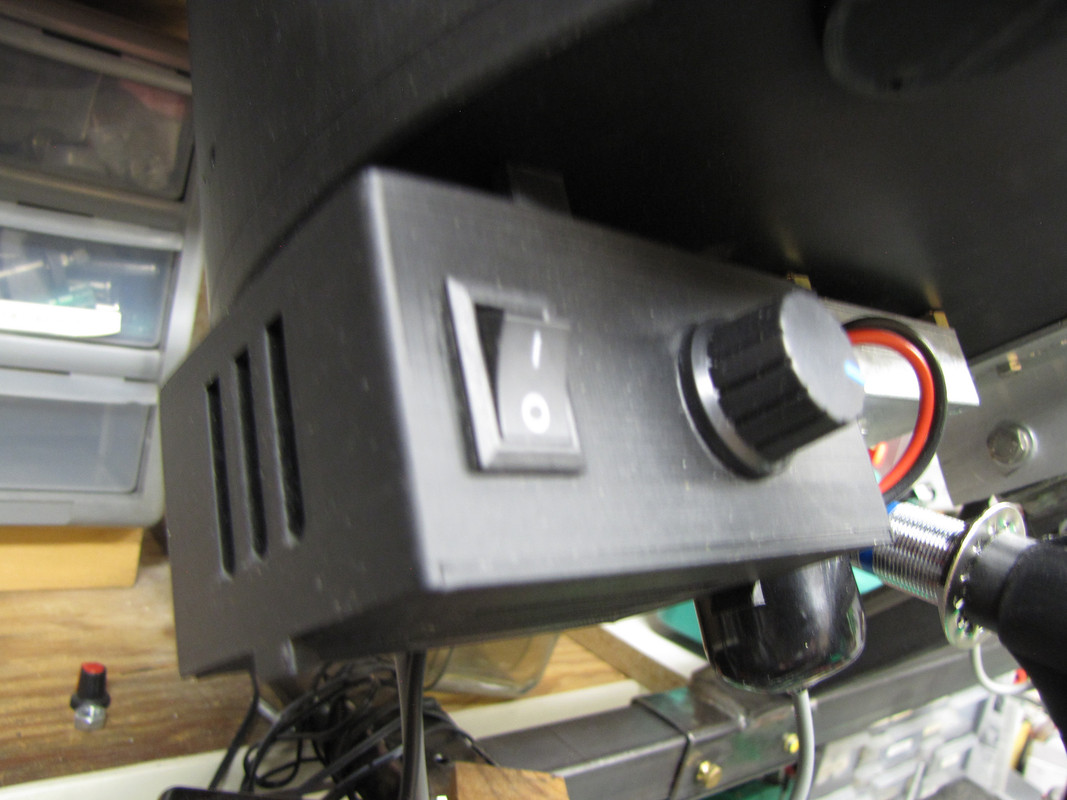
Well....since the speed control you already bought is beefier than the combo unit you mentioned in#3, I should tell you that I used the beefy one you already have, and bought a simple rocker on/off switch to go with it.....therefore maybe it's be simpler if you print the new box I made to fit that same speed control board. Fact is, I just got around to sending the stl files to TylerR Yesterday. Maybe he's posted the three files to the "Contributors" section already......(its made to mount under the collator as shown below)
Here's a picture of those parts mounted under my case collator:
Last edited by GWS; 01-15-2022 at 11:21 PM.
Thanks for catching that error in sensor type! As luck would have it, I ordered two different prox sensors, including this one, which looks like it is NC and will hopefully work! https://www.amazon.com/gp/product/B0...?ie=UTF8&psc=1
That electronic box looks good. I ran into probably the same problem you did when using that large controller in the large electronics box. The controller was too large to mount near the cutout for the power switch, so I edited the file to move the small hole in the large box down about an inch. It's printing now so we'll see how I did! I also printed MillerKiller's electronic box back extension to accommodate that controller.
Last edited by heliskyr; 01-15-2022 at 10:22 PM.
I rewrote the last paragraph of my last post, after realizing you might actually have it easier using that speed control with my new box & mount I just sent TylerR. Didn't realize you already posted. Appears I'm too late to help out with the box.... no matter...I'm sure you'll make it all work.
Last edited by GWS; 01-15-2022 at 11:21 PM.
Thanks! I'll keep an eye out for your new box and print it out as well. It's great to have so many options to customize the feeder to one's specific use case.
I have not tried running it in station 4, but I bet it would work. It is a pretty aggressive offset.
hope that helps
Immensely! Thanks!
I have it running on mine and it seems to work just fine, only issue is I think I need to smooth down the die some so it will fall back in place easier. I have tried it without the offset and it does the same thing so I know the offset is not the problem.
I soldered leads only to where I had to... to the relay pegs, but I prefer small wire nuts connecting all the wire leads. I really like the ease using wire nuts to take things apart and changing components whenever...if ever needed. The push-in connectors IMO are not as versatile.
TylerR,
Regarding my issues with the feed inserts and interface with drop tubes, turns out it was a combination of too many perimeters and low quality PLA which had some bad tolerances.
Thanks again for checking on your end.
Best regards
Karl
I suck at soldering. Still working on the wiring. Want to find some better 18ga. I have some solid core, but it is stiff and not easy to work with. And my 16ga is too darn thick for some of the screw terminals. I gotta sit down and give it a real go. Haven't had a lot of time in the last month or two.
Sent from my Pixel 5 using Tapatalk
So I wired up all of my components (roughly, outside of the box) today to test the function and I’m having a problem with my proximity sensor that I’m hopeful I could get some help with.
The motor turns on when I flip the switch, the led light on the switch lights up, the knob on the speed controller modulates the speed, and the led on the back of the proximity sensor lights up when nothing is close to it, and the sensor led turns off when I place a case close to it.
My problem: while the proximity sensor appears to be sensing cartridges as evidenced by the led turning on/off, the motor stays running regardless of the status of proximity sensor.
I’m using these components:
1. Speed controller https://www.amazon.com/gp/product/B0...?ie=UTF8&psc=1
2. Proximity sensor https://www.amazon.com/gp/product/B0...?ie=UTF8&psc=1
3. Relay https://www.amazon.com/gp/product/B0...?ie=UTF8&psc=1
4. Switch https://www.amazon.com/gp/product/B0...2?ie=UTF8&th=1
I've gone over the wiring several times to see where I made a mistake and can’t get the sensor to work,
Any help is greatly appreciated!
That happened to me once too, and I thought I had a bad sensor. Turned out I had the Relay wired wrong. A picture might help, but I'd bet you need to change leads on the relay.

I was in the same boat using scraps of wire so I bought this package of color coded wire on Amazon.
I too had problems with small screw terminals so I had these terminal lugs, pulled off the plastic and soldered in the wire(s). It was especially easier for connections with more than one wire. These forked terminals would probably work even better.

I finished mine last week. I figure not bad for never using a 3D printer before 12/26/21. The only piece I had to reprint was the drop tube for the proximity switch. I have my collator on the right side so the bullet window was facing away from me. I figured out how to print a mirror image & all better now except the #10 on the tube is also reversed now(I can live with that). I did a trial run of 400 rounds. Not ONE failure or jam of any kind. I have to say thank you again to Tyler & all who have contributed here, making it possible for the average Joe to build this. Try not to laugh at the 3D printed brass feeder in the pic. It actually works really well.

Sig! Looks great! 3d printers.....where were they 10 years ago! I think of all the time I spent manufacturing parts by hand and I am thankful all the more. And thanks be to AmmoMike, TylerR, and others who influenced me to buy my Creality CR-10v2. Way more fun than than other Home Manufacturing Methods.....and while they are printing (does take a while) we can be working on the next project's .STL files!
As for the brass collator.....you KNOW you will be printing another TylerR special to replace that.Adding two videos to show you my efforts in that same direction:.
First video (pre-3D Printer days).....4 l--o--n--g 36" tubes in a minute or less. (that's 12' of cases collated.)
Second video Making and perfecting TylerR's bullet feeder into a casefeeder (with a little TylerR help of course).
Last edited by GWS; 01-18-2022 at 06:07 PM.
 Posting Permissions


| BP | Bronze Point | IMR | Improved Military Rifle | PTD | Pointed |
| BR | Bench Rest | M | Magnum | RN | Round Nose |
| BT | Boat Tail | PL | Power-Lokt | SP | Soft Point |
| C | Compressed Charge | PR | Primer | SPCL | Soft Point "Core-Lokt" |
| HP | Hollow Point | PSPCL | Pointed Soft Point "Core Lokt" | C.O.L. | Cartridge Overall Length |
| PSP | Pointed Soft Point | Spz | Spitzer Point | SBT | Spitzer Boat Tail |
| LRN | Lead Round Nose | LWC | Lead Wad Cutter | LSWC | Lead Semi Wad Cutter |
| GC | Gas Check |

 Reply With Quote