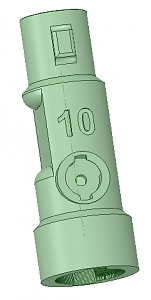
Well, a new part has been born. lol

|
   
   
|
|


Well, a new part has been born. lol
I�ve been away a while, just got an email saying this thread had a new post to find that you guys have still been putting in a lot of good work. I stopped using my bullet feeder when the PETG and hex didn�t work out as I�d hoped. I�m getting used to my RL1100 so I didn�t want to have that learning curve as well as another thing to "tinker� with at the same time.
At some point I�d like to read all of the posts I�ve missed out on and try and contribute back to this group.
Just thought I�d stop in and say hello.


Hi Fil131, and welcome back!
First, I'd recommend you read the latest manual. I think you'll find TylerR and a lot of other very good folks have been hard at work and made some incredible advancements since you were here last. Here's a link to the latest manual. Please read through it as it will provide many of the answers to questions you might have.
Ed
Last edited by RedlegEd; 02-18-2021 at 10:06 PM.
______________________________________________
Growing old is mandatory, growing up is totally optional!
Welcome back. We have been having some fun hereOriginally Posted by Fil131


hey all this has been an amazing project i have had my printers humming for better than 2 weeks on this design A BIG HUGE THANK YOU TO ALL OF YOU AND THE HARD WORK YOU HAVE PUT IN !!
I had 2 370 motors and they are working well if a little slow as they are 2 and 5 rpm's to keep the torque up the next experiment is 2 555 motors one is an 80 rpm so far not impressed lots of torque near its high rpm's but when turned down to usable rpm's not much torque. I just got my 10rpm 555 motor will advise when i get it set in.
Question has there been any work on a 45/70 400 grain bullet seating die i tryed the 45cal but the bullet is to long so I was hoping someone had tackled the challenge.
thanks all for the great projects
What are the length and dia of the bullet?
I'm in the process of printing all your brackets, Can you show a pic of the completed setup from the front view? I orderd a 750 bare bones.... So printing everything till it shows
Sorry for the delay. Here you go.
Here is the Aluminum I used from Lowes: https://www.lowes.com/pd/Steelworks-...e-Tube/3053565
Works perfectly! Great fit. Again, the pics show just a temp setup right now. I have not even tapped the pole or feeder mounts. I did tap the main mount into the aluminum. Just slid a bolt in the pole (existing hole) under the whole setup just temporarily until I like the height and tap it. Will end up cutting off the left over aluminum.
Let me know if you have any questions.
Attachment 278058
Attachment 278059
Did you post the stl files for that? Do you want to add them to the contributors folder? I can see others wanting something like that.
I posted the link a few pages back. I'm sure it got lost in all the posts. LOL. Here it is again.
https://drive.google.com/drive/u/0/f...ts1KVzTXCLXD7Q
First time using (sharing) Google Drive, so let me know if have any issues accessing. Feel free to add to the folder whatever you think folks would like. Couldn't get away from supports...which we all hate.
Perfect. Supports are taboo, but sometime unavoidable.
Edited. I just realized google drive will zip it all for me. We're good.
OK its up there in contributors with attribution.
Last edited by TylerR; 02-19-2021 at 10:34 PM.
Ok....I was just about to post up the zip for you. Appreciate that, but don't need attribution or recognition...unless you want folks to contact me for support on the designs.
No nothing like that. Just have your screen name on the file.
But yes if people want edits I am sending them your way. haha
Last edited by TylerR; 02-19-2021 at 10:54 PM.
LOL...Perfect!! Always good to delegate!
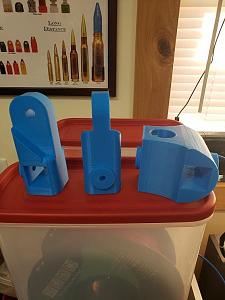
Looks Great!! I appreciate you putting this together. .... I've printed all the "Dumb, need support" Pieces, Might have been just me, But a brim was necessary so the tree supports didn't fall over... and I excluded support for the BOLT holes, as it was not necessary
They came out great.... I'm hoping to grab the aluminum today
Last edited by Anuccite; 02-20-2021 at 08:51 AM.
BTW Tyler.... I don't know if anyone said it yet.... But I like the New "T" Logo!
Hey it's my electronics post mount.
I like your dual feeder mount.
Thank you. Very simple, and I think it looks kind of pleasing.
MOLD DC 457-405-F
Details
Lee Double Cavity Mold produces a .457 diameter 405 grain Flat nose bullet suitable for cartridges like 45-70 Caliber Rifle.
Click here to view parts
length 25.5mm tip to tip
length 20mm to start of rounding of nose
diameter 11.9mm
her is a couple pics of the mounting for the 555 motors i created a riser to accommodate for the shaft length to hex coupler and with the riser there is no mounting problem testing tomorrow
also a quick grabber for the plates using a 1" #6 screw 1 lock nut and 1 regular
wont let me upload will try later
 Posting Permissions


| BP | Bronze Point | IMR | Improved Military Rifle | PTD | Pointed |
| BR | Bench Rest | M | Magnum | RN | Round Nose |
| BT | Boat Tail | PL | Power-Lokt | SP | Soft Point |
| C | Compressed Charge | PR | Primer | SPCL | Soft Point "Core-Lokt" |
| HP | Hollow Point | PSPCL | Pointed Soft Point "Core Lokt" | C.O.L. | Cartridge Overall Length |
| PSP | Pointed Soft Point | Spz | Spitzer Point | SBT | Spitzer Boat Tail |
| LRN | Lead Round Nose | LWC | Lead Wad Cutter | LSWC | Lead Semi Wad Cutter |
| GC | Gas Check |

 Reply With Quote