Lee PrecisionWidenersLoad DataInline Fabrication
Snyders JerkyMidSouth Shooters SupplyRepackboxRotoMetals2
Titan Reloading

Thread: Making that Bullet Collator

  1. #3981
    Boolit Master

    RedlegEd's Avatar
    Join Date
    Sep 2017
    Location
    Mountain Home, AR
    Posts
    578
    Quote Originally Posted by thump_rrr View Post
    Bullet feeder die insert update.
    I got up at 3:00am when my post base finished and switched over to PLA.
    I printed the 7MM Die insert in PLA .12 20% as usual.
    Besides the back looking a bit ugly where the joint is it is once again under dimensioned in the interior portions.
    I am using a vernier caliper because I don't have a set of pin gauges.
    My internal dimension are 6.8mm interior at the top, 7.6mm at the bottom
    My external dimensions are 12.1mm below the neck and 16.35mm at the top.

    I designed and printed a small washer in Tinkercad with the following dimensions.
    14mm OD. 7.2MM ID. 2mm thickness

    Actual print dimensions are 14mm OD. 6.8mm ID. 2.0mm Thickness.

    I just found the following article and was wondering if it has any bearing on the print issues I am seeing?
    https://forum.simplify3d.com/viewtopic.php?f=8&t=2042

    I need to leave for work soon but what I did was open the die insert in Tinkercad. I opened the interior dimension to 7.4mm.
    If my theory is correct I should come home to a print with an internal dimension of 7.0mm.
    I also switched back to PETG since my settings are more dialed in.

    Edit#2 Tonight when I get home I may print up a .45ACP bullet die to see if I get the same undersized results.
    Hi thump_rrr,
    One thing you may want to check is your printer's calibration. Here's an excellent video that guides you through the process (it's also in the manual.) I bring it up as I was having issues with the Ball Bearing holes on the .45 bullet dropper and worked with TylerR the get that dialed in, but first I calibrated my printer and found it was out by enough to cause some of the issues. Also, I slice with Cura, and it has the same horizontal expansion feature as well as one for just holes. Here's video from Chep that explains how it's used. Hope it helps.
    Ed
    ______________________________________________
    Growing old is mandatory, growing up is totally optional!

  2. #3982
    Boolit Buddy
    Join Date
    Sep 2011
    Posts
    145
    Quote Originally Posted by RedlegEd View Post
    Hi thump_rrr,
    One thing you may want to check is your printer's calibration. Here's an excellent video that guides you through the process (it's also in the manual.) I bring it up as I was having issues with the Ball Bearing holes on the .45 bullet dropper and worked with TylerR the get that dialed in, but first I calibrated my printer and found it was out by enough to cause some of the issues. Also, I slice with Cura, and it has the same horizontal expansion feature as well as one for just holes. Here's video from Chep that explains how it's used. Hope it helps.
    Ed
    That's exactly the page I referenced a page or 2 back.
    Everything has been gone through and all test prints come out accurately.
    I'll check out the second video a little later when I have a minute.

  3. #3983
    Boolit Master GWS's Avatar
    Join Date
    May 2019
    Location
    New Mexico
    Posts
    1,376
    Quote Originally Posted by TylerR View Post
    Which bullets are you trying to feed? I assume the 6.5 you are collating? It should not be tight at all for those, as the opening is actually 7.1mm.
    Are you printing at .12 layer height? If it is still tight try using some acetone with a cleaning jag and smooth out the opening.

    Check the manual for the link to the mcmaster carr springs. They work 1000 times better then elastics or orings.
    Can you provide a link to the springs you like? I didn't remember you moving to springs?

    Also for our Canadian brother, I'm just wondering if you have access to Zoro. I think they have springs too, and everything else McMaster Carr has....usually cheaper.........I chose them for my Dayton Motor for that reason. The Dayon Motor is an exact fit for the McMaster-Carr, and you can get them at different RPM speeds......

  4. #3984
    Boolit Master

    RedlegEd's Avatar
    Join Date
    Sep 2017
    Location
    Mountain Home, AR
    Posts
    578
    Quote Originally Posted by GWS View Post
    Can you provide a link to the springs you like? I didn't remember you moving to springs?

    Also for our Canadian brother, I'm just wondering if you have access to Zoro. I think they have springs too, and everything else McMaster Carr has....usually cheaper.........I chose them for my Dayton Motor for that reason. The Dayon Motor is an exact fit for the McMaster-Carr, and you can get them at different RPM speeds......
    Hi GWS,
    Here is the link: https://www.mcmaster.com/9654K947/. It's also in the new manual on page 5.
    Ed
    ______________________________________________
    Growing old is mandatory, growing up is totally optional!

  5. #3985
    Boolit Buddy
    Join Date
    Sep 2011
    Posts
    145
    Quote Originally Posted by GWS View Post
    Can you provide a link to the springs you like? I didn't remember you moving to springs?

    Also for our Canadian brother, I'm just wondering if you have access to Zoro. I think they have springs too, and everything else McMaster Carr has....usually cheaper.........I chose them for my Dayton Motor for that reason. The Dayon Motor is an exact fit for the McMaster-Carr, and you can get them at different RPM speeds......
    Its in the manual.
    This is the link.
    https://www.mcmaster.com/9654K947/

    I chose the 12rpm motor myself.
    Last edited by thump_rrr; 02-11-2021 at 02:54 PM.

  6. #3986
    Boolit Bub
    Join Date
    Jan 2021
    Posts
    32
    Well it looks like I was able to get it to adhere and then...not finish the print because the darn nozzle got clogged towards the end...

    Last edited by Mr_Sheesh; 02-15-2021 at 11:08 AM. Reason: Grawlix

  7. #3987
    Boolit Buddy
    Join Date
    Aug 2020
    Posts
    227
    Quote Originally Posted by SuperMoose View Post
    Well it looks like I was able to get it to adhere and then...not finish the print because the darn nozzle got clogged towards the end...

    Lol! That happened to me yesterday for the first time.
    Last edited by Mr_Sheesh; 02-15-2021 at 11:09 AM. Reason: Grawlix in quote

  8. #3988
    Boolit Mold
    Join Date
    Sep 2020
    Posts
    11
    speaking of dropper dies ... i just made a adaptor to go from the drop tube to the DAA dropper die.

    once i confirm its good i'll upload it

  9. #3989
    Boolit Buddy
    Join Date
    Sep 2011
    Posts
    145
    I failed to realize yesterday that not only did we hit page 200 but yesterday was the 3rd anniversary of this thread.

  10. #3990
    Boolit Man
    Join Date
    Nov 2018
    Posts
    85
    Quote Originally Posted by impala68 View Post
    speaking of dropper dies ... i just made a adaptor to go from the drop tube to the DAA dropper die.

    once i confirm its good i'll upload it
    MY D*A*A dropper die fits fine with TylerR's existing drop tubes. No adapters required.

  11. #3991
    Boolit Mold
    Join Date
    Feb 2017
    Posts
    21
    That Maths god were with me for once. Both set screws came loose on the cog wheel that feeds the filament. I somehow got it almost exactly right when I cut the top in half.

    Is the JGY motor better for cases? I can switch this one to cases since I have tougher motor on my current one.


  12. #3992
    Boolit Buddy
    Join Date
    Sep 2011
    Posts
    145
    Success and a partial failure.
    The success is in printing it with a hole size of 7.4mm and getting 7.1mm when I was expecting 7.0mm.

    Now the failure part is in the way the springs are to be attached.
    According to the recommended McMaster-Carr springs https://www.mcmaster.com/9654K947/
    They have a static length of 0.625” and a maximum extended length of 1.121”.

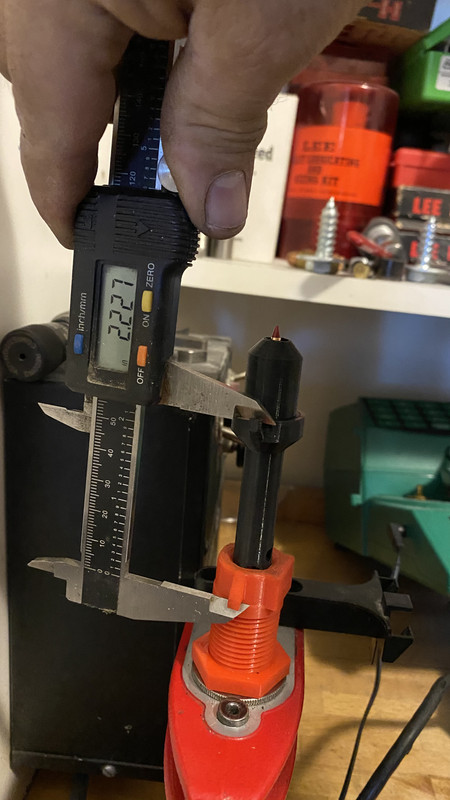
    As per my own calculations I would need the spring to stretch to 2.225” which is double the maximum recommended length and almost 4 times the original length.


    Maybe a longer die body is needed for these long bullets.
    A good inch longer would be a good starting point.
    My other thought was to fasten the lower end of the spring to the lock ring and use a longer spring which would reduce the stretch ratio.


    I will print up another lock ring with ears attached.
    Last edited by thump_rrr; 02-11-2021 at 06:02 PM.

  13. #3993
    Boolit Master GWS's Avatar
    Join Date
    May 2019
    Location
    New Mexico
    Posts
    1,376
    I finally finished my swivel mount for my hollow steel tube system....so now have a case feeder on the right side of the Tee and the Bullet feeder on the left side.....and got the second box mounted for the separate speed control. Now all I have to do is slide it in and out.

    Picture above shows a print I did to fit a hex coupler inside (and epoxied inside)

    Then I JB-Welded a 2" fender washer to one end and marked it for 30,45, and 60 degrees, then, below, the print just slides in the steel square tubing: (video demos the slide-in feature as well as the first attempt at hpbt's.)


    I tested a challenging bullet, Sierra's 165 grain HPBT......a double whammy. the hollow point is definitely harder to make play nice, especially with the big boat tail on the bottom. First attempt below with slide flush....did not work so well even at 45 degrees:


    So I added a whole 1mm washer as a spacer (for those boattails) and tilted another 7.5 degrees:


    That's more like it! Sure is sensitive.....has to be just so.....

    postpost: I used the hole TylerR designed in the back of the slider, chamfered it to allow for a flat heat bolt, and screwed it in proud 1mm. Works great!

    I plan to test 150's and other 168/165 designs so there maybe some more alterations ..... if not I will super glue the screw to keep it still. Actually, eventually will still do that....I'd rather print bullet specific plates for the bullets I use most often. Just makes sense. Amazing what owning a 3d printer can do for attitudes of more is better. We can afford convenience.....maybe the best idea is printing glue-on standoffs using the hole as a keeper. __[]__ shaped like that. What I don't want to do is have to keep a bunch of slider designs...and have to keep them straight.....I'm keeping less straight as I age in the head.
    Last edited by GWS; 02-11-2021 at 08:29 PM.

  14. #3994
    Boolit Buddy
    Join Date
    Sep 2011
    Posts
    145
    Proof of concept to attach lower spring mount to the die lock nut.

  15. #3995
    Boolit Mold
    Join Date
    Apr 2019
    Posts
    1
    Hello everyone,

    First off this forum and manual are amazing. I have been following for a while after my dad got me a 3D printer partially to print a bullet collator for him. I started with the original Ammomike base but after finding this forum I am printing the larger base and parts.

    My dad bought 2 used dayton 2L008 gearmotors off ebay, one 12v motor is inoperable and the other works intermittently. Does anyone know of a correct replacement 12v brushed motor? Looking for just the motor part as the gearbox works fine. If anyone has a lead on a replacement it would be greatly appreciated.

    Also a huge thanks to everyone that has put in work towards this project, it is very well designed and thought out.

  16. #3996
    Boolit Bub
    Join Date
    Jan 2021
    Posts
    32
    Quote Originally Posted by thump_rrr View Post
    Proof of concept to attach lower spring mount to the die lock nut.
    Nice! I did something very similar. Testing now. Works great!! Small springs on each side.

    Click image for larger version. 

Name:	Die.jpg 
Views:	9 
Size:	24.6 KB 
ID:	277441
    Click image for larger version. 

Name:	BF Drop.jpg 
Views:	9 
Size:	22.8 KB 
ID:	277442

  17. #3997
    Boolit Mold
    Join Date
    Sep 2020
    Posts
    11
    Quote Originally Posted by djinnpb View Post
    MY D*A*A dropper die fits fine with TylerR's existing drop tubes. No adapters required.
    hmm i only checked my 40S&W die and it didn't fit ... very possible the 9mm one does ... i'll check tomorrow

  18. #3998
    Boolit Master TylerR's Avatar
    Join Date
    Dec 2008
    Posts
    2,016
    Quote Originally Posted by thump_rrr View Post
    Success and a partial failure.
    The success is in printing it with a hole size of 7.4mm and getting 7.1mm when I was expecting 7.0mm.

    Now the failure part is in the way the springs are to be attached.
    According to the recommended McMaster-Carr springs https://www.mcmaster.com/9654K947/
    They have a static length of 0.625” and a maximum extended length of 1.121”.

    As per my own calculations I would need the spring to stretch to 2.225” which is double the maximum recommended length and almost 4 times the original length.

    I will print up another lock ring with ears attached.
    The die only needs to be inserted in to the press far enough to get the bullet to drop, but I understand with longer cases it still has to complete the cycle upwards. Curious, on your setup is the bottom of the die body flush with the press? Or does it extend down below? Also, which set of holes are you using for the ball bearings?
    Last edited by TylerR; 02-12-2021 at 10:12 AM.

  19. #3999
    Boolit Master TylerR's Avatar
    Join Date
    Dec 2008
    Posts
    2,016
    Quote Originally Posted by thump_rrr View Post
    Proof of concept to attach lower spring mount to the die lock nut.
    I like it.

  20. #4000
    Boolit Bub
    Join Date
    Jan 2021
    Posts
    32
    Quote Originally Posted by impala68 View Post
    hmm i only checked my 40S&W die and it didn't fit ... very possible the 9mm one does ... i'll check tomorrow
    I use DAA BF dies. They fit right on top of them. May have to sand a bit but no adapter needed.

Posting Permissions

  • You may not post new threads
  • You may not post replies
  • You may not post attachments
  • You may not edit your posts
  •  
Abbreviations used in Reloading

BP Bronze Point IMR Improved Military Rifle PTD Pointed
BR Bench Rest M Magnum RN Round Nose
BT Boat Tail PL Power-Lokt SP Soft Point
C Compressed Charge PR Primer SPCL Soft Point "Core-Lokt"
HP Hollow Point PSPCL Pointed Soft Point "Core Lokt" C.O.L. Cartridge Overall Length
PSP Pointed Soft Point Spz Spitzer Point SBT Spitzer Boat Tail
LRN Lead Round Nose LWC Lead Wad Cutter LSWC Lead Semi Wad Cutter
GC Gas Check