Please look at the mounts section in the manual to see the two options available.Originally Posted by tanders


|
   
   
|
|


Please look at the mounts section in the manual to see the two options available.

The manual is the key. And never could we just direct people to it before. You have done us a great service by producing it. Creating the design and files is one thing, but documenting it well is equally as important. I salute you my friend. well done.
Edited to add, if you are confused where to find this manual, just click on the "downloads" section of my signature.
Thanks man
Honestly I just wanted to give back after receiving some much from you and others. Your hard work and professionalism set the standard for me, so I didn't want to disappoint.
I just had to keep up with your specificity.
I have been thru the manual, quite a few times and it is well put together. I am looking at all the parts and I think I will have to create an adapter to tie the case feed adapters. I have created an adapter and I will be printing one as soon as my printer is free.
Please feel free to share with whatever solution you come up with.
If it works I have no problems sharing. Lets find out if it works.

Hope everybody had a merry Christmas! Finally my family who came (living locally) went home tonight, so I started my printer up again
No........not bright green Christmas ornaments.....my new electronic box for the case collator......a 3 piece box this time. Hope it turns out. The third piece is a stand-off to fit the collator cylinder better.......just wanted to try something a tad different. Be done at 5 am. If Murphy allows..... hope to show you more tomorrow.
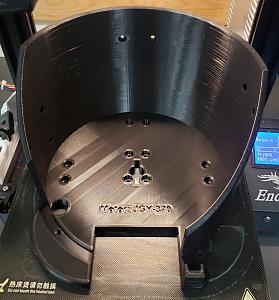
My Base is finally complete..... I'd say Cura is pretty spot on.... Look at difference in estimated vs actual
Last edited by Anuccite; 12-26-2020 at 08:14 AM.
Here is a test run with 9mm cases. Still some work left.
Perfect Model ....dang bed still can't nail the corners....even the poly bed, but I like the 3rd piece of the box, and the size of the box is so much easier to wire and install....yet still pretty small. If you can print the corners tight it's a perfect model....fits the base so fine. This is going to do it for me. Not anal enough to print the box bottom again.
Above: Models printed on the bed....the 3rd piece above the box and lid is the transition to the curved base.
Above: Original small box I made worked, but wiring was hell. Did not want to wish that on others.Jus too small.
Above: See, room to wire and rotate the board....and even add TylerR's Relay to it, which I ordered.
Above: And here's the fitted transition to the collator base. Since there was no flat surface to build the box with it built-in.
Notice that even the corners on this little piece lifted a little......wish I knew what I'm doing wrong....printing my Zyltech Satin Green PLA composite at 215 C with a 70 C bed. Maybe not hot enough? I don't understand the process I guess.
So how does my new proximity switched case feeder/collator work with .223 in the Pro Chucker 7? Fine....
RCBS Pro-Chucker owners may notice that the pusher is non stock.....I never liked their "V" block....so I 3D printed a real pusher to glove over the factory part and used a hex bolt through where the set screw held it holding both parts secure....about as simple a mod as there is.....works fine for .308 as well.....for that matter it works for all the pistol calibers too.
Now I think its high time I cleaned my reloading bench.......and my 3d printing bench.......and keep my wife happy.....
Last edited by GWS; 12-26-2020 at 04:23 PM.


Have you tried a simple heated glass bed with Elmer's glue stick and turning your parts cooling fan off? .... I have had more than one model stick too good. Cheaper dollar store glue stick works also but needs a few light coats to build up a film. I prefer that because parts are more likely to pop off after cooling. I broke a glass bed getting a bullet feed tube and flipper plate off because of Elmer's glue. Never had a problem with warping and corners.
I learned to cut glass and use scrap and reclaimed glass panels so its free.
Sent from my SM-N970U using Tapatalk
"Speak softly and carry a big stick; you will go far."
~Theodore Roosevelt~
Worst case print everything with a brim so that lifts up instead of the actual part. If it keeps going then tape the brim down too haha.
Clean your bed and check it for divots. Try also lowering the bed temperature down a bit. 5 degree increments on test pieces until it works or a colloidal failure.
I clean with 99% alcohol as I was taught before every single print. Maybe too much cleaning glosses them. Creality's treated glass lasted a month and then started lifting, and now the polypr. bed (which I sanded with 220 grit sandpaper as per TylerR's directions, is going the same way after a couple of months. Maybe it's the alcohol.....
Seems everyone has their own recipe for good prints, and I've tried two. I just am balking at gluesticks and/or masking tape. That's sounds like a royal pain in the ***.......as does having to use a brim........you then have to sand or file off? And the bed temp. I've heard more heat, less heat. Hard to keep it straight, frankly....
I guess I'm expecting stable cause and effect.......just don't have a clue what causes what and why? The bed cools down and allows you to lift the print.....so why would I "lower" the bed temperature to make it stick better.....guess I'm just too dumb to understand that.
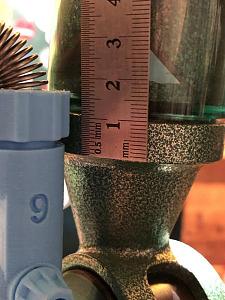
Printing is pretty much done, electronics box is about to be completed, waiting on the motor and electronic parts. I have one last hurdle to deal with though, wanted to ask your opinion on how to deal with it. I'm using an RCBS Piggyback Conversion kit and a Pro200 auto-index progressive press. These won't accommodate case feeding, so currently focused on bullet feeding only. Obviously, the shell plates for these units have a relatively smaller diameter so dies on the tool head are way too close to each other. As a result, as seen in the first picture, the powder measure is pushing the drop tube sideways when the shell plate is lowered. It will hangup on the down-stroke as well.
AM drop dupe was shorter overall so it worked out for this setup. The current drop tube, even without the spring adaptor, is a bit too tall. Wonder if the off-set drop tube adaptor for LEE APP could go in-between the Hornady adaptor and the drop tube, or, is there plans to develop shorter drop tubes, which would be some work as there are different IDs involved...
Thought I ask... Thanks...
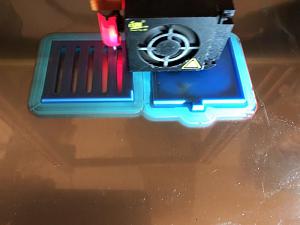
I use the glass that came with the Creality 10S for about 2 years or so. I clean with methanol before every new print. First layer 200degC, 0.3mm first layer, 60deg bed temperature (PLA). 2nd layer on is 195degC filament temp and 55deg bed temperature. I always print with 10mm brim and will tape the part down over the brim for long prints just in case... One can easily see if there is any disbonding between the glass and 1st layer using a flashlight directed from the side of the glass bed (see picture, there is a little bit of disbonding around the section closer to the camera, but the brim is holding up nicely...).
I don't get brims......I understand what they might do.....take the edge problems further from the print, but I don't understand what you do with them once the print is finished.....file 'em off? and that looks good? Dumber than a stone here.
Also answering your question in your earlier post. (I load with a R.C. and Pro 2000, and also the Pro Chucker in my video above. I'm having zero problems with clearance because I don't use those tall things on my die plates.....just a feed die. Where I switch is just under the collator using a proximity sensor. They make work for you better if you have clearance problems. TylerR has the stl's for those under adapters in his database.
One more thing.....I actually was successful making a tube case feeder for my Pro 2000. I'll post a link below for you so you can see what I did long before I found a 3d printer to play with....... but one of my next projects is to print another collator to feed pistol brass for that feeder too........once done, all of my progressives from the Lee APP to the ProChucker 7 will have collators, case and bullet, available to them.
https://www.thehighroad.org/index.ph.../#post-8162302

Last edited by GWS; 12-26-2020 at 08:49 PM.
I was able to adapt it to the 750. I cut the dillon clear tube in half and made the adapter in the attached picture to make it fit to the dillon tube. Well I had to edit the post apparently I can't upload any more pictures.
Here is the link.
https://drive.google.com/drive/folde...fF?usp=sharing
Last edited by tanders; 12-26-2020 at 09:11 PM.
Are you leveling the bed before each print?
I had a lot of lifting when I first started. I then made it a point to clean the bed with alcohol and cleaning patches, after it is clean I pre-heat the bed for 5-10 minutes then level the bed before each print.
I hate printing brims because the piece tends to look bad without a good amount of work to cut/sand etc.
With a clean and level bed I don’t have many issues at 210/55.
Nice work on the Pro 2000, congrats...
Brim usually comes off by hand, sometimes it will require cleaning with a x-acto knife. If I need edges to look sharp and clean, I use the colder/lower section of a lighter flame and run a quick pass...
In my case, I think it best solution will be moving the drop tube up under the device... Thanks...
 Posting Permissions


| BP | Bronze Point | IMR | Improved Military Rifle | PTD | Pointed |
| BR | Bench Rest | M | Magnum | RN | Round Nose |
| BT | Boat Tail | PL | Power-Lokt | SP | Soft Point |
| C | Compressed Charge | PR | Primer | SPCL | Soft Point "Core-Lokt" |
| HP | Hollow Point | PSPCL | Pointed Soft Point "Core Lokt" | C.O.L. | Cartridge Overall Length |
| PSP | Pointed Soft Point | Spz | Spitzer Point | SBT | Spitzer Boat Tail |
| LRN | Lead Round Nose | LWC | Lead Wad Cutter | LSWC | Lead Semi Wad Cutter |
| GC | Gas Check |

 Reply With Quote


