I use an old truck brake rotor to cover my pot while it heats up. After it's heated, I put the rotor on a plywood table upside down and set my ingot mold on top of it. It pulls the heat out of the mold.
redhawk

|
   
   
|

|


I use an old truck brake rotor to cover my pot while it heats up. After it's heated, I put the rotor on a plywood table upside down and set my ingot mold on top of it. It pulls the heat out of the mold.
redhawk
The only stupid question...is the unasked one.
Not all who wander....are lost.
"Common Sense" is like a flower. It doesn't grow in everyone's garden.
If more government is the answer, then it was a really stupid question. - Ronald Reagan


I can't imagine going back to pouring ingots with just one mould. I did that the first time, with one LEE mould and a Coleman stove. Took me about 4 hours to do 150 lbs of WW. Never again. I can now do 150 lbs and hour. Sorry, but I got better things to do than stand around and watch lead cool. More ingot moulds and cooling is no longer a problem. The OP did say production, so he really shouldn't be messing around with wet towels and such. IMHO

Thats about the way we started. A 10# cast iron Lyman pot on a Coleman stove with 1 ingot mold and a soup ladle. Now I use a 400# capacity pot on a 500,000 BTU Jet burner with 8 ingot molds, a nice Rowell Ladle and a nice skimmer. I can process 400# with a helper in about 2 hours from lighting the burner to empty. I'm still looking at faster and easier! Go Figure!!!Originally Posted by Springfield


The aluminum radiator should work but be careful the cores in them arnt as strong and a few 10 lb ingots might crush them. The other thing will be getting the inlet and out let down to sizes needed


I just sit the mold on a sopping wet towel. Works great. use as many towels as you need for the number of molds your are running. Keep them dripping wet.
Just watch for any steam escaping around the bottoms!!!!!
banger
I am going to suggest more molds. I bought myself a tonne of lead a few years ago and my biggest bottleneck was waiting for the ingots to cool. I used both angle iron and channel iron molds, all dumping the right sized ingot to fit into a 50 cal ammo can.
Being a farmboy, I welded my own molds from scrapyard finds. Bedframe angle iron for the triangular molds, because it was less mass and would cool down quickly, and 2x3" channel iron because I could pour more lead into them and store larger chunks.
I know I have 3 large 2x3" channel iron molds.
And maybe half a dozen angle iron molds. Some are ganged together with 2 or three molds.
I pick up the molds with vice grips so any handles dont get too hot.
Make friends with a welder and have a good supply of consistent ingots.
I'll also suggest stamping the ingots with either a maker's mark, or at minimum what kind of alloy it is. Customers will appreciate not playing guessing games with their lead down the road.
Good luck!
I'll 2nd the permanent marking idea. I just started this and wish all of mine were stamped. Before my next big smelt I'm going to buy a couple of cheap sets of stamps and tack weld a couple together. WW, PB, ISO, LINO, ect.
I use a copper crimpit to mark my clip on ingots. It makes a perfect �C� in the middle of the ingot. I haven�t marked any of my stick on ingots yet because I can readily tell the difference by sight. I am struggling to get them clean enough to sell so I�m not worried about customers getting them confused yet. The glue and tape don�t seem to flux out of the lead very well and leave a coating on the bottom and sides of my pot that has to be scrubbed out with steel wool.
Sent from my iPhone using Tapatalk
Happiness is a warm .45
I built exactly what you are talking about. I used a 6' long piece of 2"x 10" aluminum tubing and capped both ends. In the middle of the length of tubing I welded a aluminum pipe fitting so that I could thread a brass garden hose fitting into it (I could not find a aluminum threaded garden hose fitting). On each end of the aluminum tubing on the top side where the ingot molds will sit I drilled and threaded a small hole to screw in a threaded hose barb and attached a length of small diameter plastic tubing. To use it, I just attach the garden hose and turn it on to a slow trickle. This fills the tubing with cold water and the water will exit through the top side end hose barbs and away from the melting and pouring operation. On the top of the tubing I also lay a length of high temp fire resistant cloth and I dampen it well with water and then sit my ingot molds on top of the dampened cloth. This helps transfer the heat out of the ingot mold and to the aluminum tubing/heat sink. I used aluminum to reduce the weight, but steel should work just as well. I can sit 10 or so ingot molds on it and they cool very quickly. I can keep pouring until my arms can no longer pick up the ladle!!!
I solved that problem by making 8 5-cavity molds that have a built-in rise so air can get underneath. They keep me busy pouring and dumping
I remember seeing a video about a person processing large quantities of lead. He'd get several ingot molds filled then mist them with a hose. I'd probably put the lid on your smelting pot when doing this for added insurance but --- water is only dangerous when it gets UNDER molten lead.
Old-time plumbers used to smelt in the rain when they were sealing pipes.
Last edited by Conditor22; 04-23-2020 at 12:50 PM.


I just sit the pans on the carport slab. A large mass of concrete works well as a heat sink. Once solidified I dump them, and they cool quickly. Once cooled off completely they get stamped w/ composition, like 96-2-2 or 96-3-1.

What kind of mold are you using there, dragon? Do the ingots fit a twenty pound pot?
Last edited by kevin c; 04-23-2020 at 01:52 PM.
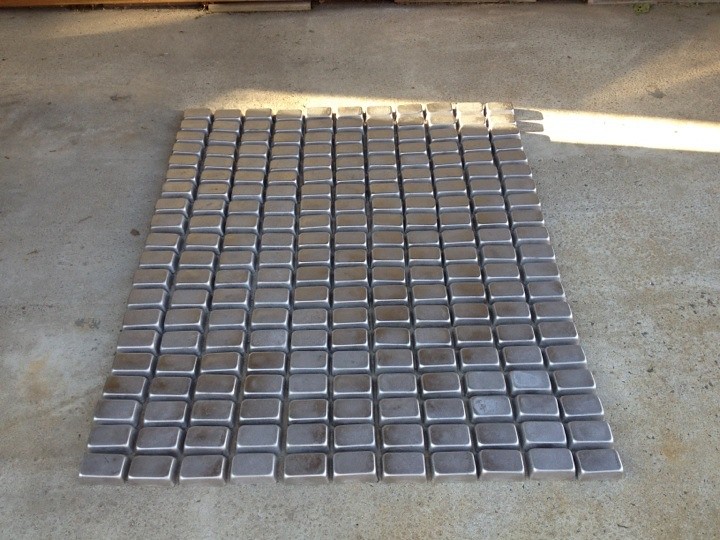
It�s a mini loaf pan that you can pick up in the household section of Walmart/Target. Not heavy duty like iron angle molds. They won�t fit under a production pot. But they do stack tightly w/ no wasted space. This is around 325#.


I use two of lakehouses molds and 6 - 12 place muffin pans sitting on my welding table. That takes care of the piddling amount of lead that I can still source. It sure ain't like the old days when I could make the springs on a 3/4 ton pickup beg for mercy with just one days collection.
NRA Life 1992
My avatar is almost a dead ringer for my little buddy Chico. Six pounds of mean that thought he was a Pit Bull. Miss that little guy.
Ah, I realize I actually have those mini loaf pans! I didn't get the right sense is scale in the first pic.
I have gone to the next size up for storage ingots of about 9-10#, and the smaller bar ingots by Lakehouse for casting alloy. My mini loaf ingots were 3+#, and were a bit hard for me to fit in my Lee, and a bit hard to preheat on the rim or handle with pliers.

I use the square muffin pans from WalMart, large cookie sheets under them with about a 1/2 inch water in them. All on wood held up on saw horses - yea, my back aint what it used to be either !
Steams like heck as you pour the alloy. I pour one pan, then the other, by the time I'm done with the second, the first is ready to dump out.
Yes, I know water and molten lead dont mix; so dont mix em !!
My smelting pot holds about 200 lbs - I can really run through it with this setup - just have to be careful.
500 lbs in an afternoon is no sweat.
Cogno, Ergo, Boom
If you're gonna be stupid, don't pull up short. Saddle up and ride it all the way in.
Why not water quench for quick cooling? After a min or so, just dunk mold with ingots into a bucket full of water.


Almost all my ingot molds are factory style. I've collected them for 40+yrs.
I use the different brands to separate the different alloys. Have 3-5 of each.
I use a turkey fryer with a 10" cast iron Dutch oven. I have a 4+lb ladle and rest the ingot molds on a pair of clay bricks spaced 2" apart. By the time I fill the 4th mold the 1st has "set" enough to move to the cool concrete. By the time the 4th is set down on the concrete the 1st is ready to dump.
But It's becoming a moot point. There's no longer any free lead or even range lead.
I just use the molds to make one pound ingot for easier storage.
And I squat on a very short swivel stool. It's pretty easy when your entire setup is only 2ft off the patio floor.
When casting ingots from WW's as a kid My Dad used 3-4 Sons & Nephews and 5lb ingot molds. All He had to do was sit in a Lawn chair, drink coffee and smoke His Pipe.
I HATE auto-correct
Happiness is a Warm GUN & more ammo to shoot in it.
My Experience and My Opinion, are just that, Mine.
SASS #375 Life
Because I don�t feel like getting a steam burn from flash boiling the water. Even with long sleeves and a decent set of tongs, I feel like that would be pretty risky. Water quenching boolits is fine because they cool so quickly. They don�t have enough mass to maintain their temperature very well. My ingots molds weigh about 10lbs when full. It takes a lot longer to cool that much lead and will produce a significant amount of steam.
Sent from my iPhone using Tapatalk
Happiness is a warm .45
 Posting Permissions


| BP | Bronze Point | IMR | Improved Military Rifle | PTD | Pointed |
| BR | Bench Rest | M | Magnum | RN | Round Nose |
| BT | Boat Tail | PL | Power-Lokt | SP | Soft Point |
| C | Compressed Charge | PR | Primer | SPCL | Soft Point "Core-Lokt" |
| HP | Hollow Point | PSPCL | Pointed Soft Point "Core Lokt" | C.O.L. | Cartridge Overall Length |
| PSP | Pointed Soft Point | Spz | Spitzer Point | SBT | Spitzer Boat Tail |
| LRN | Lead Round Nose | LWC | Lead Wad Cutter | LSWC | Lead Semi Wad Cutter |
| GC | Gas Check |

 Reply With Quote
 Bantou