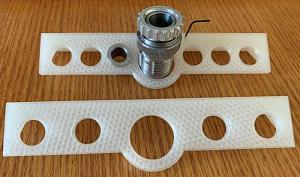
Adding a small radius to the inside will help, and adding the 1/2 diameter washer to the opposite side recreates most of what was there as far as a collar. Only many thousands of cycles will prove it out but I feel confident with what i have now.

|
   
   
|
|


Adding a small radius to the inside will help, and adding the 1/2 diameter washer to the opposite side recreates most of what was there as far as a collar. Only many thousands of cycles will prove it out but I feel confident with what i have now.
That's awesomeOriginally Posted by Beetmagnet

for some reason, it reminds me of this...
.
NRA LIFE Member
USPSA/IPSC
Yes. Yes thats it.
Just ordered 1 yesterday. Should be good for sizing boolitz, brass prep, de priming.................Now I need a boolit feeder!

Derek, with all that aerobic exercise on your arms.....you'll be able to climb any mountain!Maybe we ought to figure out a way to connect the thing to a bicycle ..... and exercise the legs every other day! I love it!


Hi all,
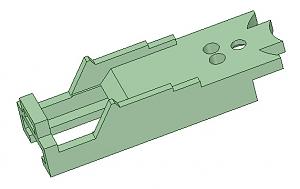
I posted another 3D printed mod to the Lee APP. Rather than do a bunch of cross-posting, you can click this link to jump to the post.
Ed
______________________________________________
Growing old is mandatory, growing up is totally optional!
Hi all,
Made another one! You can read about it here.
Ed
______________________________________________
Growing old is mandatory, growing up is totally optional!
Now in Beta Testing!
It's not the final design. I have left some things pretty raw and unorganized for the sake of testing/debugging. But now to process a ton-o-brass

Anyone have issues switching the lever around in order to make a roller handle?
The small black nut and washer on each side the secure the handle come loose. If I tighten them too hard it makes the press harder to move up and down.
Also, when flipping the handle pieces, there’s an extra little tab on each side that effects thightening everything down. I grinder those tabs almost flush.
I then had to add washers in order to line up things and lock washer as shown in the photo.
I’m gonna add some loctite before bed and see if that helps.

Hi psychbiker,
When I did mine, I noticed those nuts are staked (i.e. it's a locknut.) There is supposed to be just a little freeplay between the handle and nut. Unfortunately, when it's taken off, it pretty much renders the stake ineffective. By you putting that lock washer on the nut, it takes away the free play and makes the handle hard to move. At this point, I think you have two options:
1. You can take the washer off and try to restake the nut and put it back on and it should hold tight onto the bolt.
2. Remove the lock washer and just use Loctite to keep the nut there.
In either case, there needs to be a little play between the nut and the handle, so don't tighten the nut down too tight. I also put a dab of grease on the bolt and between the nut and handle piece. Hope this helps.
Ed
______________________________________________
Growing old is mandatory, growing up is totally optional!

I have not had that bolt out of mine , but if it is a shoulder bolt it does not need washers on either side and you will get more threads in the nut.
Thanks guys. Definitely had to file those tabs on the arms flat once they get flipped over. Filing them flat allows the arms to sit further flat against the press. I was able to remove the lock washers on the lower smaller the nuts were able to fit and the staked portion of the nut engaged.
I did add to big washers on the outside of the arms with the phillips screw. I had to ream out two washers with a stepped bit in order to get them to fit. I didn't epoxy the washers or loctite the lower nuts. I cycled the press a bunch and seemed good to go. Nothing loosened.
Making the handle on the other hand.....Used my drill press and was able to get a centered hole about 2/3 down a 4 3/16" dowel. Then used a longer bit by hand to finish and he hole came out off centered. Not a big deal but it bothers me. Think I'll do it again tomorrow and try and get the hole perfectly centered on both ends. I was also thinking about imbedding a 1/4" inside diameter nylon bushing on both ends, might make the hand rotate better. I'd just have to use a forstner bit wide enough and sink the bushing in to both ends.
Just checking if you got everything sorted out. Like you said, the protruding part of the arm needs to be ground completely flat or it will cause issues. I used a little blue locktite on the nuts to keep them in place.
With the dowel, I drilled in from both ends to ensure they were centered on both sides. I used a round file to do a little finish work so the holes met perfectly in the center of the dowel.
I sized 1000 boolits and deprimed about 3000 45acp brass and had no issues. Everything is still nice and tight and cycles very smoothly.
This looks like a very nice build. Would love to see some video of it in action. I have been doing a bunch of work on the boolit feeder originally designed by ammomike83, and now have a version that feeds 45acp brass nose down so I can bulge bust it on the APP press.
There are some other videos of it in this thread.
http://castboolits.gunloads.com/show...ollator/page43
I also designed a replacement piece for the slider to feed brass, that does a better job of supporting the base, so it doesn't get hung up so much on the shell holder. I can share the stl if anyone has interest.
Last edited by TylerR; 05-23-2020 at 12:19 PM.
anything to stop you from switching the handle arms left to right then putting a roller between them?
 Posting Permissions


| BP | Bronze Point | IMR | Improved Military Rifle | PTD | Pointed |
| BR | Bench Rest | M | Magnum | RN | Round Nose |
| BT | Boat Tail | PL | Power-Lokt | SP | Soft Point |
| C | Compressed Charge | PR | Primer | SPCL | Soft Point "Core-Lokt" |
| HP | Hollow Point | PSPCL | Pointed Soft Point "Core Lokt" | C.O.L. | Cartridge Overall Length |
| PSP | Pointed Soft Point | Spz | Spitzer Point | SBT | Spitzer Boat Tail |
| LRN | Lead Round Nose | LWC | Lead Wad Cutter | LSWC | Lead Semi Wad Cutter |
| GC | Gas Check |

 Reply With Quote


