+1. I'm getting a much larger variation on the temps.Originally Posted by MBfrontier


|
   
   
|
|


+1. I'm getting a much larger variation on the temps.
Griff
NRA Patron
SASS Endowment/Life
CMSA Life
After using my PID for a while now I have been getting more than +/- 2 degrees. I am speaking about after the pot heats up and settles down while I am casting. I have seen it as much as 6 to 8 degrees at times but not nearly enough to be concerned about. I have a fan close by pulling air away from the casting area which may be contributing to the temperature variation. Still a lot better than the temp control on the pot.
I'm in the process of making a fume extractor which will set a little behind and above the pot and vent out a window. It will use a computer fan and a 12v wall plug for power that I saw elsewhere on this website. Thanks for the ideas.
Mike B.
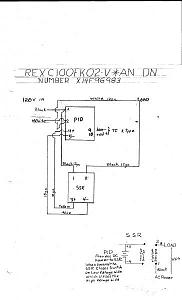
Here is what Wikipedia says a SSR is:
A solid-state relay (SSR) is an electronic switching device that switches on or off when a small external voltage is applied across its control terminals. SSRs consist of a sensor which responds to an appropriate input (control signal), a solid-state electronic switching device which switches power to the load circuitry, and a coupling mechanism to enable the control signal to activate this switch without mechanical parts. The relay may be designed to switch either AC or DC to the load. It serves the same function as an electromechanical relay, but has no moving parts.
HERE ARE MY COMMENTS: It has a low voltage side and a high voltage side. The AC power black wire is interrupted by the SSR (a switch) on it's journey from the wall to the PID to the SSR to the load (Lee Melter). When the PID controller senses a need for more heat in the melter (through the thermocouple) it sends a low voltage signal to the low voltage side of the SSR. The SSR low voltage side switches on (the red light turns on) and switches on the high voltage side allowing 110 AC to continue through the black wire to the load (melter). When the temp in the melter reaches the prescribe desired high temp (the SV) the PID stops the signal to the low voltage side of the SSR and the 110 AC switch opens which halts electricity passage through the black wire. When the PID senses there is sufficient drop in temp the process starts all over again.
PLEASE REFER TO THE WIRING DIRECTIONS ON THE SIDE OF YOUR PID FOR THE PROPER CONNECTIONS ..... The photo below shows how a cheap Rex C100 should be wired and in the lower right corner is the SSR wiring. Carefully follow the black wire and you'l see how it is interrupted by the SSR and you'll see how the SSR can switch the flow of electricity in the black wire on or off. Note the bumps along the white wire; those mean the wires bypass that is they do not connect.
Question about the Rex C100 PID controllers:
Can the "0-400 C" range unit be changed to a higher range
by somehow reprogramming or whatever.
Or is in not worth "screwing" with?
Reason I ask is twice,out of 4 orders, when I ordered a 0-1300 C unit, they sent a 0-400.
Not high enough for my desired operating temp on my lead pots
They refunded my money, but said to not return the incorrect 0-400.
Thanks,
beltfed/arnie


Yup
TO CHANGE PV setting on startup sequence to a higher setting
Rex C100 Control Keys
SET KEY
◄ Key Use to select which digit to change
▲ Key Use to Increase digit value
▼ Key Use to Decrease digit value
1. After power on Hold SET key down until
AL 1 appears on screen
2. Press SET repeatedly to cycle to LCK
3. Set LCK to 1000
4. Press SET and ◄ and hold till COD = 0000
shows.
5. Press SET and cycle thru menu
6. When COD = 0001 press SET to cycle thru
menu
7. SLH parameter you can change from 400 to 450
8. Press SET
9. Power unit down
10. Power unit on and startup display should now show
the 450 instead of 400
Mike
Benefactor Member NRA
Life Member Iowa Firearms Coalition
US Army Vet
There are two ways to conquer and enslave a nation.
One is by the sword. The other is by debt.�
John Adams 1826


^ good to know if I ever need to do that
right now mine is fine for my needs
NRA Life
USPSA L1314
SASS Life 48747
RVN/Cambodia War Games, 2nd Place
thank you, Mike,
I will try this procedure
Indeed, upping the limit to 450C should be more than high enough for my casting
So far, my first casting run with my usual 9+1 ww/lino ran very well at 404 C setting on
my 0-1300 Rex C100
beltfed/arnie
Mike,
I temporarily wired the 0-400 Rex C100
and went thru your procedure, and successfully got it to read 450 C.
and can now set it up to that new limit.
Next to wire it up with the SSR, T/C,etc and try it out
beltfed/arnie
What size project box did you use? Plastic or metal?
Last edited by RangeMonkey2009; 05-03-2018 at 12:02 AM.
Not being particularly adept at building electronics, I'm wondering if there is somebody who sells these ready to attach to the melting pot.
+1....
There is not any building of components to them more like fitting the parts in a box and running the wires to the proper screw terminals . It is more mechanical assembly of prebuilt components and you can find a lot of good ideas for setting one up by searching here , and the are some good utube tutorials as well.
It is fun to put them together.

Hook, I read once where a member was building them. Keep searching. If I run across it again, I’ll post a link.
I just built one and it’s not that hard. Hardest part for me was finding a good enclosure and cutting the holes for the components to fit in. Much more mechanical than electrical.
Just knowing enough to do it, is not enough to do it right! -Taz


Guys for those who need a reliable unit contact vender sponsor Hatch. He has a good unit and stands behind what he sells.
Here is a link to Hatch's PID's. http://castboolits.gunloads.com/show...-setup-UPDATE!
Let me add a bit about heat sinking SSRs. At about five amps for the Lee pot, the SSR doesn't generate much heat, but it still needs to get rid of it. With this load, you can bolt it to an aluminum plate or chassis if it's aluminum.
Previous posters have mentioned using thermal grease - it's often needed but you can cause problems if you use too much - its thermal transfer is NOT as good as metal-to-metal - it is only designed to fill in the microscopic valleys in the metal. The classic mistake is using way too much. Apply just a bit to the SSR and with your finger, smear it around to form a very thin coating - this typically is less than .001" thick. Then bolt it down. If when you bolt it down you see it running out of the joint, you used WAY too much.
Here is my REX 100 setup just fired it up.
Back of box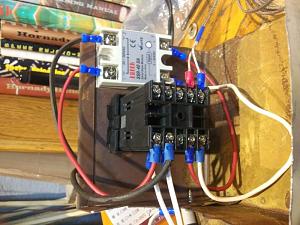
Cut sheet metal from a 80 year old floor furnace I'm removing after we got a new Rinnai
When I put mine together
I wired all the components together on my bench to make sure I understood the wiring , and that my components were good with a incandescent drop light for the load and watched it cycle on the bench , before cutting holes in the box to mount everything then with my own notes it was easy to reassemble in the box when cutting the wires to fit well in the confined space. Certainly not needed for the more skilled but allowed me to test the parts and my understanding before final assembly.
Have had time to use it for a few melts. Wow what a difference this cheap PID has made in being able to produce consistent boolits. Dont belive the calibration is accurate as any setting less than 431�C (807.8�F) results in wrinkled boolits with my usual alloy. Need to get a thermometer someday. It keeps the temp +-3�. Really shows the drop when I add ingots or sprues.
 Posting Permissions


| BP | Bronze Point | IMR | Improved Military Rifle | PTD | Pointed |
| BR | Bench Rest | M | Magnum | RN | Round Nose |
| BT | Boat Tail | PL | Power-Lokt | SP | Soft Point |
| C | Compressed Charge | PR | Primer | SPCL | Soft Point "Core-Lokt" |
| HP | Hollow Point | PSPCL | Pointed Soft Point "Core Lokt" | C.O.L. | Cartridge Overall Length |
| PSP | Pointed Soft Point | Spz | Spitzer Point | SBT | Spitzer Boat Tail |
| LRN | Lead Round Nose | LWC | Lead Wad Cutter | LSWC | Lead Semi Wad Cutter |
| GC | Gas Check |

 Reply With Quote