@John242 - Good catch! I believe you are exactly right.

|
   
   
|
|


@John242 - Good catch! I believe you are exactly right.
First, once I have had streaks or spots, they have never gone away with subsequent bluing attempts using Pilkingtons or Brownells. The only thing that fixed it was re-polishing and starting all over. However, I have now switched entirely to Laurel Mountains product. It is vastly more forgiving and those problems went away. Degreasing is a little tricky and I have found since I started using Brownells 909 in a boiling solution, those problems ceased. I have polished up to 600 and gotten very nice finishes but it is a lot slower and takes many more applications and boilings but I don't let the rust proceed very much before I boil to maintain the higher polish look.
Phil


Looks as if I am a bit late to the party but one item that gave me fits when I first started rust bluing was using paper towels! Some brands of paper towels may be OK as I have talked with some folks who do use them but I know for a fact that some brands will cause nothing but grief as they tend to dissolve (I suppose anyway) in solvents and leave a residue. I don't know if any paper towels were used here in wiping operations or not unless I missed it but if they have been used to wipe the barrel at any point I would strongly recommend tossing them in favor of cotton.
About grit, this is an area where there can be a lot of disagreement on but folks, including me, tend to want as slick a finish as they can get so they naturally assume that finer paper grit will do that, just that it may take a few more cycles than with a courser grit to get proper coloration. I am not trying to disagree with anyone about anything here, just that this has been my observation for the last 4 or 5 years and a bunch of barrels and receivers rust blued with several preparations, mostly Mark Lee.
240 grit works best for me and I have found that anything finer just makes it harder to get a darker color, I doubt anyone can tell much if any difference in the surface gloss or texture when finer grits are used! Why is this? Well it was explained to me by a worker at a professional shop that by the time proper coloration is achieved all of the sanding marks and bare surface texture is going to be covered completely by a smooth and leveled oxide layer so smoothness at that point is determined by how smooth the successive rusting cycle left the previous one underneath it. His point was that after the first few cycles the sanding texture is no longer a factor with about 240 grit or finer and will no longer affect finish except for coloring depth, which the courser grits will improve! I have gone as fine as 800 grit and the only difference it made was that it made the job harder requiring more cycles plus it made getting good deep coloration VERY difficult along with streaking and light area spots. At this point I personally don't go any finer than 240 or maybe 320 sometimes and it gives me much better and deeper coloration with fewer spotting problems. An example might be the next to last job I did about a month ago, an old Mossberg 12 ga. pump shotgun for a friend that was to be a "pickup truck" utility gun so we used 180 grit to remove some light rusting spots. We weren't trying to make it pretty so we left it with the 180 finish going for durability rather than looks, that darn thing turned out as slick as anything I have done regardless of how fine the grit and had the deepest blue/black coloration I have ever managed to get! To get it really slick took a couple of extra cycles but after we got started it was looking so good I just kept going!
To each his own but I am personally convinced that going beyond 320 grit is simply counterproductive.
Last edited by oldred; 01-09-2018 at 01:14 PM. Reason: spellin
Statistics show that criminals commit fewer crimes after they have been shot
I agree with what you are trying to point out here. I have limited experience as of yet, but i have read in various forums and texts that the way to a higher gloss or deeper looking finish (or to vary the color/finish in general) with slow rust bluing is not in sanding to a finer grit, but more of how you treat the rusting cycles. I have also had a barrel that showed obvious sanding scratches when bare metal (probably something like 220 grit) , and said sanding marks virtually disappeared after several rust/boil cycles.Originally Posted by oldred

As for your paper towels. I use cheap toilet paper when I first started rust bluing and it seemed to me that when wiping the bluing I found scratches that were not previously there. I found this hard to believe but not out of the realm that the quality of this toilet paper was so poor that there was grit/dust/something on the paper that would cause these scratches. It may also have been psychological in that the scratches were there before, I just did not notice. I switched to cotton balls and no longer have issues with this, psychological or otherwise. Point is, yes, I have since stopped using paper towels, tp, or any other cheap paper product for cleaning.
JW
"Be Thankful We're Not Getting All The Government Were Paying For" - Will Rogers
"If a man can't piss in his own front yard, he's living to close to town." - Edward Abbey via Tom Russell
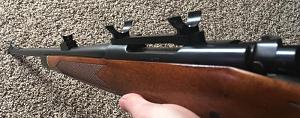
Got a chance to give the bluing another try and about finished up with this project. It came out pretty good, a lot better than the previous attempt. Not perfect, but that just means I can keep improving. Took six cycles using Brownells Classic rust blue, carding with a wire wheel instead of steel wool on the final cycle. Used acetone to degrease instead of thinner, less time in the sweatbox at a lower humidity, and oiled well at the end.
Regarding the linear streaks I was seeing before, I determined they were from my gloves. I was using new gloves every time but it turns out that out of the box they were coated with something that left a film on the metal. When rubbing the metal with steel wool, if I wasn't careful my gloves would rub the metal and the combination of friction and whatever oil was on the gloves would leave a streak. It drove me crazy! but I was able to remedy it by never touching the barrel at all and using a piece of clean flannel between my gloves and the wool. I did not have any more streaks so I suppose it worked. Thanks to everybody for suggestions and encouragement. Below are pics of the bluing itself.
About the gun in general, this was my grandfathers Winchester Model 70 that I am redoing for my uncle. It was stuck under the couch at the farmhouse when my grandfather passed and not touched for about 15 years and as you can imagine had some rust and pitting. Anyway, heres some before and after pics. Focused on the bluing but gave the stock a little attention as well. Thanks again!
This gives you an idea of the stock condition.
And the rust, mostly on the barrel but some on the receiver.
And after photos.
JW
"Be Thankful We're Not Getting All The Government Were Paying For" - Will Rogers
"If a man can't piss in his own front yard, he's living to close to town." - Edward Abbey via Tom Russell
JW, That looks just fine. The blue is the color and texture that I like if it is not the old 1900s S&W or Colt bluing.
To paraphrase Ronald Reagan, the trouble with many shooting experts is not that they're ignorant; its just that they know so much that isn't so.
The blue on Mr. Walker's 700 is beautiful and has the look I want to get on a rifle. I was wondering how to apply formula and card the inside surfaces: inside the receiver, down in sear slots, bolt release areas and inside threads such as guard screws and scope base screws? I saw a suggestion on another forum to use taps that had been cleaned with acetone to card threaded holes. I haven't tried it yet (my bluing jobs will probably have to wait till spring), but applying the bluing compound and carding internal surfaces looks like it could go wrong real fast without proper tools and technique.
This gun will hopefully be used hunting again and not as a display piece so I did not worry about the interior of the receiver and other interior nooks so much when I blued this rifle. The original bluing in these areas was still in good condition so I did not remove it, and therefore did not need to worry about re-bluing it. For the areas I did re-blue I used my carding wheel to get as much as I could, while getting to tight spaces with a wire brush and 0000 steel wool. I really did not put too much effort into these less visible areas until the final carding, in which case patience and attention to detail are the best tools. For the threaded holes I did not remove the original bluing from inside them so again, figured I did not need to reblue them. On the final carding I cleaned all holes out thoroughly with q tips and dental picks to remove any loose debris, oiled along with the rest of the gun, and then removed any excess oil before re-assembling the gun. Getting all the sharp edges and corners of a receiver certainly takes a bit more time and attention than the barrel, but I didn't have too much of a problem with it. I don't think those kinds of spaces should give you much more trouble than the rest of the gun if you just follow good bluing procedure and perhaps have a little more patience than the easier to reach surfaces
JW
"Be Thankful We're Not Getting All The Government Were Paying For" - Will Rogers
"If a man can't piss in his own front yard, he's living to close to town." - Edward Abbey via Tom Russell


Nice job there.
@Jwalker, I know it's been years since this thread started.... but shifting spots/streaks could be just finger pressure marks /impression when applying each coat. Unless the barrel is suspended that application is done in one stroke, the same should be let to dry .... then apply next stroke.... If the part is rotated even with gloves before drying... the part held where it didn't dry will get patches...


I'm no expert ( but just did that Ithaca 37 thread) but 3 things that stood out from your method were:
1. paint thinner as a degreaser? I would use acetone, evaporates completely. Paint thinner doesn't. Looks like you addressed that.
2. I never diluted Brownells rust blue. Use straight.
3. not degreasing the steel wool. Looks like you've addressed that!
Do you have a drill press? That's what I run a carding wheel on. Nothing wrong with steel wool, but carding wheel smoother IMO


If you are getting streaks, you are most likely too aggressive in the rusting process. Let the metal oxidize to where you see just a light layer of oxidation, not visible red rust. It seems counter productive, but I get quick results this way. The first couple rounds make you doubt it, but you end up with a top quality blue job. I'm in a very dry climate, never use any type of sweat box, and can still do several steam jobs a day.
The solid soft lead bullet is undoubtably the best and most satisfactory expanding bullet that has ever been designed. It invariably mushrooms perfectly, and never breaks up. With the metal base that is essential for velocities of 2000 f.s. and upwards to protect the naked base, these metal-based soft lead bullets are splendid.
John Taylor - "African Rifles and Cartridges"
Forget everything you know about loading jacketed bullets. This is a whole new ball game!
 Posting Permissions


| BP | Bronze Point | IMR | Improved Military Rifle | PTD | Pointed |
| BR | Bench Rest | M | Magnum | RN | Round Nose |
| BT | Boat Tail | PL | Power-Lokt | SP | Soft Point |
| C | Compressed Charge | PR | Primer | SPCL | Soft Point "Core-Lokt" |
| HP | Hollow Point | PSPCL | Pointed Soft Point "Core Lokt" | C.O.L. | Cartridge Overall Length |
| PSP | Pointed Soft Point | Spz | Spitzer Point | SBT | Spitzer Boat Tail |
| LRN | Lead Round Nose | LWC | Lead Wad Cutter | LSWC | Lead Semi Wad Cutter |
| GC | Gas Check |

 Reply With Quote