Load DataWidenersMidSouth Shooters SupplyTitan Reloading
Inline FabricationReloading EverythingRepackboxSnyders Jerky
Lee Precision RotoMetals2
Results 1 to 16 of 16

Thread: Joined the Hollywood Club

  1. #1
    Boolit Man
    Join Date
    Aug 2012
    Location
    Manitoba Canada
    Posts
    98

    Joined the Hollywood Club

    On Monday I took delivery of my first Hollywood, an aluminum Turret Tool.
    I've drooled over the ones on here long enough, and one finally came available.

    Nice shape, just a few paint chips, but pretty dirty.
    Yesterday was disassembly and cleaning day.
    Things mostly went well, but I wasn't able to remove the shellholder turret bolt.
    I was able to get enough solvent flushed in through the turret to free things up though.

    There must be a burr inside the bore that the handle fits into, as I can't pull it out.
    I've got the set screw out, and got it freed up enough that it moves in and out 3/16" or so, but won't pull all the way out.

    Once it was clean, I took the air hose to it to blow it dry.
    Oops.
    The paint stripped off faster than I could say "gosh darn it, that wasn't supposed to happen."
    Or words to that effect.

    So today's mission is to find some krinkle Krylon and aluminum primer, and finsh stripping the paint that's left.

    To the Hollywood rebuilders, any tips on handle removal?
    How about the shellholder turret bolt?
    It goes through aluminum, and it's in there good.
    I was contemplating heat, but I'm out of acetylene.
    Hmm, propane might be enough...

    Anyways, everybody like pics.
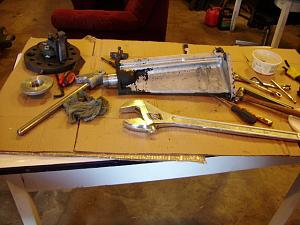
    Click image for larger version. 

Name:	SSA53598.JPG 
Views:	64 
Size:	189.5 KB 
ID:	169803Click image for larger version. 

Name:	SSA53602.JPG 
Views:	58 
Size:	185.1 KB 
ID:	169805

  2. #2
    Boolit Master
    LUBEDUDE's Avatar
    Join Date
    Dec 2008
    Location
    East Texas
    Posts
    2,678

    Joined the Hollywood Club

    Hey Rory congrats on your Turret Tool and welcome to Team Hollywood.

    I have a Turret Tool with the same problem. You can even see where someone took metal gripping tools to the handle in one of the several places.


    Note in first pic, handle can only pulled out less than a 1/4 inch.

    There a few problems with the design versus the user.

    One, before the set screw is installed, a small piece of lead or maybe a #4 or 6 shot pellet should go the screw hole first. Otherwise we have the problem we are having. The set screw itself went into the groove on the shaft. With the constant wobbling up and down and some lateral movement due to use, the set screw rolled a lip onto the edge of the groove.


    To make matters worse, when the groove lines up with the hole on the press end of the handle, it is not bottomed out. This allows for constant play up and down. Thus, while in use, the set screw just can't hold on for long periods, it slips and the lip is firmed a little bit more.


    On my different Turret Tool that I use a lot, I am constantly having to tighten the set screw, even though lead is in place as a buffer.


    Now what is this lip grabbing?

    Are there thick burrs inside the yoke from the threads? It looks like a strong possibility on mine.

    Or, has the lip dug an opposing lip/hook situation into the inside of the yolk while be being used in a loose state? As in when the handle bottoms out, then comes up 1/4 inch or so, wallering a groove?

    Yeah, the Hollywood aluminum has a great Rockwall strength, but is it only on the surface or all the way through?


    A lot of supposition and conjecture here. But my handle does for a fact have sharp lip on the groove edge caused by the set screw. I can feel it with a dental pic and papercllp as well as seeing it.

    How to prevent this problem again if you get the handle out?

    One, fill the bottom of the yolk with tightly packed paper towel material or a packed piece of wood as a spacer. I would not use anything permanent like JB Weld or epoxy. Use just enough of this spacer so the groove in the handle lines up to set screw hole.

    Two, place some lead in the set screw hole before apply the screw.

    Three, as soon as you feel any movement while in use, tighten immediately.

    Disclaimer: I'm not a machinist, I don't have a lathe or mill like most guys on this forum. These are my views as a garage hack. Maybe some smarter guys have better answers.
    TEAM HOLLYWOOD

    NRA- LIFE TSRA-LIFE SASS-LIFE

  3. #3
    Boolit Master


    Kevin Rohrer's Avatar
    Join Date
    May 2010
    Location
    Medina, Ohio USA
    Posts
    1,401
    Once the lock screw has been removed, the handle should pull out w/o a problem. If your handle only comes out 1/4", it sounds like something is holding it in, like a lock screw. I did not have a problem getting any of the handles out from my five Hollywoods that have that handle setup once the screw was removed, so it sounds like you are missing something simple.

    If you are having trouble w/ disassembly due to parts that are rusted together, try soaking them in some PB Blaster for a couple days. During the recent disassembly of my Super Turret, I had to soak the turret adapters and their lock screws for 3-4 days before I could remove them w/o damage.
    Last edited by Kevin Rohrer; 06-10-2016 at 09:08 AM.
    Member: Orange Gunsite Family, NRA-Life, ARTCA, American Legion, & the South Cuyahoga Gun Club.

    Caveat Emptor: Do not trust Cavery Grips/American Gripz/Prestige Grips/Stealth Grips from Clayton, NC. He will rip you off.

  4. #4
    In Remembrance Reverend Al's Avatar
    Join Date
    Feb 2013
    Location
    Victoria, B.C., Canada
    Posts
    1,899
    Hey! Where in the heck did you find that?


    Enjoy!


    Al
    I may have passed my "Best Before" date, but I haven't reached my "Expiry" date!

  5. #5
    Boolit Man
    Join Date
    Aug 2012
    Location
    Manitoba Canada
    Posts
    98
    Thanks Al
    I am falling a bit in love with it.
    The machining, and the way everything was thought out, is a joy to discover.


    I took a propane torch to the aluminum of the shellholder elevator, and was able to loosen the bolt.
    It didn't really want to come out, so I just made enough room to clean underneath, and reassembled.

    I was able to remove the handle, but it required a hammer and an aluminum punch.
    It pulled thin, hairlike chips out with it.
    LUBEDUDE called it:
    With the constant wobbling up and down and some lateral movement due to use, the set screw rolled a lip onto the edge of the groove.
    You can just see the slight burr on the handle, on the press side of the groove.

    Click image for larger version. 

Name:	SSA53647_zps3sjxfupo.jpg 
Views:	26 
Size:	188.7 KB 
ID:	169932

    You can really see how the setscrew has chewed up the shaft.

    Click image for larger version. 

Name:	SSA53645_zpsiopq2byo.jpg 
Views:	27 
Size:	191.1 KB 
ID:	169933


    Everything was cleaned up, acetoned, and masked off.

    Click image for larger version. 

Name:	SSA53654_zpsfopoeiyw.jpg 
Views:	33 
Size:	145.8 KB 
ID:	169934

    I got about five light coats of paint on, I'm excited to see it in the morning!

  6. #6
    Boolit Master
    LUBEDUDE's Avatar
    Join Date
    Dec 2008
    Location
    East Texas
    Posts
    2,678
    Glad you were able to get the handle out.

    Looking forward to the finished product!
    TEAM HOLLYWOOD

    NRA- LIFE TSRA-LIFE SASS-LIFE

  7. #7
    Boolit Master


    Kevin Rohrer's Avatar
    Join Date
    May 2010
    Location
    Medina, Ohio USA
    Posts
    1,401
    Rory: Let me know what wrinkle paint you used. The one I tried (PJ1 Coatings Fast Black) didn't work out well, so I am on the hunt for a more effective one.
    Member: Orange Gunsite Family, NRA-Life, ARTCA, American Legion, & the South Cuyahoga Gun Club.

    Caveat Emptor: Do not trust Cavery Grips/American Gripz/Prestige Grips/Stealth Grips from Clayton, NC. He will rip you off.

  8. #8
    Boolit Man
    Join Date
    Aug 2012
    Location
    Manitoba Canada
    Posts
    98
    Well, here it is painted.

    Click image for larger version. 

Name:	SSA53685_zpssquqfx7t.jpg 
Views:	34 
Size:	146.9 KB 
ID:	170080

    Kevin, I used Rustoleum Hammered finish paint.
    Beautiful paint, but completely wrong.
    I was looking for Krylon Wrinkled Finish, but the store had been bought out by someone that had a big project.
    You can see it has a slightly 'hammered' texture, but it is quite shiny.
    Unfortunately, you can see all of the casting lines, flashing, and grinder marks through the paint.

    Click image for larger version. 

Name:	SSA53663_zpszxlwydhy.jpg 
Views:	21 
Size:	179.4 KB 
ID:	170081

    Had a chance to bolt it down and run a few 270 brass through a F/L sizing die.
    While considerably different than anything else I've used, it went smoothly after the second one.
    Just dip your knees, lock the handle to your side, and straighten up.

    Yes, I know I may have used more grease than needed on re-assembly, but oh my, is this thing smoooooth.
    I know they're supposed to be made out of some magical aluminum, but the shellholder elevator hasn't even worn through the anodised(?) finish.

    Click image for larger version. 

Name:	SSA53664_zpswozw6yuh.jpg 
Views:	21 
Size:	193.4 KB 
ID:	170082

    Quite the treat, tearing it down and figuring out why things were laid out the way they were.
    Some of the casting is very rough, with flash left in place, other place it was removed with a very coarse rasp.
    The parts that need to be precise, however, are machined beautifully.
    To the point I could feel the spot where I'd left a little too much grease under the turret.
    Not bad for a what, 55 year old press?

  9. #9
    Boolit Bub
    Join Date
    Sep 2013
    Location
    Des Moines Iowa
    Posts
    64
    I had very good luck with VHT Wrinkle Plus. I got it at napa auto parts.


  10. #10
    Boolit Bub
    Join Date
    May 2016
    Posts
    52
    That thing cleaned up nicely. How many hours do you have in your restore?

  11. #11
    Boolit Buddy
    Join Date
    Oct 2014
    Posts
    334
    Nice work Negster!

  12. #12
    Boolit Man
    Join Date
    Aug 2012
    Location
    Manitoba Canada
    Posts
    98
    Quote Originally Posted by Negster View Post
    I had very good luck with VHT Wrinkle Plus. I got it at napa auto parts.
    Nicely done, and yes, that paint looks perfect.
    Next trip in to town I'll have to see if NAPA up here carries it.
    Thanks for the tip.

    yenningComity
    I don't know, didn't really keep track, but I've probably got 12- 15 hours into it.
    None of those hours had much hard work, as I was really taking my time and ensuring I didn't break anything.
    There were a few hurdles that I spent a good bit of time on, just because I wanted to exhaust all options before resorting to force.
    Detail scraping and scouring every last trace of old paint consumed a lot of time, but it was sitting-outside-with-a-beer work, so it doesn't really count.

  13. #13
    Boolit Master
    LUBEDUDE's Avatar
    Join Date
    Dec 2008
    Location
    East Texas
    Posts
    2,678
    The hammer tone looks good Rory.

    Negster, looks great, as good as new!
    TEAM HOLLYWOOD

    NRA- LIFE TSRA-LIFE SASS-LIFE

  14. #14
    Boolit Master


    Join Date
    Nov 2010
    Location
    Florida, where we call big dogs Deer
    Posts
    1,039
    Instead of the Krylon, you might try some Cerakoating. Once that stuff is on, it doesn't want to come off and lasts like Powder Coating, but without the mess
    Gun Control means hitting what you aim at!

    Certified NRA Pistol Instructor
    Life Member of the NRA
    Life Member of the Disabled American Veterans Association

  15. #15
    Boolit Master


    Kevin Rohrer's Avatar
    Join Date
    May 2010
    Location
    Medina, Ohio USA
    Posts
    1,401
    Negster: Did you have to do anything special, like bake it?
    Member: Orange Gunsite Family, NRA-Life, ARTCA, American Legion, & the South Cuyahoga Gun Club.

    Caveat Emptor: Do not trust Cavery Grips/American Gripz/Prestige Grips/Stealth Grips from Clayton, NC. He will rip you off.

  16. #16
    Boolit Bub
    Join Date
    Sep 2013
    Location
    Des Moines Iowa
    Posts
    64
    The only thing I did special was crank the heat in the garage for a few hours before I painted it. I also didnt handle it for 3 days to let the paint fully cure.

Posting Permissions

  • You may not post new threads
  • You may not post replies
  • You may not post attachments
  • You may not edit your posts
  •  
Abbreviations used in Reloading

BP Bronze Point IMR Improved Military Rifle PTD Pointed
BR Bench Rest M Magnum RN Round Nose
BT Boat Tail PL Power-Lokt SP Soft Point
C Compressed Charge PR Primer SPCL Soft Point "Core-Lokt"
HP Hollow Point PSPCL Pointed Soft Point "Core Lokt" C.O.L. Cartridge Overall Length
PSP Pointed Soft Point Spz Spitzer Point SBT Spitzer Boat Tail
LRN Lead Round Nose LWC Lead Wad Cutter LSWC Lead Semi Wad Cutter
GC Gas Check