Steve Hurst's traditional "loose lapping paste in the cavity" method has two problems -- the main one is the cavity begins to go out of round with the parting line axis growing larger than the 90-degree-from-the-parting-line axis the more you lap and this ovality gets agravated the more often you have to recast a new (off round) lap to keep on going on up in size. Removing the parting line from your laps helps, but the ovality is still there and it keeps on growing with each new bare lap you create. This technique is slow and is difficult to control for expanding a bullet feature multiple thousandths (like jacking out a nose .004").
Next issue is you can't keep the loose lapping compound located just in the nose area, it unfortunately migrates down into the band areas and starts enlarging other things as well. Even though you did wipe it off AFTER you noticed it moving around that first time -- the grit already got itself embedded in the extra turning slug areas before you opened it up and wiped it off and that grit just keeps on cutting.
================ Lapping 301 ================
The answer to these issues is to take a little fire-lapping technology and add it to your mold lapping technology.
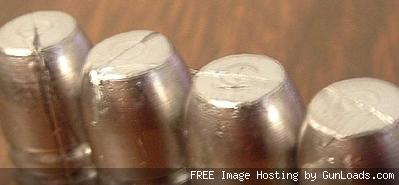
Make up your lap slug as normal, then take it to your steel fire-lapping embedding plates. Roll embed a coarse grit into the desired surface until that surface is just about solid wall to wall embedded grit. Notice that the part of the lap bullet that you wall-to-wall grit embedded has increased its diameter significantly. You just made yourself up a hard aluminum oxide porcupine with a lead core.
Now go to a clean set of steel rolling plates and re-roll your embedded grit portion (bare steel, no additional grit) until you reduce the diameter until it measures the exactly the size you want your lap job to be. Notice how round everything is? This is a natural function of the rolling action. The lead core might not be perfectly round but the cutting tips of the aluminum oxide porcupine ARE perfectly round, this is done naturally by the rolling action of the steel plates.
Now, take your lap bullet and spin it with your drill and SAND/FILE off all the areas you don't want to have lapping action from. You may need to leave the bottoms of some lube grooves to act as aligment zones (bearing journal surfaces) and I generally leave the nose tip form as the front outside bearing journal. I always clean off the gas check shank 100% and the first driver or crush band 100% as they don't need to be growing any as you lap (two critical fit-up areas).
Now wash your lap off and scrub it lightly with a toothbrush to kick free any bit of grit that isn't firmly embedded into the lead. Don't forget to do this step, you don't want any loose grit pieces moving around inside your mold .....
Ok, you got a very hard, very round, precisely sized lap portion that is really quite wear durable. You got selected outboard bearing surfaces and inside bearing surfaces to spin this affair upon and your critical surfaces that you don't want to change have been removed from the equation.
Your first lap should leave at least .002" for your medium & final finish laps to work up to -- this is because when you first try to close the mold on an oversized cutting lap it DOES cut an oblong inital cut that is larger in line with the parting line.
Think about how the oversized first coarse lap sits up on the edges of a single cavity half as if you had just rested it there ...... Your finished laps have to gently recover this natural oblong cutting action from the first lap.
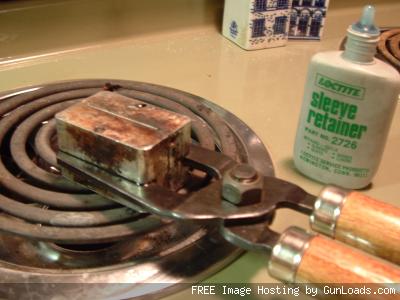
So, you got made-up durable rough laps, medium laps and finished laps. If you lubricate the cutting action with lots of liquid dishwashing soap they will last a long long time before you have to stop and re-grit roll them and resize them. They will only affect the areas you want affected. They will cut fast then they will stop cutting and spin free on your selected inboard and outboard bearing zones. The liquid dishwashing soap keeps every thing CLEAN, cool and lubricated. Just run hot water over the cavities occasionally to see how things are going. (liquid dishwashing soap is so much better for this use than oil or grease, it is a slick lubricating CLEANER after all)
Here is a magic trick -- the rough lap can actually "raise" a surface a little bit by raising a forest of heavy scratch marks for your medium and fine laps to roll partially back down. You can grow an undersized surface a little bit.
You can also intentionally "close down" or reduce an oversized bullet diameter on a LEE single cavity mold by clamping it up on the pin half in a smooth jaw machinist vise, crushing the kurling down and seating the sine forms into each other a little bit. You can dial one down by over a thousandth if you have to. Of course, you want to do this before you final lap it.
Note: If you screw up a final lap, you can close the LEE mold down a bit to recover the error before you retry the final lap.
Final lap has two real functions -- regain some better cavity roundness and reset the parting line to a nice fine line, not a big old nasty free lapping grit type parting line. Clamping forces are decreased and run time is increased on a finished lap engagement. Grit can be smaller too.
================================================
Yes, hand turning your laps has a real function -- fine work, small changes. Slow meticulous fine work is best done by hand. However, trying to remove multiple thousandths by hand is too too slow and that is where these powered hard-rolled lap techniques can do better.
================================================
Living with LEE molds is something those of us who don't have a killing amount of money tend to have to do. LEE molds don't fit individual throats all that well and tend to be undersized for most users in the nose "land rider" area as gun throats wear in this area quickly. These techniques allow you to adjust the size of a standard lee mold nose fairly easily and quite accurately.
Plus, having made up your finish lap --- keep it, you can use it when the naturally occuring simple kurling/sine form wear occurs over time and takes your LEE mold out of round a bit. Or you bang something and kick up a burr on the edge of your cavity and you mold quits dropping bullets out freely.
Oldfeller

|
   
   
|
|

 Reply With Quote

 Well, Oldfeller, I beg to disagree with you. I think this is a FINE post, and one I'll likely NEED in the near future. Only mould I have that needs fixing is that darn .50 cal. minnie mould, and that one looks fine as far as dimensions go, so you MAY have to resort to one of ol' Jump's moulds after all. Just know that our deepest sympathies go with any attemp to work on ANYTHING that boy's had his hands on! Hee hee! If you can fix THOSE, you can fix ANYTHING!