Great job should hold a couple hundred pounder of lead.

|
   
   
|


|


Great job should hold a couple hundred pounder of lead.
Valves are tightened by machine.Originally Posted by bstone5


I'm going to fire it up with some pure lead I have in sheets and blocks this weekend, so I'll get a feel for how the burner performs. It will be an easy thing to start putting holes in the top or the windscreen if needed.

man that's cool

I got a few hundred kg of lead from a range about two weeks ago. I have a 20 litre drum i cut the top out of to hold a cast iron pot and light a fire under it to do my melting in. When i brought home the masses of range lead, my dad told me the little one would take forever, not to let him get me down, i used it anyway.... He was right, it was taking longer than i remembered it taking in the past, yet it did work. I did come up with a solution that worked very well.
As my parents place is far enough out, the neighbors don't complain, i worked on it there. I got a section of a 44 gallon drum and an old gas bottle. I cut the top out of the empty bottle (ensure there is no LPG in there before cutting for obvious reasons) i then cut a circle out of the 44 gallon drum to suit the bottle. I then pushed the bottle into the hole and welded it in. I then cut a hole to feed wood from one side and a hole for the flu at the other. Light a fire under it with all the dead trees around the place. It works better than i ever expected it to. Free fuel to feed the fire and the other parts i had on hand. Don't under estimate the heat you can get from burning waste timber if you have it laying around.
It was cobbled together in about 20 minutes, but with how well it went, i am going to spend more time making it so it will last for further use. With a molten base, i can dump about 1/3 of a bucket into the pot, stir t to melt the added lead then add a bit more and repeat till the whole bucket is in and molten. I then need to wait for the rubbish on top to burn off (plastic, wood and paper from targets). I think i fed this monster about 5 buckets each weighing 25kg within about 30 minutes. The part that slows you down is the pouring ingots and waiting for them to cool so you can do more.
Tazza, That is how we smelted about 6000 lbs of range lead from an indoor range. Two improvements would be to use about a 12 foot chimney to get the nasty smoke away from your work area while the trash is burning off. The second is to fasten a small pipe to the base of your burner, angled up, and fasten a small computer fan to blow air into the burner. A small fan is sufficient as the larger fan that we tried got the drum so hot that my pants caught on fire while standing about 18" away.
I was actually thinking about adding a chimney to get the smoke from the wood burning away, i'm thinking you're onto something for making a chimney to get the smoke and other nasties away from the pot too. Some sort of hood over the pot and a fan to draw it up and out.
There is no "burner" as it is powered by timber, i just light a fire under it and keep adding wood to the fire. Less adjustable than gas, but nice and cheap.
Hello Tazza, Here are some pictures of our set up. The door to the smelter has a wire on it that will hold it open when we feed it wood. The valve has been modified to reduce splashing. Also we extended the chimney by another 8 feet.
Here we are during a nice sunny winter day pouring lead.
Here the dross is removed from the molten lead. The little scoop at the end of the bar has holes in the bottom to allow the lead to flow out. Note the taller chimney and the different valve arrangement.

Thanks for sharing the pictures, I like the design! I may yet have to make a new version of mine in the near future. I see the fan you spoke about to get more air in to really get it burning. Possibly hooking up a cheap ebay speed controller could help so you can adjust it.
Good idea for removing the dross, i currently use a ladle and turn it on it's side, it does ok, but there is always some lead trapped and discarded.
I will try and get some pictures of it, hopefully some in action if my dad doesn't get motivated and finish it before i get there.
I did find that the melt put out quite a bit of smoke too as the rubbish was burning off, i wonder if i was to setup some sort of cover over the top with a chimney i could use that to draw the smoke and other nasties up. In theory, the heat would cause convection currents to pull it upwards, good in theory at least....
If I were to build another one I would put the valve on the side opposite the door so that the pipe doesn't hinder loading in the wood. Also, the wood door could be located a bit higher and be slightly larger to aid with feeding lots of wood. It's amazing how fast it can melt a couple hundred pounds of lead. The chimney attached to the smelter is a steel pipe. It sits about 18 inches inside the barrel and is fastened to the side of the barrel with a couple bolts. The front of the chimney section inside the tank is cut away to let out the smoke. When I cut the hole in the barrel to receive the propane tank I made the diameter smaller about � inch all around and bent this edge up with an adjustable wrench. I then fitted the propane tank into the hole and hammered the raised edge against the propane tank. Welding sealed the joint and made it strong. This was a fun project. We sell the smelted lead to BC Black Powder shooters and others for $.60/lb.
That's always the way, you think of better ways to do it after the initial build. Good idea on bending the metal up to weld to the cylinder, i found mine was hard to weld as the metal was so thin on the drum, this would have made it easier.
A few years ago I built a wood stove sort of thing to cook stock, i found the same issue, the door was too low and the hole to feed it could have been larger. All depends on if i can be bothered making version two of that one. When i get it hot it works great, but there is a point that there is just too much ash at the bottom to put more wood in. It may get some slots cut in the base to allow air in and ash to fall out.
I was amazed at how fast it heats up too, it was only minutes till the lead was starting to melt. Doing it larger scale like you are is the only way to make it worth while. If you were paying for propane/LPG to heat the pot, you really wouldn't be making much selling for that price.
We used mainly short 2x4 pieces of wood. My buddy and a couple other guys were enclosing the back side of our range shooting shed using recycled windows and 2x4 lumber from our local dumps (oops...recycling centers). The cut off pieces of 2x4 were burned in our smelter. Nice and dry, no chainsaw required. We recycled the drum, the propane tank, the wood and most of all the lead. There were some hydration expenses however.
Can't complain about those expenses, I hope you made sure you were equally hydrated too
Sadly there aren't a whole lot of enclosed ranges here, my main range is open, it would be far too much work to try and reclaim lead from it. There would be many tonnes of lead there.
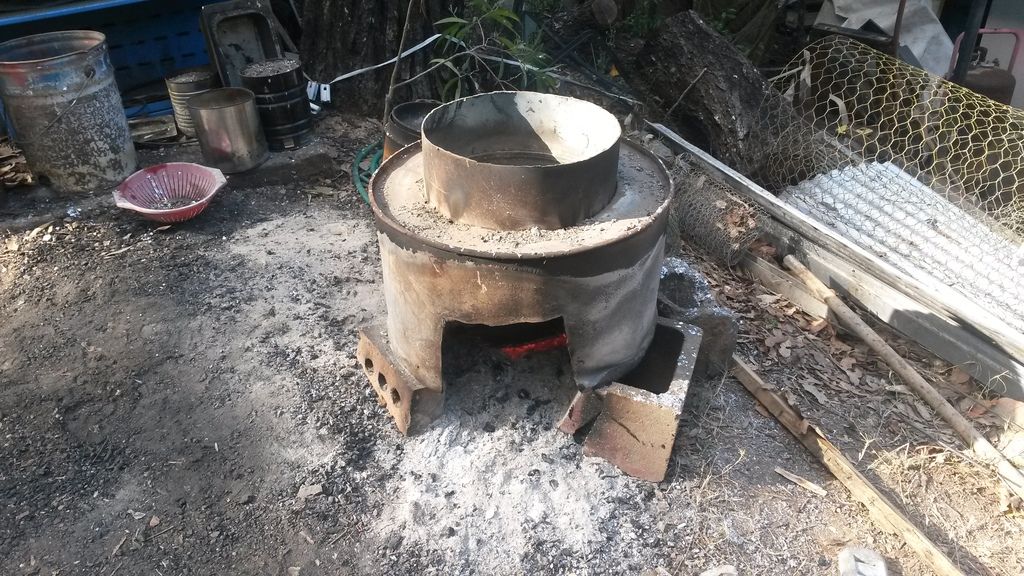
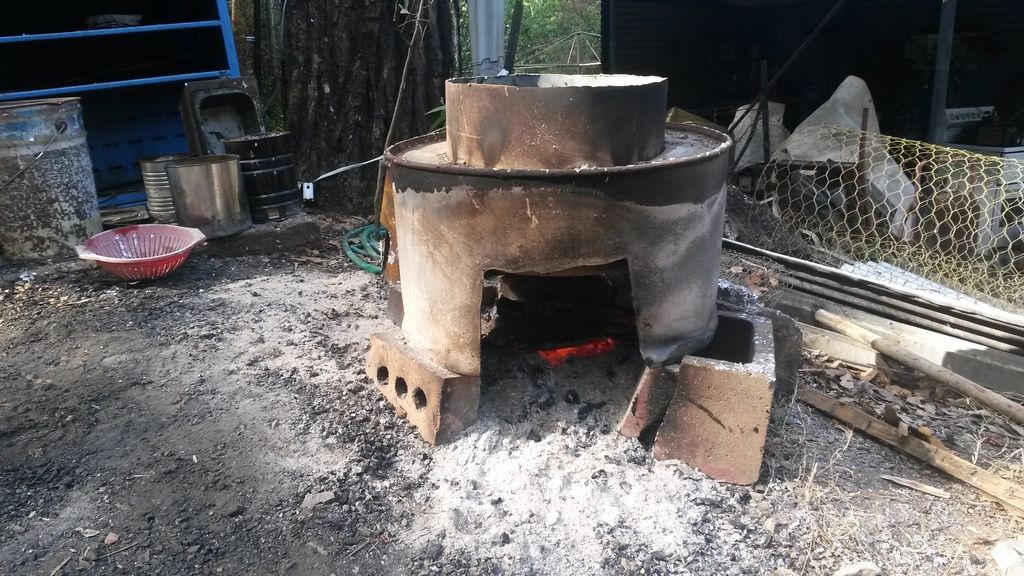
Sorry it took me so long, but here is a picture of my 20 minutes of construction. Don't mind the block that you can see is broken, Never fear, the drum is supported a little further back. This was taken at the end of the melting session, i was too busy adding, cleaning and making ingots to think of taking pictures
The broken block really looks dodgy doesn't it? The blocks aren't made to take the heat, and possibly was cracked before i even started.
Nice. Nothing wrong with that set-up. It's simple and it works. Thanks for the pictures.
You could try digging some of the lead out of the back stop from your range just to see if the effort of smelting it is worthwhile.
We have two ranges, one is 50, the other is 200. I keep thinking there has to be so much lead out there, but it would be spread out so far that it would take far too much effort to collect. The back stops are just dirt piles, so they will all be embedded into that too. One day i may have a go at scraping up what i can.
The last lot i got was from an enclosed range with a metal back stop, so it was very easy to collect.

Tazza, I've been recovering my scrap from the 25 and 50 metre ranges at my local pistol club, which means that it's non-jacketed scrap. The berms are some sort of clay-based sand - in Winter the stuff sticks together too much, so I have to wait for it to dry out (Summer) which means it's hot work!!! I use a cheap plastic garden sieve, which works very well. Even after washing the sand off it's amazing how much crud still floats up when I smelt the stuff.
I like you're setup, simple to build and use. The only problem I can see is the fire ban season - even though you could set it up to be safe to use, people tend to get very nervous when they see smoke! Which is why I use coke from my forge, as although there's a bit of smoke when I first start it up, once it's running there's no smoke.
Those would be a back stop, easy to sift out the lead, no ricochet risks. Ours are just piled up dirt, clay, sifting wouldn't work for ours unfortunately.
Nasty, summer time in the heat doesn't sound fun at all. We are in Spring, the heat is already horrible, summer is going to suck.
Thankfully where my parents live, not many people care what you do. I keep the fires small and there is little smoke too. Nothing like neighbors that get in your business when you are doing nothing wrong.
I like simple too, if it rusts out, i don't worry too much as it cost me nothing to makeonly about 20 minutes with the plasma and welder.
 Posting Permissions


| BP | Bronze Point | IMR | Improved Military Rifle | PTD | Pointed |
| BR | Bench Rest | M | Magnum | RN | Round Nose |
| BT | Boat Tail | PL | Power-Lokt | SP | Soft Point |
| C | Compressed Charge | PR | Primer | SPCL | Soft Point "Core-Lokt" |
| HP | Hollow Point | PSPCL | Pointed Soft Point "Core Lokt" | C.O.L. | Cartridge Overall Length |
| PSP | Pointed Soft Point | Spz | Spitzer Point | SBT | Spitzer Boat Tail |
| LRN | Lead Round Nose | LWC | Lead Wad Cutter | LSWC | Lead Semi Wad Cutter |
| GC | Gas Check |

 Reply With Quote