Progessing well. I've got to get back in the shop, don't know when it will be.

|
   
   
|
|


Progessing well. I've got to get back in the shop, don't know when it will be.
Very nice work I will be watching the point form die progress with a lot of interest
Dave

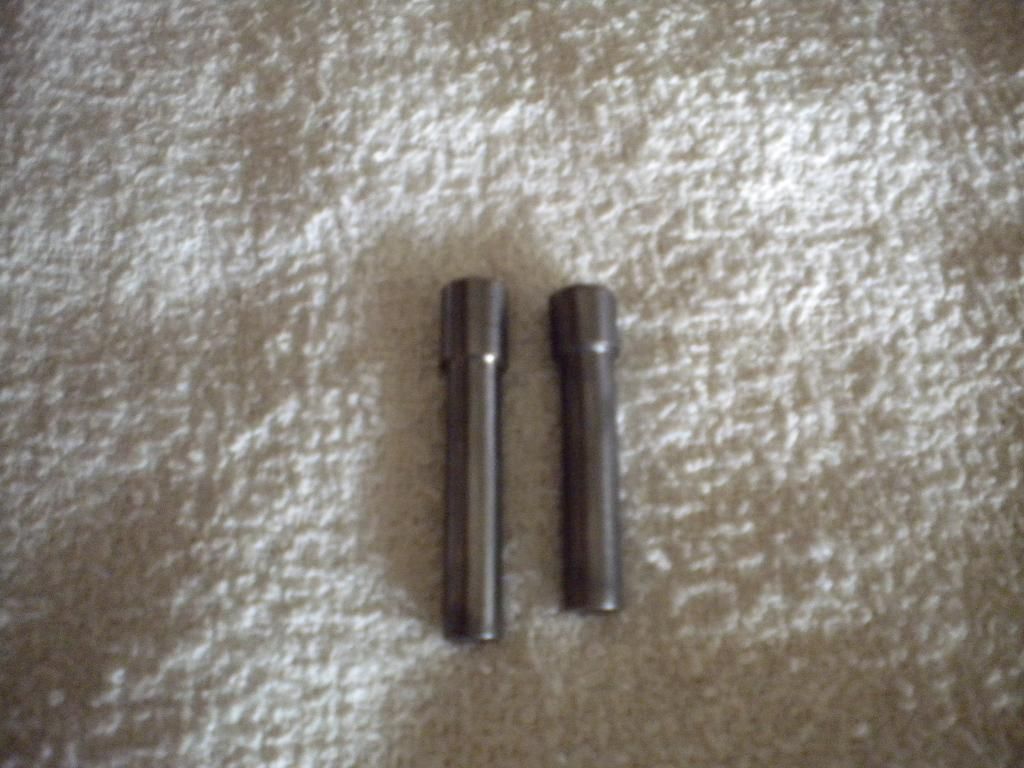
Lesson learned on punches: make sure you are using high yield strength material.
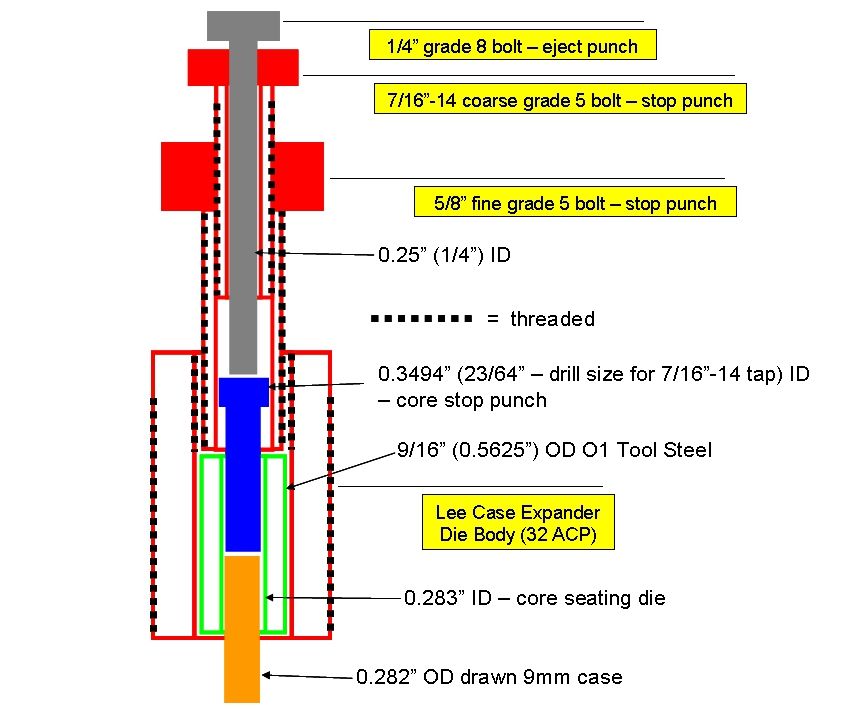
below is a pic of two punches, the one on the right is heat treated O1 with a yield strength of 50,000 psi, the one on the left is 1144 ‘Stress Proof’ steel with a yield strength of 130,000 psi… I didn’t think this would happen but my stop punch for the core seating die bent! so I had to rethink the material and ended up using 1144… I was hesitant because its hardness is about 30 RC compared to the O1 hardness of 60, as I thought the eject punch would deform the top of the punch (the eject punch is a grade 8 bolt RC hardness of 35), but so far the punch has held up fine…
the 1144 stress proof is not very expensive and can be had at mcmaster.com in various size diameters... so I will be using 1144 for all my punches for now on if possible, except for the pointing die eject punch which just holds music wire on the business end… the part that yielded is the ‘blue’ colored punch in the drawing below:
the 1144 material is really easy to machine and finish, and it does not need to be heat treated… so all punches now will be this material except as noted above…
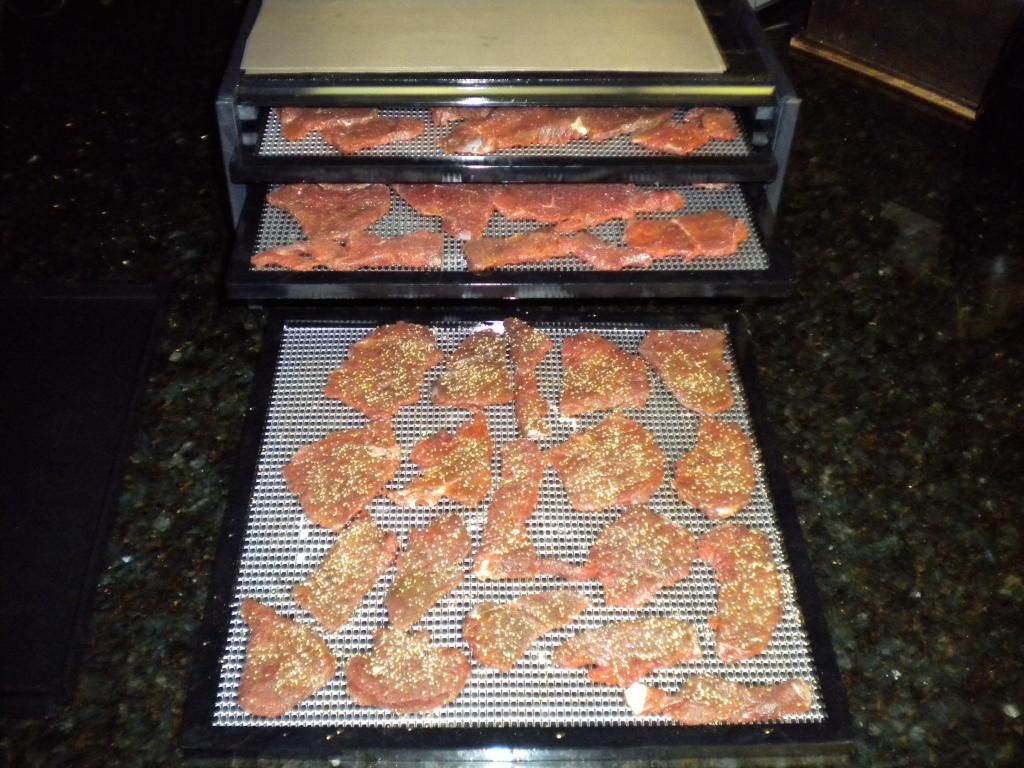
I started getting into making Venison Jerky, and by far it is the best jerky I have ever tasted! nobody in my house will eat the deer meat (daughters freak out and think I killed bambi), so the best way for me to eat the meat is to make jerky out of it and it is fantastic… here is some jerky I made this weekend ready to be cured in the dehydrator:
got the basic Excalibur dehydrator for $100, it can only handle about 3-4 pounds of meet at a time, but it keeps me in snacks for a month or so... after a lot of research here is the jerky recipe I am using:
Liquids - ounces per lb. of venison
Soy Sauce - 2 ounces
Worceteshire Sauce – 2 ounces
Guinnes Stout or any Beer (or clean water) – 2 ounces
Teryaki Sauce (optional) – 2 ounces
Note: use any liquid combination of the above desired to taste, but you need approximately 8 ounces of liquid per lb. of meat. If you want Teryaki jerky use 6 ounces of Teryaki marinade and eliminate the Worcesteshire and beer, if you want the basic smokey/salty jerky use equal amounts of all 4 liquids, if you want a real treat make some beer jerkey and use 6 ounces of Guiness Stout with 1 ounce of Soy and Worcesteshire!
Notes
all measurements are by volume
1 tablespoon = 1/2 ounce
3 teaspoons = 1 tablespoon
1 cup = 8 ounces
Misc ingredients - ounces per lb. of venison
Liquid Smoke - 1 ounce
Brown Sugar – 1 ounce
Morton Tender Quick – � ounce per lbs. (hard to find, had to get off evilbay)
Spices – all are � teaspoon per lbs. unless noted
Onion Powder
Garlic Powder
Ground Black Pepper
Lowrys (or any seasoning salt)
Ground Red Pepper (2 pinches per lbs.)
Tobasco (hot sauce- 2 squirts from the bottle per lbs.)
[1] cut the venison into thin slices no more than 1/8” thick (it helps if the meet is slightly frozen, you can put thawed meet in freezer for 2 hours before slicing)
[2] get out a large bowl and add all the spices together
[3] then add all the liquids and misc ingredients
[4] using a spoon take your time and mix them all together
[5] using a 1 gallon freezer bag add the marinade to the venison and mix it all together in the freezer bag (1 gallon bag holds about 3-4 pounds of venison with the marinade), mix it up real good almost like kneading bread dough
[6] let the jerky marinade sit in the refrigerator overnight (at least 8 hours)
[7] lay paper towels out on a plate and lay the strips of jerky on top, you want to blot the jerky dry of any liquids before placing in the dehydrator
[8] place on the dehydrator trays
[9] at this point you can make pepper jerky or spicy jerky by sprinkling on some course ground pepper or red pepper flakes, patting the top of the jerky to kind of ‘mash’ the spices on to the meat (I really like pepper jerky)
[10] let the jerky cure at 150-160F for 6-7 hours
[11] let the jerky cool and place in baggies for a few days before eating
it will store like this for several months… enjoy
Game on, it's time to start making the pointing die!
.
Last edited by Cane_man; 01-28-2014 at 02:04 AM.
Almost my exact recipe. I heat my wet/dry solution a bit to infuse the flavors before marinating. Good hint about slightly freezing before cutting meat. Makes slicing so much easier. A spoon in the door of an oven set on it's lowest temp works well as a dehydrator. Cover floor of oven to avoid wife's wrath. Oh. and your dies are looking good, also.
Now I'm confused, I don't know whether to make dies or jerky??? Good thing deer hunting season is over, and I didn't do any. Waiting on spring turkey season, that's my game.
I'm suprised that the 01 punch bent. Did you check it with a file to confirm it is a heat treated one??? Now I've got to re-think my punches. I wonder how 4140PH compares to 1144???
great work Cane!
make both!
the O1 was heat treated, not sure why it failed... mcmaster lists 4140 as having a yield strength of 60,000 psi... the Ted Smith pdf recommends using 1144...
finally sketched out the pointing die, and with any luck i can get started making the reamers this weekend:
Are you planning on some sort of a spring arrangement to keep the ejection pin out of the way? As drawn you'd be forming a point around the ejection pin.

CM, are you going to make a spoon type cutter, D cutter or fluted cutter? Standing by for the next exciting installment of your saga.
Mike
Politicians should be limited to two terms.
1 in office. 1 in prison.
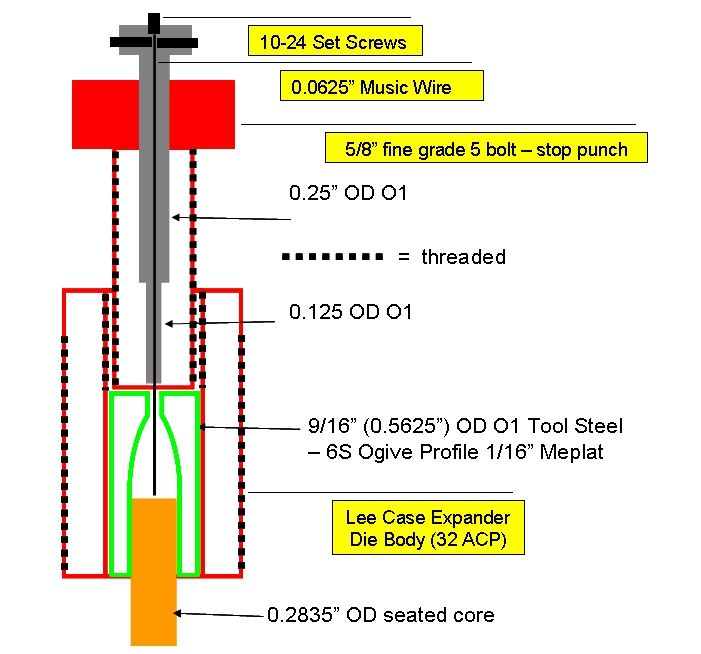
supe, i lift the eject punch up so the wire is out of the way and i have a brass pin that holds it in place while the point is being formed, then pull out the brass pin and eject the bullet... this way the point doesn't form around the wire as you mention... i did not show this brass pin in the drawing, but it is about 3/16" diameter and about 1" long and fits through the head of the large stop punch bolt (red on the drawing) on top where i drill a hole through the side of it... i'll show a pic eventually when it is all done... second thought, i will put up a pic of my .224 pointing die to show it... this weekendOriginally Posted by supe47

Last edited by Cane_man; 01-31-2014 at 11:29 AM.
What hollow point diameter are you going to make? What is the smallest one what are you able to do?
Tdub, making a d-reamer (spoon) and a two fluted reamer... i found that the d-reamer is really good at hogging out the rough profile and taking out the steps after step drilling, and the 2 fluted reamer was needed to get a good semi-finished profile ready for lapping...
not sure i understand the question, but i have made a set of swaging dies for 0.224 55gr 6S 0.047 meplat... this particular swage die set in this thread is for 7mm 140gr 6S 0.0625 meplat... both are flat based and i suppose you could consider them hollow point or open point
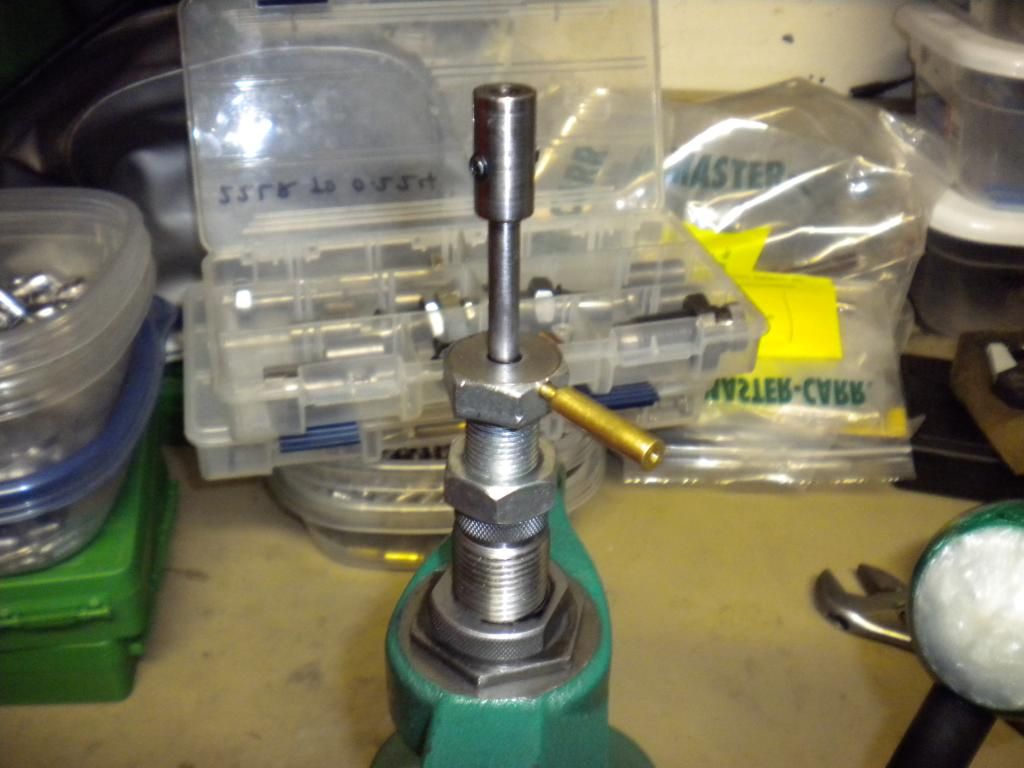
here is the eject punch with the brass pin holding it up, this is for my .224 die


A spring is a whole lot easier....
pin is easy to slide in and out and doesn't wear out
Yes I meant meplat. Any picture of finished bullets?
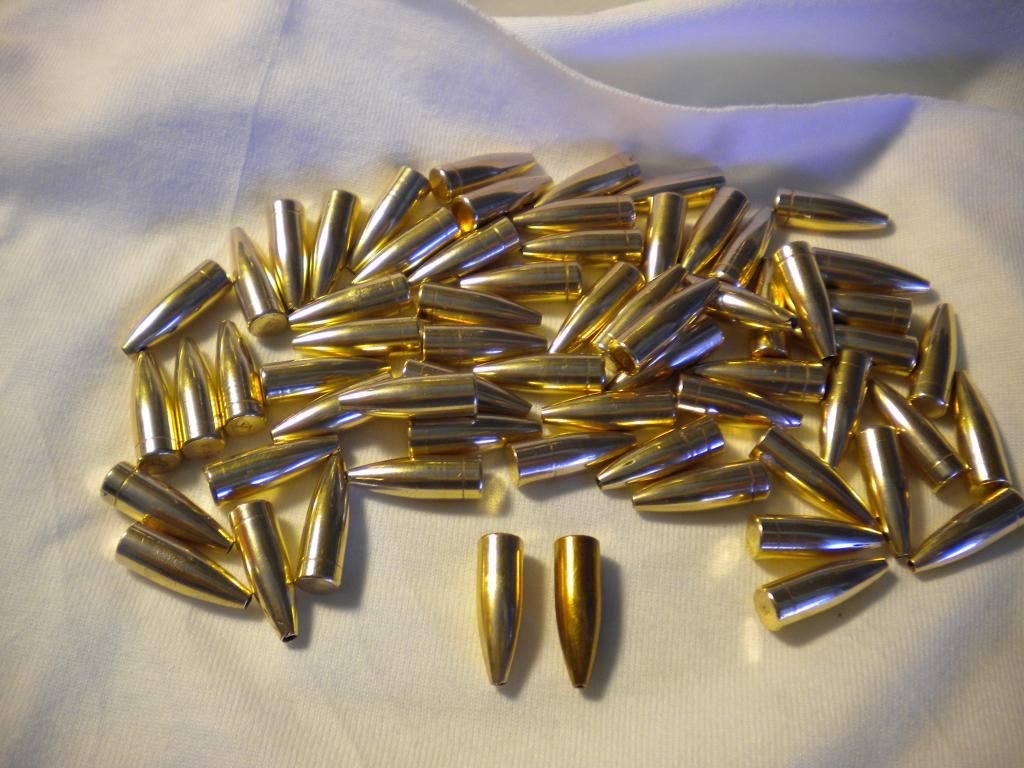
the two bullets in the center: left is the .224 bullet swaged with my homemade dies, right is the Burger production bullet i was trying to copy:
this was my first batch with the new dies, but with a little more care on using the right jackets and a better technique with point forming with the dies/press would greatly reduce the wrinkled and folded tips, then use a meplat trimmer to square the tips and it is very very close to the production bullets... these bullets shot MOA at 100 yards
Great looking bullets. I have a problem with big meplat due to the Danr dies. The ejecting punch is so big that I am unable to have meplat like you
According your picture the ejector of swagged eject the whole OD O1 part?
not sure i understand the question, but only the wire is ejecting the swaged bullet... the punch just supports the wire... the large bolt is drilled out to support the punch (which i did not show on the drawing)... the drawings are just conceptual and i have left out a lot of dimensions, etc.
i understand about the wide meplat, its not easy to make a pointing die with a small meplat because of the ejection wire problem... larger the meplat the easier it is to eject from the die
I see. When I was trying to eject the bullet from the die with smaller then supported punch. The punch penetrated the lead and get stuck on the ejection pin completely
Nice precise work done.
 Posting Permissions


| BP | Bronze Point | IMR | Improved Military Rifle | PTD | Pointed |
| BR | Bench Rest | M | Magnum | RN | Round Nose |
| BT | Boat Tail | PL | Power-Lokt | SP | Soft Point |
| C | Compressed Charge | PR | Primer | SPCL | Soft Point "Core-Lokt" |
| HP | Hollow Point | PSPCL | Pointed Soft Point "Core Lokt" | C.O.L. | Cartridge Overall Length |
| PSP | Pointed Soft Point | Spz | Spitzer Point | SBT | Spitzer Boat Tail |
| LRN | Lead Round Nose | LWC | Lead Wad Cutter | LSWC | Lead Semi Wad Cutter |
| GC | Gas Check |

 Reply With Quote