


Once you have made your pattern, you need to get some basic Leather crafting tools, and of course, some leather. The most complete source of leather crafting tools today is Tandy Leather Factory. If they don't have it, you most likely can't get it any where else. Like most niche hobby suppliers, their regular prices are bit dear, so it pays to get on their mailing list to take advantage of their sales. This month they have two items on sale that are essential to making holsters. The first is leather, and the second are harness needles.
Right now, they have veg-tan double shoulders (economy grade) on sale for 3.49 a square foot. For less than forty bucks, you get enough leather to make nearly a dozen average sized holsters. These are 7-9 ounce untrimmed pieces of leather that will be somewhere between 8 and 11 square feet and may have range marks (i.e. scars, brand marks, etc). But for the novice holster maker, they are a godsend. They cost less than half of what the premium leathers do, and with care you can place your pattern to avoid the worst of the range marks. And there will usually be plenty of perfectly good areas.
A word about leather. Leather is sold ostensibly by the weight of the leather per square foot, and because of the variance in the hides and their preparation, it is usually expressed as a range, 6-7 oz, for example. Economy grade leather will usually vary a bit more, like 5-8 or 7-9 oz, but for our purpose, that is about as relevant as the price of eggs in Alaska. A one foot square ounce of leather is approximately 1/64 of an inch thick, so most leather, while graded by weight is actually sold by thickness. This means little outside of a game of "trivial Pursuit" except that when you are making a holster, you will want to make the appropriate choice for the gun you are making the holster for.
Here's a suggested guide for selecting leather weight for a project.
Gun weight Leather Weight
0-20 oz. 5-6 oz
20-30 oz. 6-7 oz
30-40 oz. 7-8 oz.
40+ oz 8-9 oz.
Bear in mind that these are guidelines, not immutable laws of time and space. If your pistol weighs 31 oz and you have some 6-7 ounce leather you will not burst into flames if you make your holster out of it.
Here is a photo of the stuff required to make a nice holster. I have made a holster with a nail, a knife, a stick, and a needle and thread, but I don't recommend it
You will see a pair of shears, a stitch line cutter, a pair of pliers, a thonging chisel, an edging tool, a pair of harness needles, and a soft blow hammer on top. Below is a roll of waxed thread, a rotary hole punch and a gun, in this case, my much beloved 44 Special Flattop. Underneath it all is the all important manila folder which becomes the pattern. They now make a two prong thonging chisel that is much better for holster making. DO NOT GET A FOUR PRONG you will curse it every time you have to wrestle it back out of the leather.
If you saw my previous post on holster pattern making, jump right in. Other wise, go read it first.
Once we have our pattern made, we transfer it onto the leather by tracing the pattern onto the grain side of the leather, making sure we have the right side up. Don't laugh, I have two left-hand holsters that didn't start out that way. Try to position the pattern to minimize waste while avoiding any big nasty marks or scars. Then, pin the pattern firmly in place with a stout hunk of lead, a box o' boolits or your off hand and trace the edge with a ball point pen, being careful not to let the pen wander off.
The next thing to do is cut out the pattern. A pair of shears work best for this, provided they are sharp. I used a pair of aircraft snips for years before My wife got me the Fiskars for my birthday one year. However, an exacto knife, or any really sharp knife will do just as well. Carefully cut around the edge. Remember, the better your pattern and the better you transfer it it, the better your holster will be. I often find it easiest to cut off the entire corner or edge where the pattern is in order to reduce the weight of the leather flapping around.
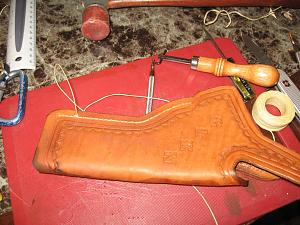
Next up is to form the belt tunnel. Take the belt that you want it to fit on and lay it on a clean flat surface. Take your belt tunnel and get it wet, run it under the tap for 20 or 30 seconds. Now lay it on top of the belt and position it to get the the angle you want the holster to ride at. Try to visualize how the gun will fit on the belt and adjust it so that what you see is what you get. Now, take a smooth metal, wood, or hard plastic tool, such as a spoon, a butter knife handle, a boning tool or whatever, and form the tunnel on the belt. Don't scratch the leather, just rub it firmly with the smooth belly of the tool, not an edge. Once the tunnel is formed, set it aside to dry. Once it is dry, take the edge beveler and bevel the edges, trying to maintain the same angle all the way around.
Now is the time to perform any basket stamping or hand carving that you have a mind to do. Basket stamping covers up most minor range marks and I suspect that was the reason that many police leather suppliers began pushing 'basket weave" leather goods to allow them to use cheaper leather. I usually put at least a simple edge pattern on my holsters, but it really doesn't matter. If you are interested in that sort of thing, there are a great many people more qualified than I to tell you about it. If you live near a Tandy Leather store, everyone of them has expert craftsmen who either work or shop there who can help you. There is also a lot of stuff on the web.
Once you have made whatever aesthetic improvements to the leather, it's time to dye the holster. Here, there is only one choice. Fiebings Oil Dyes. Not Lincoln, not the water based garbage that Commifornia makes you buy, but Fiebings Oil-based leather dies. Nothing else compares when it comes to holster making. Using a dauber, out doors, apply a smooth even coat going up and down, then do it again going side to side, then finally diagonally to ensure even coverage. My favorites are USMC Black, British Tan and Saddle Tan, but there are many others available. Pick your favorite.
A pair of cheap nitrile surgical gloves will keep you from dyeing your fingers and hands as you turn over and pick up the pieces as you dye them. Fiebings is good stuff--it will dye your skin as well as the leather. When finished, set the project aside to dry, ideally in the afternoon sun..
Next it's time to assemble the holster. If you are making a thumb break holster, now is the time to punch the hole on the back strap. Lay the gun on the project and double check your pattern. Mark the spot where you want the snap to be. Leave the strap portion for later, but punch, cut or drill a half inch hole for the female snap.
First we attach the belt tunnel. We do this by applying a thin coat of rubber or contact cement to the back of the tunnel where it touches the back of the holster and then doing the same to the corresponding spots on the holster. Keep the glue away from the edges. When you press the tunnel onto the holster body, glue will spill out of the edges, onto your fingers and onto the holster, making a sticky mess. Avoid this if you can by being frugal with the glue. It is there to hold the pieces while you sew, nothing more. If a thumb break holster is being crafted, rivet the female snap in place now.
If you have never used one before, take a few minutes and practice with the stitching groover on a piece of scrap leather before attacking your holster with it. It has an ell shaped cutter that slides in and out of the shaft when the lock screw is loosened. Adjust it so that it will scribe a channel about 1/8 of an inch from the edge. Then carefully scribe around the edges of the sewing flaps on the belt tunnel to mark where you are to make your holes.
There are several ways to make the stitching holes. When the leather to be sewn is 3 layers or less in thickness, I use a thonging chisel. This looks like a tiny pitch fork and works by pounding it through the leather, pulling it out, and then going on to the next holes. If you overlap each strike, so that the back leg is in the last hole you punched, you next hole will be an even distance from the last one and your stitches will be nice and even. Use a straight edge to mark the groove where the stitch line runs parallel to the belt.
For a main seam when there will be multiple layers of leather, especially if there is a liner or multiple welts being used, I use a 3/32 drill to make the holes. While the project is flat, before the welt(s) are installed but after the liner is in place, I chisel the holes in the top or front stitch line. Don't bother with the back--odds are long that it won't match up any way, then when the holster main seam is glued, I use the holes to guide the drill bit. Make darn sure you keep the drill perpendicular to the project, otherwise the backside of your stitch line will wander around like a drunken snake.
Now you're ready to start saddle stitching the holster together. Unless you've got a grand or so that you don't need, this done by hand. Take a peice of waxed thread 6 times the length of the stitching line and put a harness needle on each end. Use the large 00 size if you have a choice. Twist the needle to wrap the thread tightly at the ends. Start on the belt tunnel and push the a needle through one hole and then pull it through until you have equal amounts of thread on each side. Now you are going to pass each needle through the next hole, one at a time, from opposite sides. Continue to sew back and forth, pausing every two stitches to pull the thread tight. This makes for a strong seam. And should the thread break or get cut somewhere down the road, the fact that the leather is sewn from both sides means that half of the stitch will still be intact. Continue to the end and then back stitch through the last two holes. This where the pliers come in handy. Pull the thread taut and cut off the excess.
Once the belt tunnel is done, the next thing to do is glue the welt strip. Once again. be careful not to get glue on the finished surfaces. Then we must fold the project and glue the main seam. This easiestly accomplished by folding the holster into a "U" and dunking the bottom of the "U" into a shallow pan of water and letting it soak until you feel the leather soften, usually 20 to30 seconds. Then push the glued edges together, carefully aligning them before pushing the glued surfaces together. A good pattern well cut will mate up nicely. Lack of attention will show up here when the edges don't match up well. Using non- marring clamps or a couple boxes o' boolits, clamp the edges together and let the glue dry.
Once dry, punch or drill the holes for the main seam and then prepare your thread as before. If the leather is thick, though, use a peice 7 or even 8 times the length of the stitch line. Start at the bottom and work your way to the top. Backstitch as before, but do three stitches and pull both needles from the back to tighten the thread before cutting. If you use a very sharp knife and cut close to the stitch the release of tension pulls the stub back into the hole for a tidy stitch.
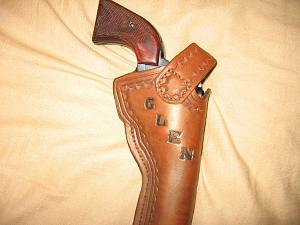
Next wet mold the gun to the holster. Dunk the holster in water for 30- 40 seconds, shake off the excess and shove the gun into the holster. Using the pads of your thumbs, force the leather snugly around the gun. A boning tool is used for really fine fitting, but be careful not to mar the finish with any sharp edges or fingernails. Mark the snap setting for the male snap, if a thumb-break. Once formed, set the holster aside to dry and give your gun a good wipe down with a water displacing oil.
DO NOT LEAVE THE GUN IN WHILE THE HOLSTER DRIES--IT WILL RUST.
The final steps are to sand the edges and joints, bevel the edges, and apply a good edge dressing. I use a drum sanding disc on a dremel tool for this, but you can do just as well with a peice of 220 or 280 grit sand paper and a piece of dowel. It just takes a little while longer. Smooth the main seam and the top of the holster, take a damp sponge and lightly moisten the edges, then go over them again, Take the edge Beveler and trim off the feathering that the sanding left, then re-dye the sanded areas. While the dye is still wet, rub the edge with a peice of canvas or old blue jean material to burnish and smooth the edge. Finally, apply a good edge dressing to the edges.
After it dries thoroughly, check the final fit of the gun, then attach the male snap for a thumb break. and you're done.

|
   
   
|
|

 Reply With Quote


