RepackboxInline FabricationMidSouth Shooters SupplyTitan Reloading
RotoMetals2Load DataWidenersSnyders Jerky
Reloading Everything Lee Precision
Page 2 of 3 FirstFirst 123 LastLast
Results 21 to 40 of 41

Thread: How do i buff a linseed finish to a shine?

  1. #21
    Boolit Master SPRINGFIELDM141972's Avatar
    Join Date
    Sep 2007
    Location
    SE Missouri / SE Alaska
    Posts
    559
    JIMinPHX-

    Filling the grain is done after you have raised the grain and removed the whiskers. I use a mixture of fine wood sanding dust (from my 320 or 400 grit sanding) and finish to create a sloppy paste that I apply liberally and allow to tack up. I then remove the majority of the excess with a coarse cloth. The remaining paste is worked into the grain by hand and allowed to dry. After which I fine sand this down to the surface of the wood. It results in a smooth surface for the finish to be applied to. You don't need 20+ coats of finish to get to an acceptable finish that way.

    Word of caution- I don't fill the grain in the areas I intent to checker. The small amount to sanding grit that gets mixed in with the wood dust will dull your checkering tools in short order.

    Regards,
    Everett
    "There's a reason John Browning's middle name is Moses."

  2. #22
    Boolit Grand Master

    Wayne Smith's Avatar
    Join Date
    Mar 2005
    Location
    Hampton Roads, Virginia
    Posts
    13,655
    Lot of good information here but one piece is missing. The way oils 'harden' is called polermerization. Tung oil completely polermerizes, BLO doesn't. BLO will never completely "dry" or harden in the pours. That's why you have to continually renew it, the old formula previously posted applys to BLO and furniture finish, applies equally to gunstocks. Tung oil is a permanent finish.
    Last edited by Wayne Smith; 04-23-2010 at 01:14 PM.
    Wayne the Shrink

    There is no 'right' that requires me to work for you or you to work for me!

  3. #23
    Boolit Master
    Join Date
    Apr 2007
    Location
    Annapolis,Md
    Posts
    2,673
    Most methods of filling pores that involve wet sanding oil finishes and/or commercial pore filling products won't withstand abuse in the form of soaking rain. There is nothing more disheartening than watching the finish you spent months putting on a stock wash away when wiping down after a day spent hunting in the rain. One sure-fire way to prevent that, which is admittedly labor intensive, is to coat the stock with spar varnish first, then sand it back down to bare wood. Repeat as necessary until the pores are filled level but the surrounding wood is bare, then proceed with whatever oil finish you like. The same effect can be accomplished with a thin epoxy, such as West System 207. Lots of work, admittedly, but doing a job right usually takes extra work, just like most things in life.

  4. #24
    Boolit Buddy
    Join Date
    Dec 2008
    Posts
    227

    boiled linseed only

    never use raw, only boiled and the more you rub it the better with the heel of your hand. Rub until you develop friction heat and then keep rubbing. the friction heat slowly oooks the oil dry. Then add a "little" more oil, a drop or two and rub some more. It takes many hours to produce the London finish so famous for linseed oil finished stocks. But there are few if any that are more beautiful.

  5. #25
    Boolit Grand Master JIMinPHX's Avatar
    Join Date
    Aug 2007
    Location
    Moving back east now
    Posts
    5,089
    Can we make this a sticky?
    “an armed society is a polite society.”
    Robert A. Heinlein

    "Idque apud imperitos humanitas vocabatur, cum pars servitutis esset."
    Publius Tacitus

  6. #26
    Boolit Master sheepdog's Avatar
    Join Date
    Mar 2009
    Posts
    972
    Quote Originally Posted by JIMinPHX View Post
    Can we make this a sticky?
    +1 for a sticky.

    What I ended up doing is taking BLO and handed rubbing it in. Never really got warm as mentioned but massaged it in every nook. Let sit for 15, rubbed excess off. Let site for 36 hours to dry. On fourth coat right now.

  7. #27
    Boolit Grand Master leftiye's Avatar
    Join Date
    Nov 2006
    Location
    Sagebrush flats, Utah
    Posts
    5,543
    To fill your grain fast you can wet sand with linseed oil (boiled) as the wetting agent. This is AFTER you've put on enough coats to create what is almost a finish - not after each coat.

    Alternatively, if you just apply coats and sand a little until the grain is completely filled, your finish will have much more depth, and bring out the beauty of the wood much better. This is much easier done with Birchwood Casey Tru oil as it dries faster, and applies much more finish at a time. Stains also screw up the beauty of the wood. I only use them if the wood NEEDS them to cover something up (like sapwood or repairs).
    We need somebody/something to keep the government (cops and bureaucrats too) HONEST (by non government oversight).

    Every "freedom" (latitude) given to government is a loophole in the rule of law. Every loophole in the rule of law is another hole in our freedom. When they even obey the law that is. Too often government seems to feel itself above the law.

    We forgot to take out the trash in 2012, but 2016 was a charm! YESSS!

  8. #28
    Boolit Master Oyeboten's Avatar
    Join Date
    Apr 2010
    Location
    Kansas
    Posts
    757
    Japan Drier ( any good Paint Store ) will greatly aid the drying time of various Oils used in 'Rubbed' Oil Finishes.

    It contains Lead, so, keep whatever it is added to off your skin...find a rubbing method where this is easy and not a hassle needing gloves and so on...

  9. #29
    Boolit Master
    Join Date
    Apr 2010
    Posts
    2,287
    I always use bees wax to weather prof my linseed oil finish.It is what my grampa used &
    it has worked for me.But then again I don't let it get to wet either.But back in the day, that's
    what they used.

    I have also mixed 1/3 pine tar, 1/3 bees wax 1/3 turps.It's said that is what the Finns used.
    I have not found the pine tar in this mix darkens it any to speak of.I have done pine tar finish
    also on a couple of rifles, but that's a different subject & mix, all together.

    Fly

  10. #30
    Boolit Grand Master uscra112's Avatar
    Join Date
    Jun 2006
    Location
    Switzerland of Ohio
    Posts
    6,337
    Leftiye has it about right. One thing that old-timers knew is that you don't build up to a fine finish, you cut down to a fine finish. Wet sanding using 240 grit and oil is my preference now, after trying almost every other scheme that the gunsmithing books could dictate. Raw linseed oil only, too. Be especially careful with tung oil - it's toxic. So are "boiled" oils, which have chemical dryers added to them.

    First coat, have the stock and the oil very warm, maybe 110 degrees. Don't spare the oil - lard it on. Don't try to wipe off the excess, either. Let that oil "cure" until it's gummy or even a little beyond. (Always dry in a warm place with plenty of air, but not in direct sun. Raw oil often takes about 3 days.) Wet sand with 240 grit and more oil. Again, do not wipe down. Let that wet slurry stand until it's good and gummy again. Longer is better. Do it again until the grain is well filled. Sand aggressively - you want to be cutting down everything but what's filling the grain. Once it's well filled, use less oil and 400 grit paper. (You'll use new paper every time.) Two or three coats more, then switch to 000 steel wool and no fresh oil to remove that gum. (The old-timers used burlap, but only because they didn't have steel wool.) Here is where the magic will happen. You will be cutting off the gummy top layer, and lo-and-behold, underneath you will have a smooth finish. Not shiny like modern polyurethanes - oil finishes never get that smooth. Once you are there, let cure for a week or more. From now on, just a few drops of oil on your hand, rubbed until your hand gets very warm, will keep the shine going. After this treatment, however, you do want to wipe the wood with a hard cloth. I use cotton twill from old chino pants.

    If you ever damage this finish, start in again with oil, wet-sanding, and steel wool and you will be able to completely restore the it, leaving no trace of the injury. Can't do that with polyurethanes!

    Linseed oil is great stuff. I use it to oil up a barrel after browning, instead of mineral oil. It keeps water off metal, so it's a good rust preventer. Preserves leather. Waterproofs fabric - (linen canvas with treated with linseed oil was the original tarpaulin). Sailors used oil-treated cloth for rain-gear, hence the term oil-skins. The main ingredient in traditional spar varnish is linseed oil. Raw linseed oil is non-toxic - heck, they sell it in health food stores, although there it's called flaxseed oil. Linseed cannot be washed off with plain water - but you CAN remove it by boiling the stock in trisodium phosphate, When I'm doing a major glue repair on a stock, I clear all the oil out that way, do the repair, then refinish.
    Last edited by uscra112; 04-29-2010 at 03:56 AM.
    Cognitive Dissident

  11. #31
    Boolit Grand Master

    MtGun44's Avatar
    Join Date
    Nov 2006
    Location
    eastern Kansas- suburb of KC
    Posts
    15,023
    Watco Danish oil. Let the first coat dry, then sand off the raised grain. Sand second coat
    while wet with 320 grit wet or dry until there is lots of 'mud'. Even out the mud and let it
    dry for a day or two. Sand water wet with 400 grit. Dry and apply more Watco with a cloth.
    Dry then wet sand next watco application with 600 grit wet or dry, less mud but spread
    evenly, let dry. Water wetsand with 600 or 800 grit, dry. Final few coats are rubbed in
    by hand.

    Far superior to linseed oil.
    If it was easy, anybody could do it.

  12. #32
    Boolit Buddy Gunfreak25's Avatar
    Join Date
    Nov 2008
    Location
    Arizona
    Posts
    265
    When working with BLO and PTO, remember to keep things simple. I am not sure where it originated, but "adding one coat a day for a week, one coat a week for a month, etc" you will end up with a HEAVILY oil soaked stock. There is no reason to apply more oil to the stock than it needs. The biggest mistake I see people make is applying BLO too quickly or to heavily. BLO needs to be rubbed in by hand in thin coats a time, be sure each coat has fully dried before applying the next coat otherwise your adding fresh oil onto partially dried oil, you'll end up with a gummy mess that won't dry or look very good.

    The trick to getting a glass smooth finish is almost all in surface prep. Before applying your BLO or PTO (pure tung oil, www.realmilkpaint.com) you will want to sand your stock (always use a block) with progressively finer grades of sandpaper. If the stock is already pretty smooth I just give it a good once over with 220 grit, and finish it with superfine 0000 steel wool. Now when it comes to applying your BLO, apply it either by hand or with more superfine steel wool. It's what I call and "oil scrub" finish. Just apply a decent amount of oil to your steel wool and begin buffing it into the wood, keep it as wet as you can because with this method the stock will take in a little more oil. After your scrub, let it sit 20 minutes and then completely wipe off any standing oil. When you have applied your last coat of oil, let it dry 48 hours. Now here's the last secret to getting that butter smooth oil finished stock, apply your choice of wax. For a softer feel you can use tom's 1/3 mix www.thegunstockdoctor.com Tom makes a great product. But if you want a harder looking shine just rub on a coat of Johnson's Paste Wax, let this dry for 3 hours and then thoroughly buff it off.

    Here's a copy and paste of my original post on giving a stock a BLO scrub and wax finish over at my HQ.....

    My very first shotgun was a New England Firearms single shot 12 guage. I think it was $80 when Walmart used to sell guns here. I decided the poly had to go, as I do not like poly.
    It's very tough to remove so I thought i'd post how I do it.

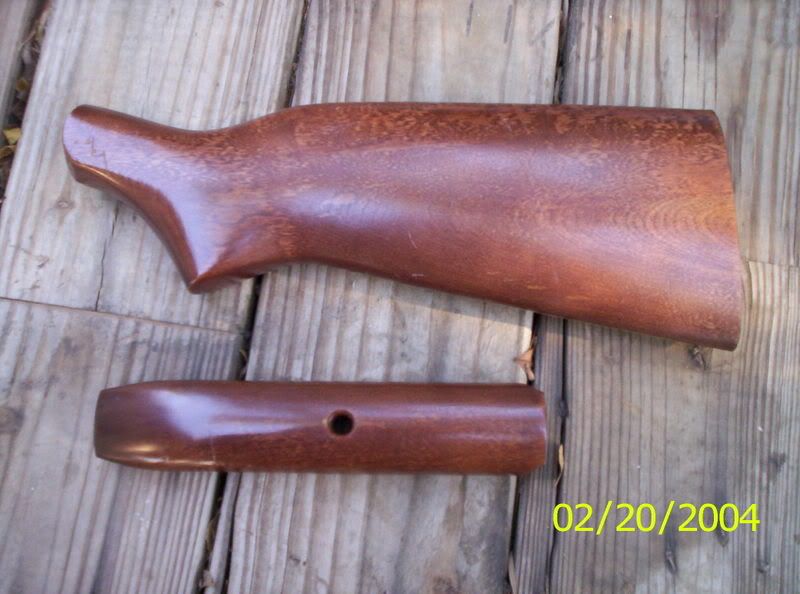
    Here's the stock with the factory poly finish.


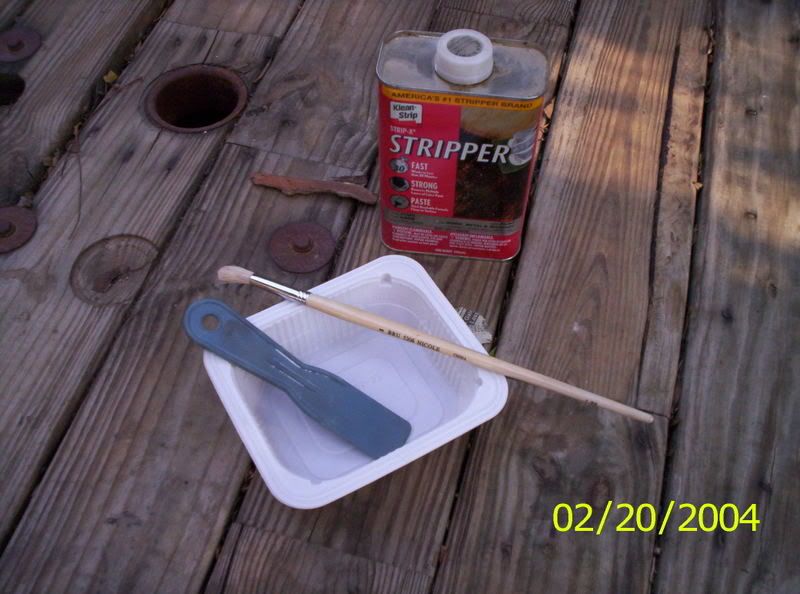
    Here is the tools. StripX, a plastic scraper (solvent proof), plastic tray, and the only brush I could find laying around.


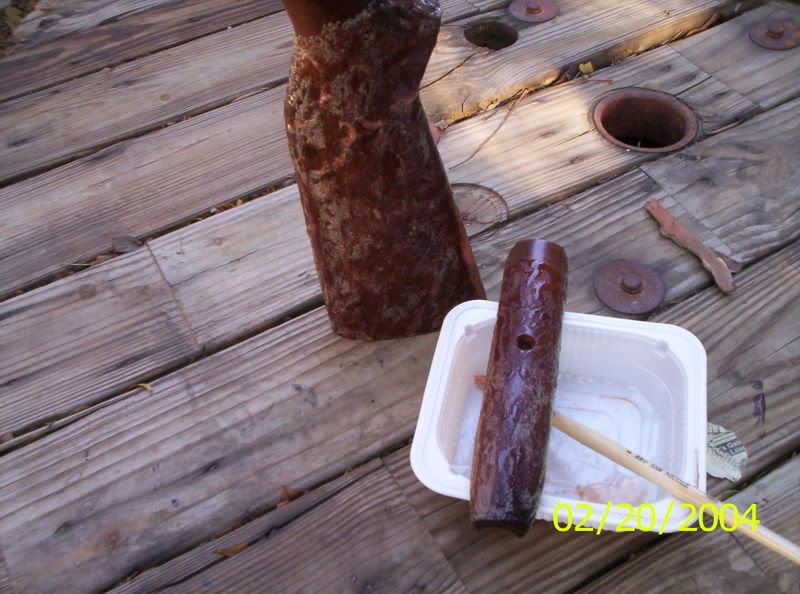
    After applying the stripper (nice and thick, don't skimp) this is what it looks like after just a couple minutes of sitting.


    After sitting 15 minutes, I used my plastic scraper to scrap off the loosened and melted polyurethane.


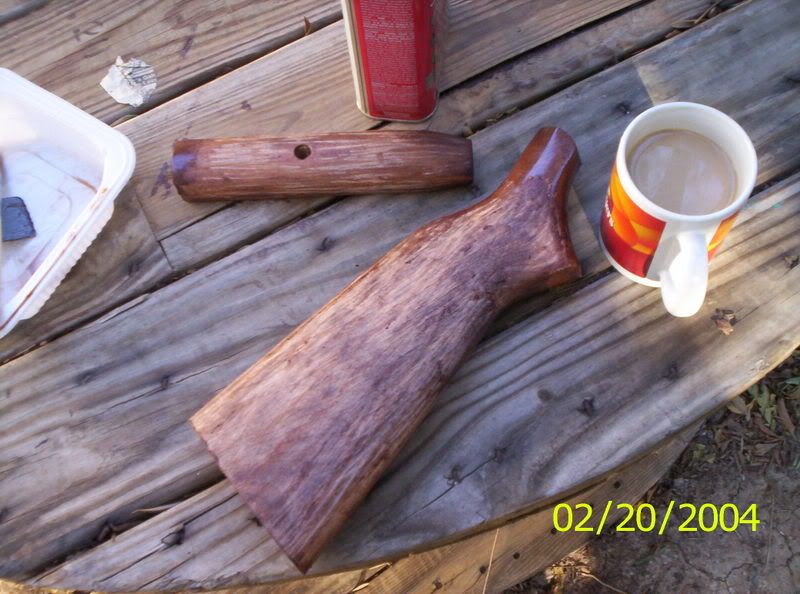
    After scraping off the melted polyurethane, I ran the stock under a little hot running water from our big sink, you can use a nylon brush to remove the stripper and finish from the stock, or you can use a light abbrasive pad like those green scotchbrites, or a brilo pad with the soap rinsed out of it. I used a brillo pad. As you can see I left the top portion of the stock unstripped, this gives me a place to hold onto the stock as i'm removing the poly from the rest of it. I go back and strip the rest off later. It's what works for me.


    This stock needed a second stripping, so I gobbed the StripX back on, and let it work for another 15 minutes.


    Here it is after washing it off in the sink again, and 30 minutes dry time.


    2 days later after drying at room temperature (74 degrees), I used 150 grit paper to give the stock a light once over. I made sure to keep the plastic/rubberish buttplate attached during this sanding, to keep from rounding the edges of the stock and to make sure the buttplate does not overhang the stock afterwards. It's very ugly when that happens. You'll want to wrap some masking tape around the edges of the buttplate during the sanding, so you don't scratch it.


    continued......
    "The tree of liberty must be refreshed from time to time, with the blood of patriots and tyrants. It is its natural manure." -Thomas Jefferson

  13. #33
    Boolit Buddy Gunfreak25's Avatar
    Join Date
    Nov 2008
    Location
    Arizona
    Posts
    265
    Here's the stock many days later after 2 oil scrubs and 1 hand rubbed coat. After the last coat of oil was applied I let the stock dry 2 days before waxing. When waxing I buff on 1 coat, let it dry 2 hours, then buff it off, I also did a second coat of wax for added gloss.
    If you do this step correctly, the wax will give the stock a hard glossy feel and will not smudge off or leave fingerprints on your stock.


    Another picture to show the shine.


    And here's the link to the original post on the forum.

    http://www.surplusrifleforum.com/vie...504597#p504597

    I took my shotgun hunting last year, spend 2 days out in the field. Haven't had to rewax the stock yet, and that was a year ago. If done right, the shine will last many years, though you will want to occasionally add a thin coat of wax. :thumbs:
    Last edited by Gunfreak25; 05-14-2010 at 02:29 PM.
    "The tree of liberty must be refreshed from time to time, with the blood of patriots and tyrants. It is its natural manure." -Thomas Jefferson

  14. #34
    Boolit Grand Master leftiye's Avatar
    Join Date
    Nov 2006
    Location
    Sagebrush flats, Utah
    Posts
    5,543
    If anyone might like to know, those western maple (also called birch, often from box elder trees) stocks will take an aqua fortis stain, and it ain't too bad.
    We need somebody/something to keep the government (cops and bureaucrats too) HONEST (by non government oversight).

    Every "freedom" (latitude) given to government is a loophole in the rule of law. Every loophole in the rule of law is another hole in our freedom. When they even obey the law that is. Too often government seems to feel itself above the law.

    We forgot to take out the trash in 2012, but 2016 was a charm! YESSS!

  15. #35
    Boolit Mold
    Join Date
    May 2010
    Location
    Wilkesboro, NC
    Posts
    1
    Brownell's makes a product called Lin-speed oil. Talk about shine. I used it on a pair of 1911
    grips I made out of desert ironwood..knock ur eyes out. Tung oil I believe will do u a better
    job though that is if ur dead set on an oil finish.

  16. #36
    Boolit Buddy Gunfreak25's Avatar
    Join Date
    Nov 2008
    Location
    Arizona
    Posts
    265
    Remember, Linspeed and Tru Oil are NOT oil finishes. They are VARNISHES and will dry as such, hard and shiny. Not bashing the stuff, just be sure of what you are buying before you do.

    95% of your "Tung Oils" you'll find at places like Lowes, Home Depot or Walmart are NOT real tung oils. They are wipe on type varnishes and polyurethanes that contain little to no tung oil.

    The only place that I am aware of right now that sells real, pure 100% non toxic tung oil is www.realmilkpaint.com They have two kinds, pure tung oil and the dark raw tung oil. The raw tung oil is just as it sounds, it has been squeezed from the nut of the tung tree, filtered and bottled. For gunstocks, ALWAYS use the lighter tung oil which has been treated with heat (boiled really) so that it will dry much quicker than raw tung oil. Pure tung oil is in all respects, just like BLO. The difference being the types of plants the oils come from and the fact that BLO has had other additives added to it that make it toxic if consumed.
    "The tree of liberty must be refreshed from time to time, with the blood of patriots and tyrants. It is its natural manure." -Thomas Jefferson

  17. #37
    Boolit Grand Master Char-Gar's Avatar
    Join Date
    Mar 2005
    Location
    Deep South Texas
    Posts
    12,820
    I have been working with Tru-oil for 50 years and dozens of stocks. I slather on two or three coats and let it dry for a couple of days. I don't want any runs, but other than that I pay too much attention. I am interested in getting a build up quickly that fills the pores of the wood. When the grain in filled I take 000 steel wool and cut it back down to wood.

    YOu now have a dull oil finish and if you like you can apply a coat or two of Johnson Paste Wax and be happy.

    However, I like a high gloss finish so I add one coat per day and rub it in with my hand making a drop of oil go far as possible. When each coat is throughly dry I rub it with a clean cotton cloth with pretty hard hand pressure.

    After about 10 or 12 coats, I give it a sanding with 1,200 grit emery paper available from an auto paint supply store. I repeat this three or four times.

    For a finial finish I rub the stock with very, very find rubbing compound from Brownells.

    What you end up with after a months work is a good finish with a smooth satin finish that has a good gloss and shows off the grain of the wood every well. It is as durable as any other finish and can be repaired easy.

  18. #38
    Boolit Buddy johnlaw484's Avatar
    Join Date
    Jan 2010
    Location
    MISSOUR-AH
    Posts
    173
    Being an old sailor where spar varnish is king. I have used it on gun stocks and achieved a beautiful, durable finish quickly.
    I have hand rubbed it and even used an air brush to apply the final coat.
    There are two theories to arguing with a woman .. . Neither works.

    Women always say that giving birth is way more painful than a guy getting kicked in the nuts.There is no way to prove that they are wrong.

    But a year or so after giving birth a woman will often say "It would be nice to have another child".

    You never hear a guy say, "It would be nice to get kicked in the nuts again".

  19. #39
    Boolit Bub
    Join Date
    Jan 2010
    Location
    Texas
    Posts
    62
    I shouldn't be giving away my secrets but I retired from full time Smithing years ago.
    Rule #1: Never use steel wool.
    Rule #2: Never use steel wool.
    Steel wool snags and pulls the finish from the pores.
    Rule #3: Use Naptha, never paint thinner.

    Use refined Linseed or Tung oil, never raw. Thin it with Naptha; 25/75 Oil/Naptha. It will soak deep into the wood and it does fill the pores.
    Once the pores are 90% filled, add additional thinned coats using 600 or finer scotchbrite dipped in the 25/75 solution. You do not want a buildup on the surface of the wood.
    When the oil finish feels totally dry, apply a Carnuba Wax and buff dry with a cotton cloth. Add a fresh coat of Wax every year. This finish will last for decades and will not scratch white.

  20. #40
    Boolit Buddy deerslayer's Avatar
    Join Date
    Apr 2009
    Location
    Indiana near cincinnati
    Posts
    347
    Knowing nothing about how to finish a gustock I embarked on refinishing a single shot, shot gun my father had given me when I first started deer hunting. I simply sanded it down to raw wood. (sanding them down is a bad idea I later realized it changes the final fit when reassembling). After sanding with progressivaly finer paper down to about 400 grit I then done my normal wood working trick which is a gluewash. Take some regular elmers white glue and mix it 50/50 with water in a dixie cup, brush on a thin coat and let dry. After it has dried hit it with some fine sand paper and the glue wash will de-wisker, seal and fill all in one step. After that I just used minwax polyshades in a color I prefered and the gun still looks great today and is as smooth as a babies but.

    I know its not an oil finish but the gluewash is what I really wanted to highlight how to do.
    Remember the average response time of a 911 call is over 4 minutes. The average response time of a .357 is around 1300 F.P.S.

Page 2 of 3 FirstFirst 123 LastLast

Posting Permissions

  • You may not post new threads
  • You may not post replies
  • You may not post attachments
  • You may not edit your posts
  •  
Abbreviations used in Reloading

BP Bronze Point IMR Improved Military Rifle PTD Pointed
BR Bench Rest M Magnum RN Round Nose
BT Boat Tail PL Power-Lokt SP Soft Point
C Compressed Charge PR Primer SPCL Soft Point "Core-Lokt"
HP Hollow Point PSPCL Pointed Soft Point "Core Lokt" C.O.L. Cartridge Overall Length
PSP Pointed Soft Point Spz Spitzer Point SBT Spitzer Boat Tail
LRN Lead Round Nose LWC Lead Wad Cutter LSWC Lead Semi Wad Cutter
GC Gas Check