Can someone put together a basic tutorial on paper patching?
I read through a lot of this, but never having patched, I don't really know where to start.

|
   
   
|


|


Can someone put together a basic tutorial on paper patching?
I read through a lot of this, but never having patched, I don't really know where to start.

Good point. Most info is well hidden within many threads!
But to start the ball rolling .....
Other folks do it in a much simpler way than I do but the advantage of my way is that the patch wraps perfectly and easily the first time. So I'll try to explain ....
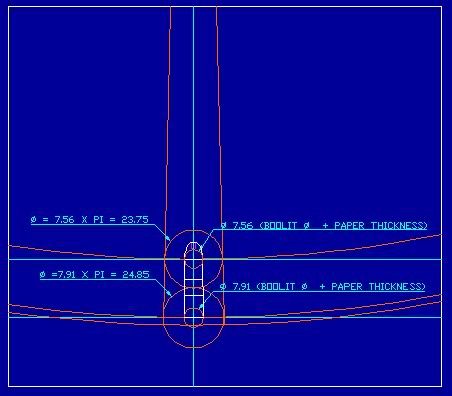
The first step is to make the patch. To do that, one needs the correct sized boolit. I can only say what I do. I make a 'shaped' boolit which has compleax tapers on it. That's not important. What is is that the patch should ideally have the correct shape to make it easy to roll on. I do that by measuring from the boolit heel to the start of the ogive - where the patch will come to. I take the paper I am going to use and measure the diameter of those two points with one layer of paper. I then work out the two circumferances and from then on it gets hairy! I use CAD to develope shape by drawing the two circumferances, one above the other at the intended patch length. I then use the 'tangent' function to find the intersection point which is the radius I will use to develope the profile. I then draw three circles, the first through the upper circle centre, the second through lower centre, and the third is an offset which gives the desired tail skirt. Then I skew the 'shape' to get the patch angle. I told you it gets hairy!
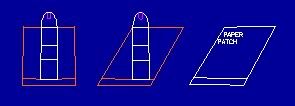
Anyway, here is the result.
A close-up showing the curves.
The 'extra' line helps with alignment and gives the seating depth.
And a patched boolit.
Would you like me to post pics of each stage of the developement?
Last edited by 303Guy; 03-26-2010 at 05:38 PM.
Rest In Peace My Son (01/06/1986 - 14/01/2014)
''Assume everything that moves is a human before identifying as otherwise''


I'd love to see your library of Patch designs available on castpics. That something you'd consider?
Reloading Data Project - (in retirement)
http://sourceforge.net/projects/reloadersrfrnce/
yes pleaseOriginally Posted by 303Guy

there are two good books on patching bullets at Shiloh rifles , one by Orville Loomer is about 10.00 it is simple and easy to understand.
the other is by randolf wright and is about 25-30 dollars , they go through making patches , rolling and all kinds of stuff ,
The lyman book #3 has a short simple section on pp ing ,
While the books are geared towards black , they do give the basics of how to go about it for any kind of wraping,.........Dean
lover of 74 sharps
MYWEIGH scale merchant
" i'll tell the story 10 different ways before I'll lie to you."
This is of course not exactly a 'basic' guideline but one could assume that any beginner paper patcher is CAD literate, right?
I had to go into CAD and do some 'creating'. I hope this shows what I want it to.
The boolit profile.
Finding the arc centre and the patch width.
Angling the sides.
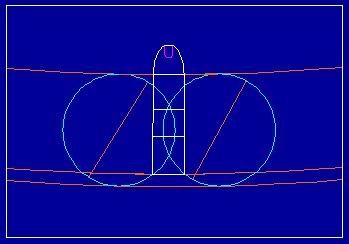
Here a 30� side was selected. The sides are simply rotated by 30� about their midpoint. Lines are then extended and trimmed.
From straight side to angles side and the final, labelled patch. The seating depth line is omitted here.
Note that the patch sides are not parallel.
Feel free to ask any questions.
Last edited by 303Guy; 03-26-2010 at 09:56 PM.
Rest In Peace My Son (01/06/1986 - 14/01/2014)
''Assume everything that moves is a human before identifying as otherwise''


the simple answer.
for smokeless.
start with bore diameter [yours] that should be the size of your basic lead boolit.
patch to at least groove diameter, .001 over is better i.m.o.
then size your dried patch to the final groove diameter.
use two wraps so the ends meet.
then start with a low end j-word load and work with it some.
you can size a bit over bore diameter,and patch a bit larger and size back down also. and this might produce a better tighter patch.
the faster you go the harder your alloy should be.
make sure the paper covers the base of your boolit, either twist or fold the ends over.
ideally you want confetti when the boolit exits your bbl.
you are protecting the boolit from the lands and grooves and hot gasses with the paper.
but what do i know i don't paper patch, i shoot plain ole cast.


Your FIRST BASIC REQUIREMENT....is a Shiloh Sharps M1874 rifle from Shiloh Rifles in Big Timber, Montana!!
"The South died with Stonewall Jackson!"
Who would have thought it........ your actually going to PP for smokelss loads in your Sharps now........ this is the Smokeless PP forum ya know.

Get Paul Matthews book, "THE PAPER JACKET" from Wolff Pub. Best book I have ever found on PPing.
45 AUTO! Because having to shoot someone twice is just silly!


He got you there, Rick...admit it.
CM
Retired...TWICE. Now just raisin' cows and livin' on borrowed time.
so I start with a boolit that fits the lands... or size it down to the lands. (seems like an awful lot of sizing for most boolit designs.)
What is good paper to start with (easy to work with?)
Is the paper selected by width? i.e. that two wrappings bring you bore size?
I need to cut the paper such that it wraps twice around and the end is near (touches but does not overlap) the beginning with a 30degree angle. (though I catch 60 degrees mentioned now and then.)
do I lube the paper?
do I size it again after wrapping?
Does the boolit design need to be smooth (i.e. no grease grooves?)
Are there issues seating with paper getting torn?
paper.
some use plain ole print paper like for your computer.
i don't like bright white paper the clays and titanium content is a bit high but it does make a nice tight tough jacket.
paper is selected by thickness.
30 is fine 45 is okay too the angle isn't the important thing unless yu are gonna try to match the twist and have the paper ends line up in the grooves.
a bit of lube before final sizing don't hurt anything. very small amount.
you can either size after or not. if the paper shrinks enough to be tight on the boolit and is close enough in diameter you don't need to.
lube grooved is fine, just dont fill the grooves with lube.
use an m-die and a bit of case flair and you shouldn't tear the paper.
don't crimp unless absolutely necessary.
you want the paper to cover all parts of the boolit that will make contact with the bore.
there is a thread here about half patching for a bore rider that might warrant some testing.
That's 60� off the horizontal or 30� off the vertical. It's an easy angle to patch with. I was using an angle that aligned the start and end with each other - because I thought it looked cool - but it was too difficult to work with so I went back to 30�. Printer paper makes a nicer tail fold/crimp and is thicker. It's also easier to make printed patch patterns. But I use notepad paper - some are better than others for the purpose. In my parts, my choice is Croxley A4 (I think it's Croxley!?)... beginning with a 30degree angle.
Rest In Peace My Son (01/06/1986 - 14/01/2014)
''Assume everything that moves is a human before identifying as otherwise''
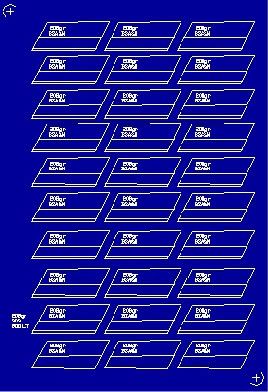
I patch all mine with 16# green stripe printer paper. The kind with the holes on both sides. Works great and is free for me.
45 AUTO! Because having to shoot someone twice is just silly!
I chose my paper first, based on type and weight. Then I settled on a bullet diameter which combines with the paper to make a 'package' which matches barrel dimensions.
I don't need to resize anything...and my patched bullets would be entirely proper with smokeless powder, if I used it.
CM
Retired...TWICE. Now just raisin' cows and livin' on borrowed time.
but the basic idea is to start with an undersized bullet?
(and here I am with a bunch of fat boolit moulds..)
Yup. The idea is to patch the boolit to slightly oversize such that it will fit the throat of the rifle. I have a Lee .311 mold which I can patch as is but needs the drive bands sized after patching. Without the patch, the nose or bore-ride section rattles in the bore.
I suppose we can only tell you what we did to make our patches work in our rifles. You would then have to make sense of it all and apply it to your rifle. I have a bunch of Lee Enfields. I have just developed a boolit and load that works in one of them. To use the same casting in one of the others, I would have to size that casting into a two diameter core (I have the die made already).
If you are going to start with the paper I would suggest looking at printer paper. When wet rolled it sticks to itself and makes a nice roll over crimp on the base. If dry wrapped it makes a nice fold crimp over the base. And it works in a printer! Notepad paper on the other hand, is thinner and not all of them sticks to itself. Some of them won't work in my printer. The one I use does but I have to feed them singly.
By the way, I think softer alloy is more forgiving as far as patched size goes. I made a patched boolit for my 25-303 with a bore-ride section that just touched the bore. A recovered boolit showed rifling impression on the bore-ride section, so it must have obturated somewhat.
Hope that helps some.
Rest In Peace My Son (01/06/1986 - 14/01/2014)
''Assume everything that moves is a human before identifying as otherwise''
Well, I've got a carcano I can play with - about .268 IIRC, and some .264 FMJ's...
 Posting Permissions


| BP | Bronze Point | IMR | Improved Military Rifle | PTD | Pointed |
| BR | Bench Rest | M | Magnum | RN | Round Nose |
| BT | Boat Tail | PL | Power-Lokt | SP | Soft Point |
| C | Compressed Charge | PR | Primer | SPCL | Soft Point "Core-Lokt" |
| HP | Hollow Point | PSPCL | Pointed Soft Point "Core Lokt" | C.O.L. | Cartridge Overall Length |
| PSP | Pointed Soft Point | Spz | Spitzer Point | SBT | Spitzer Boat Tail |
| LRN | Lead Round Nose | LWC | Lead Wad Cutter | LSWC | Lead Semi Wad Cutter |
| GC | Gas Check |

 Reply With Quote