Thanks for the explanation, pdawg. You had my curiosity bubbling.
Barra, you're not doing what I thought you were doing. Press on...
CM

|
   
   
|


|


Thanks for the explanation, pdawg. You had my curiosity bubbling.
Barra, you're not doing what I thought you were doing. Press on...
CM
Retired...TWICE. Now just raisin' cows and livin' on borrowed time.
Good stuff 303guy, thanks for the pics and info, this helps a lot. I don't want to try glue so I'll start with the 45ş and work my way across several other angles each way in, lets say 5ş increments, to see if there is a sweet spot that can be zeroed in on.
Eli
Shallow like microgroove or even shallower?Originally Posted by pdawg_shooter

The man who invented the plow was not bored. He was hungry.


Lead Pot
IN MY MIND.....it unwraps!! And THAT'S....what's most important!!
"The South died with Stonewall Jackson!"


That's what I recall reading as well and not just for cartridge guns but chase patching for muzzleloaders too ~ shallow rifling. Of course the chase p[atching doesn't have to be cut to release easy.
Like I said though, I am no pro at this and have no first hand experience with original rifles designed specifically for paper patch.
Longbow
Lead Pot
My .50 is a C. Sharps.....right hand Badger barrel!
In my opinion.....there's a bunch of you guys trying to make something simple......into a very difficult thing with a whole lot of the 'blather' aka BS that's being put forth! The important things are having a good profiled bullet matched to your rifles ROT, patch paper of the right thickness to give a good fit into the bore if you're shooting bore diameter bullets, and a good combination of powder, wads, and or lube cookie if you're using a cookie! Frankly I use the 45 degree angle cut on my patches and I have spent a little time getting the template to the exact size such that the ends of the patch meet with no overlap!! I also see some wrapping that is taking the patch damn nigh to the upper end of the bullet and that in my opinion is as useless as tits on a friggin boar hog!! But hey.....I don't give a rip if you're using toilet paper to patch with......if it works....more power to you!! And as for the one hole groups.......I think the guys putting that out need a WHOLE BUNCH of toilet paper or either like someone said....."These guys are shooting from 25 yards only!"
"The South died with Stonewall Jackson!"
My one hole group comment seems to be taken out of context. Didn't say I could do it just meant that there are are a lot better shooters than me to whom the small details make enough difference to worry about.
Longbow

Well then, since the direction of wrap seems to arbitary and likewise the angle then why not just choose the direction that would tighten in the bore (in theory at least) and unwrap on muzzle exit? The angle that seems like a good arbitary choise would align the top and bottom of the patch edge on the same side of the boolit. I settled on a 30° angle because it was steep enough to pevent unwrapping and seemed easier to roll on. I have found a paper that does not need a dab of glue on the overhanging corner and 'crimps' over the base. I'll try 45° but if it means too much paper waste then I'll go back to whatever is easiest. I think the choice of angle is going to be influenced by the proportions of the boolit.
Now there is an interesting point. How high should the patch go and what happens if it is too high or not high enough?I also see some wrapping that is taking the patch damn nigh to the upper end of the bullet ...
My aim has been to patch the boolit so that the entire length of the patch contacts the bore to some degree. That means the bore ride section is patched to bore diameter, ie, the core is smaller than bore diameter. Low velocity recovered boolits show rifling impression all the way to the ogive. But then the chamber end bore is larger than at the muzzle end.
Thanks for all the input.
Last edited by 303Guy; 11-18-2009 at 02:26 AM.
Rest In Peace My Son (01/06/1986 - 14/01/2014)
''Assume everything that moves is a human before identifying as otherwise''

Well I reckon if the patch at the front is just long enought to allow the boollet to seat/scribe in the throat rifling where yer need it to be than that is far enough.
Mine are a bit long in the non scribed area but I wanted to see how it would fare first.
No thaving impressive results from me I think is not having a boolet from yet to wrap and make to fit the chamber lead yet!!!
Now if I fix that then I'll have to find a nother excuse why I can't shoot
Barra
P.S. the general consenses at the range is you "can't PP smokless guns..period..." Don't work yudda yudda.
Who am I to deny them???
I just tried a new lot of paper (which I am hoping is the one that 'crimps') and measured out a patch that would align the top and bottom corners, cut it, wet it and rolled it on - it was a perfect fit! And it 'crimped'! Now to give the cut angle I have a problem. How is the angle measured? I have been calling the angle as being off the vertical and that was about 30° which could be called 60° off the horizontal. The angle I have just tried is about 30° off the horizontal or 60° off the vertical.
I found that this much sharper angle was actually easier to roll on and to make the ends meet.(Conserving paper is only a secondry consideration. 100 A4 sheets cost me like 3 or 4 NZ dollars!)
Rest In Peace My Son (01/06/1986 - 14/01/2014)
''Assume everything that moves is a human before identifying as otherwise''
Oh boy. Are you ever going to have fun when they do work!... the general consenses at the range is you "can't PP smokless guns..period..."
I'd love to see their faces then and hear their comments!
Rest In Peace My Son (01/06/1986 - 14/01/2014)
''Assume everything that moves is a human before identifying as otherwise''
Hah!
I've shot lots and lots of one hole groups --- one shot groups that is!
Bob
I was always taught to respect my elders, but it's getting harder and harder to find any!
Μολὼν λαβέ; approximate Classical Greek pronunciation [molɔ̀ːn labé], Modern Greek [moˈlon laˈve]), meaning "Come and take them" is a classical expression of defiance reportedly by King Leonidas in response to the Persian army's demand that the Spartans surrender their weapons at the Battle of Thermopylae.
Come now !
It is time to differentiate between TRADITIONAL patching with banknote or high quality rag bond paper, perhaps modern 100% cotton bond paper, and all else.
For the former, all the originals I've seen let you see the complete wrap joint in one view of the bullet . That's a small range of variability. Not very important in my view. It's the stretch in traditional paper that is important for adhesion. The grain cut question goes to the stretch/adhesion result.
Since many here are cutting edge, you have to figure out the new materials and techniques that work as well as the old. To do that you need to be skilled in both. BvT
Every lawbreaker we allow into our nation, or tolerate in our citizen population leads to the further escalation of law breaking of all kinds and acceptance of evil.
Since almost all aspects of our cultural existence are LIBERAL in most states, this means that the nation is on a trajectory to dissolution by the burden of toleration and acceptance of LAWBREAKING as a norm, a trajectory back to the dark ages of history.
BvT
When I started patching (last fall) I was also interested in 'conserving paper'.
I had two reams of 'antique' paper that I felt would be perfect, and didn't want to waste any.
I played with patch length and patch angle until I had a shape that would yield three patches from each horizontal strip cut from the page.
In order to make the patch wrap around twice and meet at the ends, I had to put a lot (I mean a lot) of stretch in the paper. I used a plastic roller to accomplish that, before laying the bullet on the patch.
The method worked Ok, and I wasted no paper, but the total thickness of my patch was not enough to match the barrel.
That's when I switched to wrapping dry (to totally eliminate stretch) and decided that 13000 patches from a ream of paper, instead of 19500, would (sigh) just have to be good enough...
CM
Retired...TWICE. Now just raisin' cows and livin' on borrowed time.

You guys sure make a big job out of nothing with this PP thing.
Just make a pattern on a sheet of paper and mark it for what bullet.
Save this sheet when ever you need to cut patches.
Run this sheet through the scanner and make several sheets, Staple each strip at one end and cut the long strips. I staple 12 sheets together at a time. Then cut the individual patches. I get 336 patches from these twelve sheets and it take me about 15 minutes and each patch is identical. and I use a rotary paper cutter.
I have one for every bullet I patch.

I paper patch the 308, 30-06, 300RUM, 35Whelen, 375 H&H, 45-70, and 458Win. All with smokeless. All seem to shoot good. Fact is the 300 will shoot just under 1" at 100yds. Guess paper just wont work with smokeless!
45 AUTO! Because having to shoot someone twice is just silly!
I used MS Paint to draw a similar pattern. I can open that file and send it to the printer. It's pretty easy to make adjustments when needed, and save those as separate files. And...no 'master copy' to worry about spilling coffee on...
The patches are outlined in red, and the black line is where I position the base prior to rolling.
I also use a rotary cutter to knock 'em out...
CM
Last edited by montana_charlie; 11-18-2009 at 10:11 PM.
Retired...TWICE. Now just raisin' cows and livin' on borrowed time.
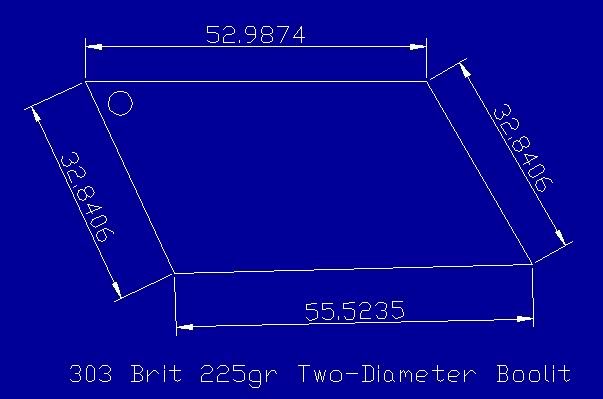
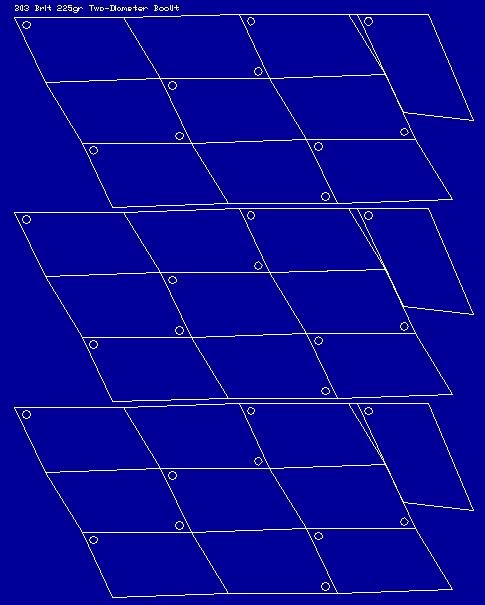
I devised a printer 'template' too. Mine is a bit more complex because my boolits are tapered and two-diameter so the sides of my patches are not parallel. Then I found the paper I want to use doesn't like my printer much! Then, for some reason, the damn things don't fit my boolit! (The prototype was perfect). Oh well, back to the 'drawing board' - with my new paper.
Rest In Peace My Son (01/06/1986 - 14/01/2014)
''Assume everything that moves is a human before identifying as otherwise''
This quote gets thrown about by weirdly ignorant ignoramices:"...my opinion is as useless as titts on a friggin boar hog!!"
Everyone knows that tits on a boar tells you how many teats his female offspring are going to have. Five teats on a side are clearly less potent as say 14! Quit throwing around assinine stupidities like that one, it gets my goat.
Baby piglets take on one teat for life. If a sow has 28 piglets but has ten faucets 18 piglets are going to die.
TED
TED
Excuse me if this has been covered before but instead of complete templets, how about using a small paper-cutter like this Friskers trimmer?
Using carpenters double-sided tape or hot glue, fix it to a larger section of common artists thick mat-board for a working surface, then mount a small angled piece of mat-board on the working surface of the tool, to the left of the blade/guide arm, so that it gives you the 45ş or whatever angle you want when it makes cuts.
Double-stick another piece of mat-board beside the out-feed side of the cutter, on top of the base mat-board, so that it is flush with the mounted tool surface. Then you can make markings for different sized patches as needed, moving the first cut edge of a patch over to the line and cutting it off with the blade.
All you'd need then is to cut the sheet donor sheet to straight, sized strips and run them through your set-up.
By-the-way, Friskers makes other cutters that are less expensive but these use small mounted blades which make good cuts but the rotor blades give cleaner results and last longer.
They also have another craft-cutter that is more expensive but it's not worth the extra expense.
I also wanted to pass-on the suggestion of freezing damp paper a day or two before cutting patches. Woodcut artists using quality papers will sometimes print colour blocks that require many burnishing over several blocks, a chore that will take days to accomplish. To keep the paper from molding, they will wrap the damp sheets in plastic and freeze it until the next block is printed, the result of which is a 'softer' paper which is easier to print by burnishing with a hand-tool.
I believe doing this will give some additional stretch to paper for patching. Lightly damp paper is used so the best way to do this is to use a fine mist spray bottle and take a sheet, wet it well, then stack three or four sheets of dry paper on top, spray another sheet, stack more dry, etc. Give some time for all the paper to become evenly damp after you wrap/store in plastic and stick it in the freezer a day or more.
Hope this is useful, if you try it, let us know the results.
Eli
Last edited by eli; 11-23-2009 at 07:40 PM.
 Posting Permissions


| BP | Bronze Point | IMR | Improved Military Rifle | PTD | Pointed |
| BR | Bench Rest | M | Magnum | RN | Round Nose |
| BT | Boat Tail | PL | Power-Lokt | SP | Soft Point |
| C | Compressed Charge | PR | Primer | SPCL | Soft Point "Core-Lokt" |
| HP | Hollow Point | PSPCL | Pointed Soft Point "Core Lokt" | C.O.L. | Cartridge Overall Length |
| PSP | Pointed Soft Point | Spz | Spitzer Point | SBT | Spitzer Boat Tail |
| LRN | Lead Round Nose | LWC | Lead Wad Cutter | LSWC | Lead Semi Wad Cutter |
| GC | Gas Check |

 Reply With Quote