RepackboxInline FabricationWidenersSnyders Jerky
RotoMetals2Reloading EverythingLoad DataMidSouth Shooters Supply
Lee Precision Titan Reloading
Page 4 of 6 FirstFirst 123456 LastLast
Results 61 to 80 of 101

Thread: No core seating for me.

  1. #61
    Boolit Grand Master 303Guy's Avatar
    Join Date
    Oct 2008
    Location
    New Zealand
    Posts
    9,078
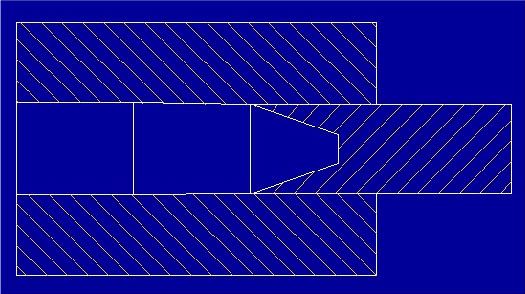
    Actually, Pillardrill, the sprue cutter has more of a parabolic shape. That gives it quite a sharp cutting edge.

    You know, if I had the means to create those 'drawings' that you do I might be able to run some ideas past you. What software do you use for creating them?

    So far, this is the best I can do;

    It's a boolit mold for my 303-25. (Being of British influence, we name our wildcat cartridges back-wards. You would call it a 25-303. Wonderful cartridge by the way! Loaded with 85 gr Noslers, it pole-axes a feral goat and never before have I seen a turkey just drop down, close its eys and not twitch! Even goats that normally kick around for a few minutes do not after being pole-axed! There is much to learn about terminal and any other ballistics!)
    Rest In Peace My Son (01/06/1986 - 14/01/2014)

    ''Assume everything that moves is a human before identifying as otherwise''

  2. #62
    Boolit Man pillardrill's Avatar
    Join Date
    Jul 2009
    Posts
    75
    303,

    I use Paint to make the sketches, quite easy to use once you get the hang of it.

    Is it the mold for the paper patched Boolits?

    Regards

    Pillardrill

  3. #63
    Boolit Grand Master 303Guy's Avatar
    Join Date
    Oct 2008
    Location
    New Zealand
    Posts
    9,078
    Thanks for that, Pillardrill. Yes, that's for my 303-25. I have made that mod and it works but the nose shape isn't what I want. I'll make a sizer die for it finish the shaping and add a hollow point.

    I don't knurl mine. Does it make much difference? Yesterday when I loaded my one and only 25 PP boolit, the core slipped in the patch. I fired it anyway and I think I hit my turkey. (It died soon after firing).
    Rest In Peace My Son (01/06/1986 - 14/01/2014)

    ''Assume everything that moves is a human before identifying as otherwise''

  4. #64
    Boolit Man pillardrill's Avatar
    Join Date
    Jul 2009
    Posts
    75
    303,

    did you check for an entry wound

    well knurling didn't seem to make much difference apart from bonding the paper to the bullet a bit better. The paper patch really comes out nice and shinny after sizing though.

    Regards

    Pillardrill

  5. #65
    Boolit Grand Master 303Guy's Avatar
    Join Date
    Oct 2008
    Location
    New Zealand
    Posts
    9,078
    Ummm... well .... actually ... you see ....

    The turkey I shot at had been wounded by a 22 rimfire. (I would not otherwise have chanced an unkown POI on a living creature). I should have mentioned that before - it makes me look like I shoot at things!

    The turkey did not look fatally wounded and I have known turkeys to kick and twich for ages. This one was walking with one wing hanging a bit low. It then died within a minute or two after my shot, so ... I probably hit it. It had two sets of holes in it, one with more stuff coming out. I have rechecked the loading and inspected the fired primer and it was a below starting load and a fairly tough alloy boolit.

    I think knurling may be a very good idea if the patched boolit is to be sized!

    I had a go with 'Paint'. Here is my ideal 303 Brit boolit profile.

    I left out the actual dimensions as this was a first attempt. The vertical lines are points of dimension change.

    I believe that this profile is as close to ideal as can be. The boolit (patched or otherwise) closely fits the throat. It engages the rifling along the full leade as it begins it's acceleration on firing. That's what the centre section taper is for. It's easier to find the right shape than to actually make it! A fired boolit shows no rifling impressions on the nose riding section but the patch does. That can't be bad.
    Last edited by 303Guy; 09-08-2009 at 04:20 AM.
    Rest In Peace My Son (01/06/1986 - 14/01/2014)

    ''Assume everything that moves is a human before identifying as otherwise''

  6. #66
    Boolit Man pillardrill's Avatar
    Join Date
    Jul 2009
    Posts
    75
    303,

    looking good. Paint is useful in making sketches which you can save on a computer and actually find when needed instead of looking through a mountain of drawings.

    I made a die for a 32"acp just as an experiment. The boolit is round nosed. I thought it would require less force to form it. I guessed wrong, it's harder than a 9mm to make. Either the tubing is thicker. I didn't harden the plunger which was made of mild steel. It bent and actually expanded. I had better luck with a hardened one.

    The little critters look good, ready when I need to load for a 32"acp which is never

    Regards

    Pillardrill

  7. #67
    Boolit Man pillardrill's Avatar
    Join Date
    Jul 2009
    Posts
    75

    Sectioned

    After a short break, during which I was making a grinding rest for my workshop 
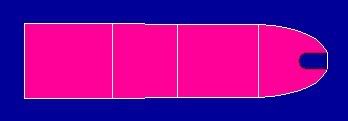
, I finally got around to section bullets produced from lead filled copper tube.

    I had also made a 7.65mm version but discovered that the pressure required to swage a 1/4" lead filled copper tube to form a bullet in this caliber was around 3 times that required to form a 9mm one.

    The reason became apparent when viewing the sectioned bullets. The process expands the lead filled copper tube but also shortens it. The resulting copper jacket is much thicker than the copper tube which it was formed from. In the 9mm version, where an 8mm copper tube is used, the jacket is slightly thinner.

    Also for those doubting Thomases the jacket thickness is uniform in both calibers.
    Attached Thumbnails Attached Thumbnails G Type 9mm, 7.65mm sectioned.jpg  

  8. #68
    Boolit Man pillardrill's Avatar
    Join Date
    Jul 2009
    Posts
    75

    Failure

    Well experimentation is a hit and miss thing if you excuse the pun

    This was my attempt to pre-cut the lead filled copper tubes before swaging. With the aim of having an accurately sliced blank instead of using a hacksaw to have a predicable expansion in hollow point bullets. This method would have be also less time consuming.

    I had an inkling of what could go wrong but decided to try anyway.

    Well the blades didn't break, but the blank got stuck on the blades and the ejector only pushed out the lead core.

    I have some ideas including using a steel plate which will push on the whole face of the blank instead of only on the lead core.

    But that is another experiment
    Attached Thumbnails Attached Thumbnails failure.JPG   untitled.JPG  

  9. #69
    Boolit Man pillardrill's Avatar
    Join Date
    Jul 2009
    Posts
    75

    Success

    Well the simplest solution might be staring us in the face. After managing to get the jammed blank out of the tool I had just made and going through my french repertoire I decided to take the tool apart and remove the 6 blades I had welded in place. Instead of a piston I used an adjustable stop so that blanks can be split to different lengths if need be. I then took an old kitchen knife, place a blank in the tool and used the 6 slots as guides for the blade. Just give the blade a couple of whacks with a mallet and Bob's your uncle.

    I then placed the blank in my die, swaged a hollow point and fitted an airsoft pellet.

    Loaded it onto a weak powder charge and fired it into some loose sand.

    You can see the results for yourself.
    Attached Thumbnails Attached Thumbnails 6 SPLIT.JPG  

  10. #70
    Boolit Grand Master 303Guy's Avatar
    Join Date
    Oct 2008
    Location
    New Zealand
    Posts
    9,078
    Waaay Cool, pillardrill!

    So, if the ejector punch were to be slotted to fit over the blades ..... ?

    I'm thinking along the lines of a harder alloy PP core fore higher velocity and your principle of splitting the nose would solve the expansion problem as in a varmint boolit. Mmmm.....
    Rest In Peace My Son (01/06/1986 - 14/01/2014)

    ''Assume everything that moves is a human before identifying as otherwise''

  11. #71
    Boolit Man pillardrill's Avatar
    Join Date
    Jul 2009
    Posts
    75
    That was my original thought. But I just went ahead with a simpler solution.

    Cutting with a knife would avoid bullet imbalance, since you are not removing metal like when you use a hacksaw. The cut metal will then be brought together during swaging. Ready to open up upon striking.

  12. #72
    Boolit Buddy
    Join Date
    Feb 2009
    Location
    Outside Seattle, WA
    Posts
    141
    Great thread, fellas.
    Would it be possible to make something like this work on an arbor press?
    I'd love to get something like this to reform my reject cast boolits, but don't have the tooling myself.
    Pat

  13. #73
    Boolit Man pillardrill's Avatar
    Join Date
    Jul 2009
    Posts
    75
    Outdoors,

    I guess so, some arbor presses are in the 2 ton region, same as a vise so you should be good to go if you have one. You are not swaging lead filled copper tubing but just lead.

    Pillardrill

  14. #74
    Boolit Man hcpookie's Avatar
    Join Date
    Jan 2008
    Location
    Williamsburg, VA
    Posts
    82
    You could simplify your jacket cutting by starting with an allen wrench that just barely fit into the jacket, then turn the end down to fit in a die holder. If the end is chamfered or tapered it will create a 6-point star with petals that are thinnest toward the tip. I haven't tried this yet, but I plan to for my .45 bullets You could probably make the hollow point forming die to use an allen wrench and get the same results while eliminating the extra step.

  15. #75
    Boolit Man pillardrill's Avatar
    Join Date
    Jul 2009
    Posts
    75

    Allen wrench

    I think I understand your idea. The green bit in the nose forming part of the die would be made from an allen wrench. This would score the inside of the jacket at the tip. It would certainly speed up production.
    I think I have seen commercial bullets which have a similar shaped hollow point.

    The score marks would not be as radical as the way I segmented the bullet but it is worth a try.

    You could also score the inside of the copper tubing (minus lead) and then cast the cores prior to swaging, but that would be increasing the work load.

    I have made a few bullets with the front part of the core segmented and formed into a normal round nose without a hollow. Just to see if the hollow point could be avoided. Just have to try them.

    I will sacrifice an allen wrench on the altar of knowledge and see how it goes

    Good shooting.
    Attached Thumbnails Attached Thumbnails untitled.JPG  

  16. #76
    Boolit Buddy
    Join Date
    Feb 2009
    Location
    Outside Seattle, WA
    Posts
    141
    Not to hijack the thread,
    but does anyone know someone who might be able to make a die like these for those of us who lack the tooling? Seems like a fairly straight-forward job, if you have a lathe and/or mill.

    Feel free to pm me - I don't want to redirect this thread from the technical issues.

    Pat

  17. #77
    Boolit Man pillardrill's Avatar
    Join Date
    Jul 2009
    Posts
    75
    Outdoors,

    I am willing to share information but I have enough stuff on my hands to start making stuff for others.

    Regards.

    Pillardrill

  18. #78
    Boolit Man pillardrill's Avatar
    Join Date
    Jul 2009
    Posts
    75

    Pre cut :razz:

    attached are pics of 2 bullets I found whilst surfing the net. One has a hexagonaly shaped hollow point even if it is clear that the jacket has been cut.

    The second bullet has clearly been cut before being shaped since the cut jacket folds over each other like the petals of a rose. (poetic isn't it)

    The jacket has not been weakened but pre-cut in both cases.

    Attached Thumbnails Attached Thumbnails Winchester Ranger T .jpg   hollowpoints-l6ax9bfp.jpg  

  19. #79
    Boolit Man pillardrill's Avatar
    Join Date
    Jul 2009
    Posts
    75

    Experiment

    I tried to weaken a piece of lead filled copper tubing by slicing the first 4mm and then swaging it to form a bullet, as shown in previous posts.
    I wanted to avoid to putting a hollow point and plugging it with a plastic airsoft ball to help in feeding. This would eliminate manufacturing steps and the risk of having those little plastic tips crowding the bottom of a magazine should they come off.

    I swaged the copper tubing into a normal round nosed bullet and fired it into soft sand. A bullet made from the same tube but minus the slicing was also fired. The normal bullet showed no expansion whilst the one with the segmented nose opened up as you can see.

    I made another nose former with a very small shallow hollow point which should not interfere with feeding.


  20. #80
    Boolit Man pillardrill's Avatar
    Join Date
    Jul 2009
    Posts
    75

    pics

    oops forgot the pics of the segmented round nose bullet minus hollow point (A thousand apologies for the quality)
    Attached Thumbnails Attached Thumbnails round nose precut.JPG  

Page 4 of 6 FirstFirst 123456 LastLast

Posting Permissions

  • You may not post new threads
  • You may not post replies
  • You may not post attachments
  • You may not edit your posts
  •  
Abbreviations used in Reloading

BP Bronze Point IMR Improved Military Rifle PTD Pointed
BR Bench Rest M Magnum RN Round Nose
BT Boat Tail PL Power-Lokt SP Soft Point
C Compressed Charge PR Primer SPCL Soft Point "Core-Lokt"
HP Hollow Point PSPCL Pointed Soft Point "Core Lokt" C.O.L. Cartridge Overall Length
PSP Pointed Soft Point Spz Spitzer Point SBT Spitzer Boat Tail
LRN Lead Round Nose LWC Lead Wad Cutter LSWC Lead Semi Wad Cutter
GC Gas Check