Here is what I did to make a bottom pour valve for my smelting pot. Sorry I did not take any pictures of the valve while I built it but I will try to explain as detailed as I can.
1. Start out with a piece of 1"x2"x2" solid square steal stock.
2. Drill a 1/2" hole all the way though it side to side (the 1" edges are the ends and top and bottom, the 2" edges are not drilled through)
3. Now drill a crossing hole from top to bottom the sized .2570 or size "F"
4. Now from the top drill the size "F" hole out to 7/16" but stop when you reach the bottom of the crossing 1/2" hole
5. Tap the bottom half of the size "F" hole out to 5/16"
6. Counter sink the top 7/16" hole
7. weld up one end of the 1/2" crossing hole
8. weld a long 1/4" rod to the top of a 5/16 counter sink bolt (this will be your valve)
You crack open the bolt to let lead flow and screw it down to stop the flow. The lead flows around the bolt down to the 1/2" hole and then out the none welded up end. You have to cut a hole in the bottom of your pot for this valve. I bent a "L" shape in the end of the 1/4" rod so I could open and close it without vise grips.
Mine works like a champ, one design change I will make once I get another pot. In mine I cut a hole in the side of my pot and welded the valve in the bottom with it sticking out the side just a little. This always leaves about 2" of lead in the pot. Next time I will cut a round hole in the bottom big enough for the bolt head to pass through and just weld my valve on the bottom. This way I can empty the pot.
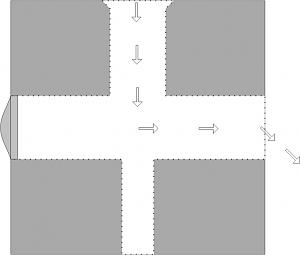
trying to help describe so I sketched a diagram
In the picture I welded up the left side and the threaded bottom with the bolt screwed in keeys lead from flowing out that hole


 Reply With Quote


