Snyders JerkyWidenersRepackboxRotoMetals2
Inline FabricationLee PrecisionReloading EverythingMidSouth Shooters Supply
Load Data Titan Reloading
Results 1 to 11 of 11

Thread: BSA R-10 177cal

  1. #1
    Boolit Buddy
    Join Date
    May 2018
    Posts
    321

    BSA R-10 177cal

    Iīve no doubt got a new found respect for the minescule little 177cal. Since i came to "discover" H&Nīs semi new offering of 20grain hollow point pills it DOES carry merit.
    Why?
    Simple really. The 4,5mm shoots flatter for a given amount of power. What i learned from the #El-cheapo# project was quite evident iīd say. Pushing a 20 grain pill beyond the speed of sound for an even 100 Joules of muzzle energy sure opened up my eyes at least.

    So.
    Did a job on a Reximex Zone for a gentleman and was offered not one but two PCPīs in return.
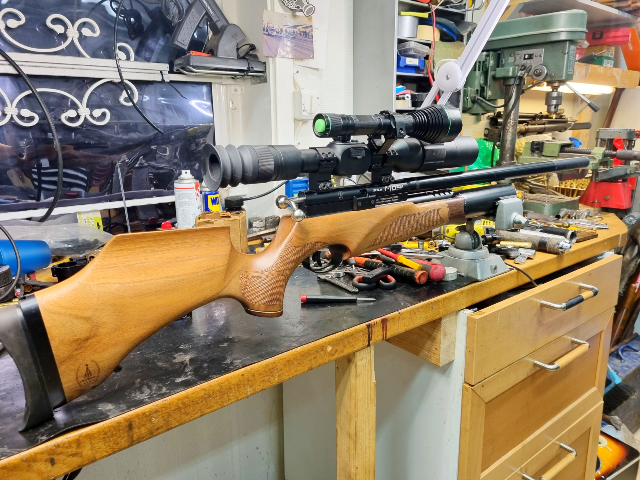
    One of them this BSA R10 MkII in 177cal and the other an Evanix Hunting Master AR-5 in 22cal.


    These are by any measure not cheap PCPīs. On the contrary, although.. i have to say one of the best looking ones out there. This one had been standing dormant for quite some time why it was in need of some dire attention no doubt.

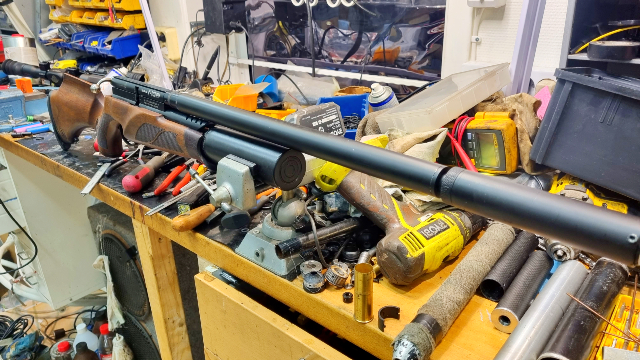
    No pressure left, of course, why i took to filling her up and then let her rip using JSB 8,4īs across the FX brick. Well.. she at least worked
    What came out the other end tho was... 3 Joules.
    No. Thatīs not a misprint! So yeah, she no doubt needed to come apart.


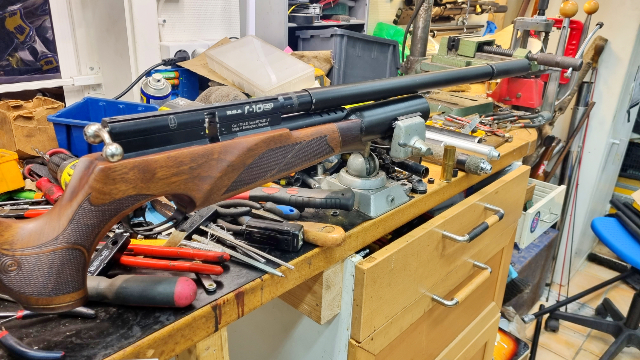
    Yeah. On that. I can tell for a fact that theyīre not supposed to be green within!


    Yes they are regulated but truth be told these regs have an extremely poor reputation. For instance, whatīs the plan using all them belleville washers? Whatīs up with that? Yeah well, whatever i guess..
    Getting the thing going again was one thing but.. getting ahead of myself here.


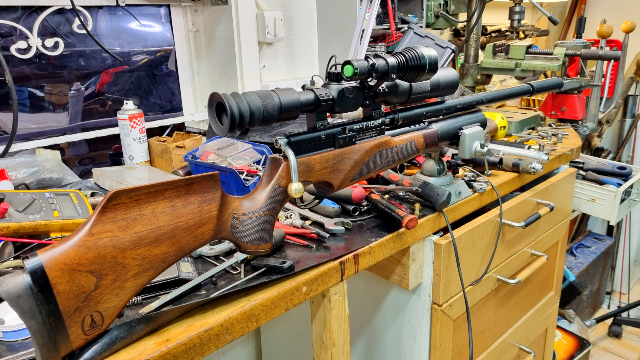
    Yeah. The front end of the probe was massacred and thus.. I keep a lathe donīt i so rest of it goes without saying i hope. These ARE to be had new, made out of stainless, though. Which is worth of notice.
    Point being the stock probe is plated and this plating has a rep of falling off and getting into the gun ruining accuracy and what not. My new probe though out of SIS-2541 tool room steel.
    Here a small tidbit though. These guns donīt carry a breech seal per normal but instead carries an o-ring on the front of the actual probe. For better for worse, and i guess thereīs advantages to both setups, be it either an o-ring on the probe or an o-ring installed to the breech in a more conventional manner.
    Last edited by Racing; 10-18-2023 at 07:42 PM.

  2. #2
    Boolit Buddy
    Join Date
    May 2018
    Posts
    321


    The breech is a little different too. Transfer port indeed but one that registers off the actual barrel, not the breech. In turn the probe is spring loaded via a 6mm diameter steel ball that works off an indent on the actual probe.


    ...as we can see here. In turn the "closing" of the bolt is via a sorts of banjo fitting thatīs bolted to the probe. This works on the recess to be seen on the actual breech. Doesnīt really work all that well as power goes up, let me tell you...


    So whatīs my intent with this one? As i truly find this a really really good looking little carbine i intend to keep it, just modify it for the mainstay of my PCP shooting, which is ratting.
    As such it needed an active IR setup why this Accufire Noctis TR-1 came in handy. Supposed to be made in Texas.
    Sturdy and quality piece of kit no doubt altho in DIRE need of a software n firmware upgrade. Really love it but.. IMO it was let into market like a year to early..
    Am in contact with Accufire though to get news on when the new software is up for use. As an IR however it works really well already as is.
    Happy with that.


    As beautiful i found the rifle.. hue of it was a tad meek. So handed it some dye and took it from there. Major improvement in looks me thinks. Yes. Of course since handed layer upon layer of a 50/50 mix of linseed and turpentine.


    Now. Please keep in mind that this is a British made rifle. From Birmingham no less. As such it was, or HAS to have been, mainly thought for the British market handing that a powerhouse it never was. To keep permit exempt in Britain weīre talking 12fpe but not even the so called FAC versions carried all that much power. Yet another issue with THIS particular rifle was that accuracy was certainly lacking using them 20 grain pills..
    However.
    As youīll find out shortly.. thereīs a NUMBER of points within that.. letīs just say donīt cater to making power and although that sheīs still a LOUD little girl even at limited numbers.
    Yes. Sports a shroud, but truth be told.. iīve had the innards of that shroud like inside out and upside down and i STILL fail to "see" the thinking behind it. In short, moderator time and at first here i went lazy and just used a store bought finnish made Jaki suppressor for it. That at least brought noise level down to sane amounts.

    So what IS my goal here?
    Well. Having experienced 1st hand what them H&N 20īs will do what i set out for in this case is a 45J "Ratter". Iow sane levels of power BUT with the added intent of going SUPER quiet.
    Is that a thing even?
    Yes. Yes it is. Read on...


    To get the shroud more effective i took to recutting a diffusor for an FX. That sure made the shroud come more into play, and the things noise level went down even further.


    But.. i guess no surprise to those reading my posts.. Yeah. Weīve pulled this one before right! Uhu. A new poppet sporting a 2mm spindle was called for. In turn then of course modifications to the actual valve housing as well.
    The thing using a poppet on 2mm is that it hands less closing forces on the poppet and thus power will rise. Essentially sans any drawbacks, but more so.. itīll hand performance still at sane levels of hammer spring. In short running a 2mm poppet spindle will let you get away with way less hammer spring for a given power goal.
    Yes. Of course it sports a bearing insert. One out of JM-7 bearing bronze, reamed to size.

  3. #3
    Boolit Buddy
    Join Date
    May 2018
    Posts
    321


    Then... the elephant in the room, i guess. Remember.. this piece was never intended for high power use (as a mere 45J would be considered high power ) why the stock barrel is on a mere 390mm (at most, there were shorter versions too). As we know power output of a PCP is VERY much about barrel length and add to that that a 177cal is REAL air hungry getting there - in contrast.
    So yeah. I picked a 550mm jobbie up that i modified to fit the BSA breech and transfer port (which is countersunk into the actual barrel). This.. opened up a completely different ballgame.


    Doing so i went up on diameter for the shroud, now using a 28*1 tube. Thing here is that lately some of the higher end mans have started using filler for the shroud, which of course brings noise down even further, why i am too.
    Keeping it clean n simple what i do is make sure the shroud becomes as active as i can and then wrap the barrel with regular kitchen rags, Wettex as theyīre called around here.
    Of course i turned a new diffusor for it too, out of steel this time, and then one with a rather limited through hole of 5,3mm. Two "windows" are cut beneath that, oblong, using a 9mm diameter end mill.
    In short a diffusor that makes for a WAY more "active" shroud. That diffusor then bolts directly to the barrel end, 1/2"-20 thread per usual, and carries on forward with the industry standard 1/2"-20 to be able to mount a moderator to it too.
    Moderator in case just as home brew and did this EVER do the trick! Let me tell ya! Weīll get to that tho..


    So. There i was. Trying my "new" rifle out, shooting away like noones business when all of a sudden.. a large BOOM and the thing came apart!
    NOT ideal!
    See. The upper is connected to the lower using a mere 2 screws. M4īs to be more exact. The front one runs into the brass of the valve and from what it seems these parts simply ainīt made to be picked apart and bolted back together again on a steady basis.
    In short the threads had failed.. So i picked the pieces up and thought to myself that if a couple of M4 screws had done the trick for like 20+yrs.. going M5 should last forever.
    As it turns out tho, not so..


    End cap for the tube sports the hammer spring adjuster too. Well guess what. Using the hammer spring for an FX Impact that adjuster broke in half!
    Real obscure thread too..
    So i simply put that end cap on the lathe and drilled it out. Then turned an insert for it sporting 1/2"-28 UNEF thread and done deal. Enough of the meek stuff already!


    On that note, on a general whole, i have to say iīm a tad disappointed in the choice of materials at hand. No matter if itīs the brass of the valve or the cast aluminium of the breech or.. the probe or whatever.
    Materials used simply ainīt from the to shelf and.. that kind of annoys me with a rifle this expensive from the get go. Iīm a capitalist and all for making money but when putting a quality product to market.. nah. Just nah.
    BSA could sure as eff have done better IMO. But! OTOH.. i sure get to iron the weak points out donīt i!

    In turn it shows that this is an older design. Indeed the later R-12 sports a monoblock for the working innards.. why this R-10.. how shall i put this? Itīs an intricate build for lack of better description.
    In turn itīs "strangled" within in so many places itīs not even funny. Cause see, in Britain they go to great lengths making sure this will keep being a 12fpe gun.

    Thus i came to look into the various openings and orifices within and they ALL needed attention to get where i was going. As most of them are upstream of the valve in turn..
    Most that "upgrade" their R-10.. thatīs about replacing that p*sspoor stock reg. Most go for a Huma one.
    But.
    Iīm very well aware that regulated guns needs a plenum to draw from to make stable and repeatable performance happen. As it happens then thereīs this "void" within the block that ainīt used and i thought to myself that might be a good starting point for a plenum, which the gun basically lacks all together.
    Not so.
    That "void" turned out to be on a mere 12ccīs.

    So? What gives here. What iīve done is order one of them universal bottle mounted regulators from China that can be had like.. everywhere these days.
    Yes.
    Sorry to say that will impair on the extremely good looks of the thing a tad but thereīs no two ways around this. It simply HAS to be done and as that arrives iīll be drilling the block out like.. everywhere to that way hand plenum volume.
    Most likely in turn iīll replace the bottle with a slightly larger carbon fibre one down the road. As i came into this PCP as cheap as i did i do not mind spending a few bux on it, not one yota, to get where i want.

  4. #4
    Boolit Buddy
    Join Date
    May 2018
    Posts
    321


    So that there is a "blast tamer". These guns are known for hammer bounce and indeed shot count is downright poor as performance goes up. Tried that there solution in the pic to no avail, itīd go skewed time after time..
    So made a fresh one, now on dual runners. Much better.
    For those of you not familiar with the blast tamer, that there "hook" is wrapped around the drive peg of the hammer. The runner legs are spring loaded, and thus will act to resist the hammer from bounching back vs the hammer spring, which will hand hammer bounce and so on.


    All that trouble, cause this has been labor intense, and ALL of a sudden all the start aligned! Now.. recall that shroud n moderator setup?
    This was really late at night at the shop just before heading home. I had just put the thing back together, now as our creator intended, why me an friend Mats walked over to the camping table where we do most of our PCP testing out the door into a birm.
    Loaded her up and let her rip.
    Me and Mats staring each other down like a friggin pair of idiots.. as the FX brick pronounced 942fps.
    It was so DEAD quiet youīd hear a pin drop to the floor WHILE me shooting it!

    The experience was downright surreal! Absolutely surreal! Fired yet another.. and yet another. To us shooters, i guess we all interlink guns and noise. One way or another, but this was on a whole new LEVEL! Imagine if you will you standing 10 yards away.. you wouldnīt notice iīm using the piece.
    YES! It is THAT silent in operation!


    Valve was still handing concern though why i went full retard on it. Uhu. Seat out of JM-7 bearing bronze, enough already. Under the seat btw weīre talking 6mm diameter.
    Removing all the bottle necks of the setup sure made for a difference and as you can gather.. 20 grain pill going approx 950fps. You do the math. This UNregulated though.. to be kept in mind.


    Then.. a SSG was bound to happen. It came to make for a WORLD of difference and as it basically kills hammer bounce right in its track an already silent PCP went even more so!

    What a Secured Spring Guide will hand is a dead stop for the hammer spring. Thus no spring pressure working on the poppet in idle and whatīs more with a SSG hammer free flight can even be introduced. Issue is, had to cut slightly into the stock of this beauty to make this happen. That rod of the SSG needs somewhere to go so..

    Then.
    Accuracy issues. Even with the new barrel, something was amiss. As youīve read me rant on.. barrel vs moderator linearity is key! Key as it lets us run smaller diameter through holes on all the workings within the shroud/diffusor/moderator.. making for a more quiet gun.
    Well.
    Home brew, but.. iīm an engineer right and as such lazy. Fact is.. that you ARE kind of is the motor of becoming an engineer in the first place!


    ..got this box/drawer full of 1/2"UNF thread protectors and saw one that... THAT`LL fit! As is! Even sports an insert already! Cool, letīs use that!
    As i guess for all to see.. Some Mr Handyman made this one. Most likely free hand aaaaaand.. baffle whip hello.
    Yep. Getting that outta there, full of lead shavings.
    I CAN NOT stress enough the importance of dialing your diffusor as well as moderator in on a lathe!


    When i installed the barrel in turn, went like 1mm to deep. Handed that the actual transfer port could move around, handing me cracked sealing o-rings.
    So a new one was in order, and has stopped the ills dead in its tracks happy to say.


    Piece carries its breech seal on the probe stock, right. Hm. When i made the new probe i made it two part which hands that you can swap the "nose" of it at will.
    To this point i saw like them 950-960 out the snout, still using reasonable hammer springs but.. itīs like it didnīt want to go further?
    Valve exhaust as well as transfer and in turn barrel entry is all on 4.4mm diameter. However, the probe being intended for pellet use (as in contrast to slugs) it had to be of less diameter than the chamber right. So.. this i counterdrilled 4,1mm.
    Hm.
    Although i had been adviced not to.. i then came to countersink like a pocket on the barrel, and this then to install a breech seal - as in an o-ring. Thus moving the seal from the probe onto the barrel.
    Made me a pin probe, or slug probe if you wish, and let her rip. Sure. It now sported a better working transfer port but..
    Chrono came to a halt at 1020 fps.
    That is more than a marginal jump in my book! From a pin probe alone..

    Still at work on this piece and thus thereīs more to come. Suffice it to say though that she slowly coming full circle. Still awaiting that chinese made universal regulator why iīm currently running off of bottle pressure.
    None the less, 1020fps is WAY more than needed, but truth be told sheīs STILL real quiet in operation. In spite that.

    Yeah.
    .. to be continued..

  5. #5
    Boolit Buddy
    Join Date
    May 2018
    Posts
    321
    Accuracy issues.
    Yep! Check!
    I thought about this for a little while, talking it over with a few of the boys and came to the conclusion that this CAN be a matter of to loose a chamber vs the now pin probe in effect.
    Checking the stock chamber on the stock barrel that TOO is rather loose vs the pill diameters used and i for one wonder why on gods forsaken..
    Anyways.
    Chamber in this case, i really need to slug the barrel closely. Point being that i want to be able to set pill diameter as close as i can, and in doing so it might actually be an idea to use the chamber as sorts of a sizer while at it.
    In turn thatīll conclude 100% that the pill gets presented to the rifling in the exact same manner time after time too.


    So. The answer to this, which by any normal measure is a massive overkill, was to turn myself a "thimble" - aīla FX. Just this one out of steel, seeing what might be to come.
    So barrel and thimble got threaded 3/8"- UNF and done deal. What this hands me is a couple of things actually.
    First up control of chamber diameter, of course.
    Second up absolute control of forcing cone and actual lead in, where i set the cone at 11deg for just short of 2mm.

    As noted above these BSAīs seal that chamber via an o-ring ON the actual probe. Ie; it rides with. The issue iīve got with that is the pin/slug probe used as that presents an appreciable weakening of the material downstreams on the probe that might very well become an issue if i opt to take the route of sizing the pills as they enter the chamber.
    That there in the pic whatīs more is to be cut back approx 9mm worth and a delrin spacer is to be turned the equivalent. Point is that BSA in their wisdom came to set the one of the two anchor screws for the breech vs the tube right there, just ahead of the transfer port.

    Thus whatīll happen here is that as i cut them 9mm back iīll also cut me a recess on 8mm flat diameter 1,8mm deep for an o-ring groove. The weld a "lid" back on and turn that thing so approx 1mm remains.
    Then the spacer out of delrin based on that measurement.

    Now do you see what i mean by "cumbersome" build?
    Why was the breech made as it is in the first place? Why not a CNC cut piece thatīd retain a bit of "floor" at the mag cutout and then a bolt right through there?
    IMO that would have been a way smarter design move, but hey... thatīs just me.

  6. #6
    Boolit Buddy
    Join Date
    May 2018
    Posts
    321
    Yeah.
    So i got to slug the bore and sheīs a big girl alright. 4,61-4,62mm worth. In short dead on the money as far as that "re-swage" little tool i made up, no wonder it works as well as it does.

    Got to cut that recess for an o-ring on the barrel, to seal vs the probe. Got to turn a weld on "lid" for that recess too and will use a 4,65mm mandrel as a "jig" as i set the TIG welder up to work.
    Iīm however still a tad undecided on probe diameter..

    Got to move that "where the boolit needs to sit at idle" point to where i want it to be. As it turns out, leaves rather little as far as leeway for setting the positions, if you catch my drift here, and in short iīd due that say that weīre there.
    Yep. Thatīs us where weīre at in short.

    Iīve been giving this there with chamber diameter some thought and have discussed it with a few other fellows.. That thimble i cut now sports an approx 4,68mm chamber, this then to be used with a 4,62-4,63mm pill. I know it might me splitting hairs, but this there got my attention a bit to be honest.
    What iīm giving thought to is cutting yet another thimble as iīve got it all apart on the bench right now, and then one with a 4,60 chamber iīll hone out to 4,62. In short a chamber thatīll size the pills to what theyīll need to be every time you chamber a round. That idea kind of speaks to me, have to say and as itīs semi simple to turn such a second thimble with it all apart and thus all the dimensions needed to be set and checked right there n then..
    Sure.

    Whatīs more then i got to turn a fresh probe end, this time out one thatīs a tad longer. In short itīll sport that increased diameter that holds that banjo fitting too.
    On that banjo fitting in turn.. hm. Itīs out of hardened steel right and that makes it real tough to alter/cut into. So going to anneal that and then drill through it and thread that hole M3 too.
    Thus as i send that allen cap head down there to bolt it to the probe itīll run through the bottom of the banjo fitting too, making for a WAY more rigid setup.
    Then again..?
    I kind of fail to see the reason for it being out of hardened steel? It works up against cast aluminium.. Well, whatever. I guess. Iīll re-temper it when done no matter.

    So. New probe end, but to be honest iīm still a bit on the fence as far as diameter.
    I cut that recess for a sealing o-ring right and as such.. albeit the chamber mandates a probe on 4,65mm or so the o-ring sure would seal better on 4.9mm. In short iīm debating cutting that probe sporting a step. Weīll see where that takes me..

    Where weīre at the pill will now be juuuuuuuuust presented to the rifling upon chambering, assuming still the same 20 grain pills. Indeed the actual probe pin is adjustable if the need arise to say use the shorter 16 grain offerings.

    Yeah well. With any luck (read - time to myself) iīll have this thing up and running again tomorrow night.

  7. #7
    Boolit Master brassrat's Avatar
    Join Date
    Feb 2012
    Location
    conn.
    Posts
    983
    Wow in several places

  8. #8
    Boolit Buddy
    Join Date
    May 2018
    Posts
    321
    Yeah.
    Weīre good. Found the culprit and have taken care of it, weīre indeed good.
    This is us, right here.
    To be honest, in hindsight, this has been semi labor intense though, that much should be admitted to.

    One thing at a time tho why first up..


    Iīve been asked on this nifty little "re-swaging" tool i made up.
    Look. This isnīt rocket science by any measure, more so shade tree if anything. But the bottom line is that it works, and works very very well.
    The "anvil" sports a 2mm through hole and that where that cut off and ground approx 90deg jewelers screwdriver comes in, as thatīs what i use to poke the "redimensioned" pill out of there.
    As you can see three different drifts/mandrels or whatever you want to call them. Left one for the 20īs, middle for the Piledriver pills and in turn the one on the right for H&Nīs 16 grainers.
    So.
    If you have a rifle that "wonīt shoot" i for one at least call for it to be slugged. Shove a couple of pills through the barrel and take a micrometer to them to get an idea of where youīre at.
    This is a good idea for ALL rifles out there as seeing is believing. Thus i KNOW the barrel used to be a big girl alright, and can due that compensate.
    Simple as pie.


    Yeah. So chamber cut away and barrel threaded 3/8"UNF. Most airguns have the chamber as part of the barrel no doubt. Welp, cutting and threading per the pic hands me all the leeway in the world to set forcing cone, leade and what have you as i see fit.
    Indeed the idea of a thimble is far from new, but i feel it was called for in this particular case. Labor intense indeed..


    Then for the thimble. Yep, in this case out of steel, youīve seen me make them out of brass previous. Same same but.. i had in mind i MIGHT come to use the thimble as a "sizer" too. As it turns out though, no need...
    However.
    Making a thimble thereīs WAY WAY WAY more to it than meets the eye! By altering dimensions you alter how the pill is presented to the rifling, IF at all, and so on.
    Porting, how the thing seals vs the probe and so on and so on.

    So.
    Gun back together and firing away. Indeed accuracy improved and i started seeing groups. Then it struck me! IDIOT! Iīm an absolute IDIOT! In doing all of this i also felt that i hit them pills on the stiff side why i altered the nose of the drift for the 20 grain pills right.
    Well. In doing so i also made it an ever so slight tad shorter, ending up with pills not expanded as much as they needed to be.
    Uhu.
    Back on the lathe and the cut i took was a mere 1/10mm off of the base of that drift, which made the pills expand something as silly as 15/1000mm aaaaand.. BINGO!
    From seeing groups to tac driver in one blow. To the point where the hole this thing ripped at 30m on target, hard to tell how many shots fired.
    FINALLY!

    Guess it goes to show that at times it IS useful to question yourself!

    That being said weīre at a point where this unit is to be used, as in hardcore. Left the shop last night with a smile on my face, have to say. Last thing being i took it apart again to check it all over, and it all indeed seems to be kosher.

    Now thatīs not the same as that this thing is done, far from it.
    Iīve got notice that the regulator i ordered is at least on home turf, as for deliver date though no idea. But seeing that, and many other aspects of this thing i guess...

    ..yeah. To be continued..

  9. #9
    Boolit Buddy
    Join Date
    May 2018
    Posts
    321
    Got to have a sit, trying the thing out.

    Handle a load of the "small things", down to resetting the depth of the mandrels used to "re-swage" pills.

    Still have issues using the mag, will need to look into that.
    In an effort to make the thing even smoother i came to replace the hammer spring with a softer dual setup. Ie; each spring in itself being softer but combined hand what i need, and then some.
    Believe iīm going to look into hammer stroke again at that. Currently running at 960-980 approx, which is more than i ask for by any measure but..

    On that.
    Those of you that have read this thread i indeed at a rather early state came to comment on hammer TOTAL weight. See, this units do have a thing or two that rides with and it of course all adds up. Didnīt take to that at first thinking "what are they all blabbering about the hammer being to heavy?" but as it turns out.. yeah.
    Now of course these are generic numbers but on a whole i rarely see the reason for a PCP hammer to go much beyond 50 grams. As you lighten the thing indeed mass will decrease and render that youīll use more hammer spring for a given setting but that is a fair trade all things considered as i regard it as thereīs SO much advantages coming from a lighter hammer setup.
    True.
    Not all that many grams that differ but.. this is not a game measured in kilos exactly why every little bit helps.

    Time permitting iīll be pushing on today. Want to see where i end up so to say. Have gotten notice that the regulator is on home turf at least, now for the wait before a letter stating what i owe as far as import duties i presume.
    That WILL be a game changer though. For this particular rifle i expect to set reg pressure to somewhere between 150 and 160 bar approx. That will entail increasing the odd end n bit to reach the powergoal set no doubt, but iīll be perfectly content seeing them 20īs zip downrange around 900fps to be honest. Iīll even go with like 850 or similar..

    That being said iīm still struck by how INSANELY quiet this thing is! It beats ANYTHING else in the gun room at the shop, and that by quite a margin. Goes to show the importance of through holes and what not playing around with this stuff and if ever.. uhu. Learned tons from it. For the better so going to look into what can be done to my FX Wildcat Mk3 too upcoming.

  10. #10
    Boolit Buddy
    Join Date
    May 2018
    Posts
    321
    ..this is turning into a diary of a madman as much as a post on the BSA R-10 LOL

    Got a couple of hrs with it today on the bench, shooting away.
    Net result is that the 20īs work well but the very much surprising darkhorse here was that i came to expand them 21 grain Piledrivers a tad more n lo n behold..
    Literally pinpoint accuracy! The "re-swaged" version of them shoots extremely well even!
    I about wrote them off and just thought.. well, whatīs the harm? Kind of. Shoved 10 through there at 230bar and.. Itīs simple, them targets donīt lie.

    Like racing. When the flag drops the BS stops. That simple really.

    Still fooling around with hammer spring settings, undecided. Iīll get there though no doubt. The SSG sure has lent me way more shots per fill but the reality of it is that the 200cc original bottle is simply to small at these power levels. Donīt get me wrong, thereīs no panic over this.. got a decent compressor standing a few feet away.. no harm no foul, but..
    Remedy to that though as you know, underways. At that point to implement the regulator setup and at the same time, for starters at least, a 350cc bottle on 61mm diameter vs the stock 50mm.

    Ya know, all this trouble and in turn work invested.. itīs starting to pay off no doubt. Lovely gun and as i now KNEW it to be accurate slinging them Piledrivers at approx the same speeds the 20īs work themselves outta there.. Yep.
    She came with ratting tonight, and indeed got her first scalp in her new guise.. check.
    Nothing spectacular, nothing remarkable.. just a rather numb *thud* and one dead rat at approx 40-45 meters. Again boys.. do NOT write the 177cal off without some serious consideration.
    Yes. Aware that what iīm doing here isnīt exactly "mainstream" as far as 177cal, i donīt care. Them "heavier" 177cal pills are here to stay no doubt and they make EXTREMELY short notice of the rodents.
    Where the 25cal pills about anihilate them, where headshots render decapitation, the 177īs just show this minescule little entry and an about explosion like exit. One major benefit is how flat shooting the 177 is vs say the 25. Itīs a whole new experience, learning to do AWAY with holdover (or under for that matter) to the extent iīm used to.
    At 20 and 21 grains in turn the pills cut through the wind in a very similar fashion to their 22cal counterparts. None of that "itīs pointless since thereīs wind and itīs a mere 8,4 grain 177cal."

    On that note though, still getting familiar with that Accufire IR setup and iīm embracing it more n more. Have to say. Given what it needs as far as IR lighting the picture is very clear while still being "mellow" in tone on the eyes.
    In turn, donīt quote me on this, i believe itīs to 23 powers or the likes making a 40 meter shot on a rodent childs play really, as long as the rifle in case is KNOWN to be accurate enough.
    ..and this one surely is

    Upcoming?
    Yep. Sure need to figure that SSG out better than iīve come to do current. No doubt thereīs more to be had there. Ditto for the probe end, it retracts a fair bit now as you close the bolt.
    In other words, the pill in there first with a straight and inline movement of the bolt, then as you move to close the bolt the entire thing moves a few mills back before coming to rest. Where weīre at that will to jump around on firing as far as the bolt, basically killed in its tracks. The longer, more sturdy and way heavier bolt arm sure does what itīs intended to, of course in liason with that spring loaded 6mm dia bolt that works on a recess on the bolt body.

    As that regulator shows up, will i reach my powergoal on the given transfer port diameters? Now of course that will depend to a large degree on what pressure iīll end up using, but from what iīve seen so far it might be. It very well might be. Guess iīll come to a rest somewhere around the 160-170bar level. Will handle that as i get there though, of course.

    Btw. As i sat there shooting them 20īs, with great success, i of course also tried the now expanded 16 grainers. Nope. Completely off the map. Might very well be that them being that much shorter theyīre not really presented to the rifling and thus..
    In fact it strikes at least me as even being likely.
    Worth pursuing? Nah. Not really, not to me at least. Seeing the intent of this unit iīm very happy and content with it shooting them 20īs and now 21īs as well as it does so see no real point in going after making the 16īs work as well.
    Albeit iīm certain the piece would, just given what it craves.

    N still...
    That "noiseless" thingy there. It still strikes me as d*mn odd. It really does. You creep up on that trigger, nice n slow.. expect a crack of any sorts but.. not there. Just this rather dull *thud* and thatīs it.
    In fact, started to try n mimic for the Wildcat Mk3, albeit that one is 25cal and run at approx 90J (65+fpe). Looked into the diffusor setup for starters and in turn that insane "carry tube" that runs between the muzzle and the diffusor. Drilled through that tube like a madman.. and then wrapped the entire thing before shoving the shroud over it all again.
    Better but still a FAR cry from this BSA so.. more work to be done there too.

    Next couple of days tho.. enjoy the thing and bring it ratting. Letting it breathe and do what itīs intended to. Yeah. She handles that with ease, looking REAL good doing it!

    So yep.
    You guessed it.
    ..to be continued..

  11. #11
    Boolit Buddy
    Join Date
    May 2018
    Posts
    321


    As much as iīm undecided on this from a looks point of view, this is where iīm heading. The steel cylinder in pic to become a much needed plenum volume.
    Bottle, as you can gather, is on 350ccīs and thereīs sure 480īs and 500īs in the bin too.

    So yes. That universal regulator showed up and.. Iīll put this together and take it from there.

Posting Permissions

  • You may not post new threads
  • You may not post replies
  • You may not post attachments
  • You may not edit your posts
  •  
Abbreviations used in Reloading

BP Bronze Point IMR Improved Military Rifle PTD Pointed
BR Bench Rest M Magnum RN Round Nose
BT Boat Tail PL Power-Lokt SP Soft Point
C Compressed Charge PR Primer SPCL Soft Point "Core-Lokt"
HP Hollow Point PSPCL Pointed Soft Point "Core Lokt" C.O.L. Cartridge Overall Length
PSP Pointed Soft Point Spz Spitzer Point SBT Spitzer Boat Tail
LRN Lead Round Nose LWC Lead Wad Cutter LSWC Lead Semi Wad Cutter
GC Gas Check