Titan ReloadingReloading EverythingMidSouth Shooters SupplyWideners
Snyders JerkyLoad DataRepackboxInline Fabrication
Lee Precision RotoMetals2
Page 1 of 3 123 LastLast
Results 1 to 20 of 51

Thread: "Woodworking" with Bois D'arc/Osage Orange

  1. #1
    Boolit Master
    Join Date
    Oct 2011
    Location
    Texas
    Posts
    1,224

    "Woodworking" with Bois D'arc/Osage Orange

    If there is a forum section in which this thread would be better placed, MODS should feel free to move it there. On inspection, I could not find one that seemed more appropriate.

    Not long ago, a very kind gentleman, a STERLING individual was kind enough to send me some chunks of Bois D'arc wood, which are of suitable shape/size for fashioning into pistol stocks. I am in his debt.

    I've known, for a long time, that this species of wood is harder than hammered cat-STUFF, very dense, and can be difficult to work with. My progress is slow, due to the wood, and my marginal wood working skills.
    I am seeking advice from more experienced wood workers (whether in general or with this species of wood, in particular), on best techniques and tools for such a project. Please DO NOT assume that any advice you might give is so obvious that I might already know it (if I DO already know it, it won't hurt me to hear it again).
    I DO understand about going slowly, not just due to the nature of the wood itself, but also in the interest of "making mistakes slowly", so as to correct them. The nice thing about Bois D'arc is, even if one does NOT wish to go slowly, THEY WILL. I don't mind this, but I am not young. If there are techniques that save time/labor, I welcome hearing of them.
    My tools are minimal. I have a portable hand saw, which I would not hesitate to use for large, gross cuts, but will likely stick to a fairly aggressive hand saw and a hack saw for any cuts requiring any level of precision. I have a serious-duty Dremel tool, with which I am semi-acquainted, which I would also not hesitate to put to use. I have an inexpensive, though very effective reverse-cut(?) "Japanese style" saw, also.
    All/any constructive input is appreciated.
    For in much wisdom is much grief: and he that increaseth knowledge increaseth sorrow. Ecclesiastes 1:18
    He that troubleth his own house shall inherit the wind: and the fool become servant to the wise of heart. Proverbs 11:29
    ...Verily I say unto you, Inasmuch as ye have done it unto one of the least of my brethren, ye have done it unto me. Matthew 25:40


    Carpe SCOTCH!

  2. #2
    Boolit Master


    MUSTANG's Avatar
    Join Date
    Jan 2012
    Location
    Kalispell, Montana
    Posts
    2,755
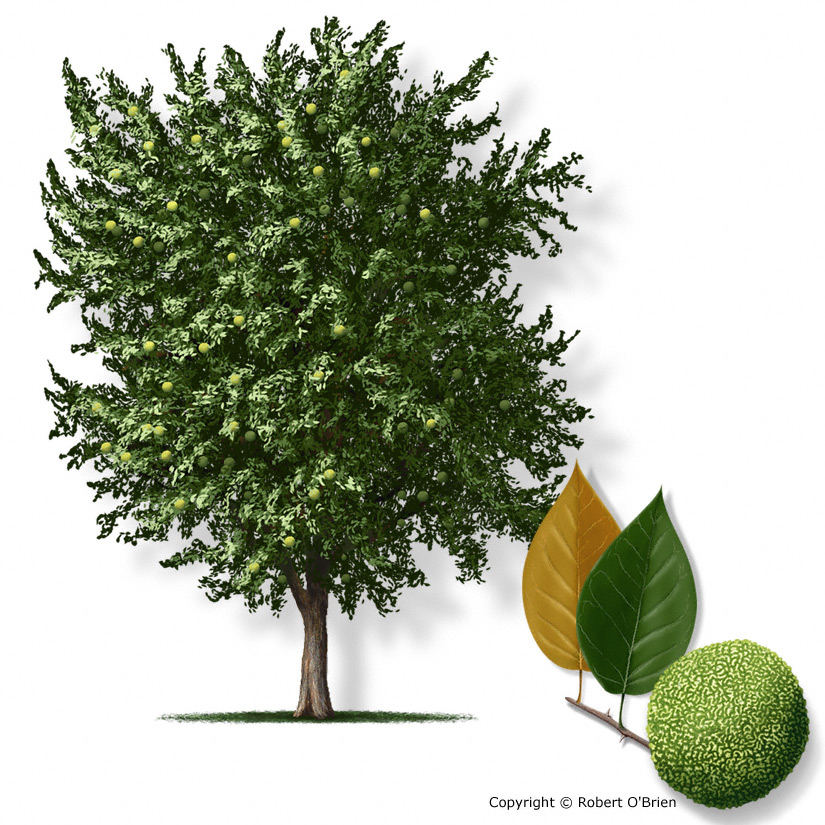
    Never did any wood work with the Bois Dark tree; but in the 1960's we spent a year living in a part of Texas where these grew. I remember it as being exceptionally hard as you mention. Also remember what we as Kid's called the Bo-Dark-Apples; those green fruits were in size between a Peach and a Grape Fruit if my memory serves me. Boys of the time and area were notorious for throwing them at each other in simulated and real "Battles". (See bottom right of attached picture below).

    Thanks for posting, best wishes with your wood working effort. Sometimes it takes something like this thread to bring back pleasant memories of our youth - long forgotten.

    Mustang

    "In the beginning... the patriot is a scarce man, and brave and hated and scorned. When his cause succeeds, the timid join him, for then it costs nothing to be a patriot." - Mark Twain.

  3. #3
    Boolit Master
    Join Date
    Jul 2009
    Location
    Central Texas
    Posts
    1,949
    I use bois d'arc for hammer and ax handles, it's great stuff for that. I'm fortunate to have some growing on my place.

    Helps to follow the grain, if possible. It's real bad about splintering if you cut the wrong direction, and it cracks badly if cut green and allowed to dry too quickly. If your chunks are cured, I'd probably saw to rough shape and sand to size (but I have a bandsaw and 2x60 knifemakers grinder, so it's easier for me).

    Considering your tools, I'd probably follow the basic plan you have already laid out and see how hard it is to get the desired results.

  4. #4
    Boolit Master
    farmerjim's Avatar
    Join Date
    Nov 2012
    Location
    St. Francisville, Louisiana
    Posts
    1,926
    I have one back by my pond. In 30 years of living in West Feliciana Parish, I have never seen another one.
    There is no difference between communism and socialism, except in the means of achieving the same ultimate end: communism proposes to enslave men by force, socialism—by vote. It is merely the difference between murder and suicide. Ayn Rand

  5. #5
    Boolit Grand Master
    Mk42gunner's Avatar
    Join Date
    Aug 2005
    Location
    Butler, MO
    Posts
    9,046
    I've made a few knife handles from it, one of these years I'll get around to making handgun grips. One of my grandpa's had a feed scoop with a hedge handle that lived in the feed crib, it was nicely polished after about fifty years of use.

    Scary sharp tools help immensely.

    If your piece of wood wants to crack after working on it, a coat of boiled linseed oil seems to stop it.

    Robert

  6. #6
    Boolit Master
    Join Date
    Feb 2019
    Location
    New Market, Iowa
    Posts
    1,470
    Many, many fence posts have been cut from the Osage Orange tree. We called it HEDGE. Those fence posts last forever. I've also cut quite a bit of it for firewood. Makes a very HOT fire. I always thought the wood had a pretty color, but I'm not creative enough to ever actually carve anything out of it. I would like to see some pistol grips made from it. Only suggestion I can make would be to maybe use a dremel tool?

  7. #7
    Boolit Master beezapilot's Avatar
    Join Date
    Sep 2013
    Location
    Central Fla
    Posts
    598
    Go to the top of the page, click "outdoorsman" there is a section for knife making and what not. The same people will probably see your post here, but you may find some information that you are looking for in that section.
    The essence of education is self reliance- T.H. White.

    Currently seeking wood carving tools, wood planes, froes, scorps, spokeshaves... etc....

  8. #8
    Boolit Master

    sparky45's Avatar
    Join Date
    Apr 2010
    Location
    SE, KS
    Posts
    2,405
    Osage Orange, as it's called here is a beautiful wood to work with on a Lathe. Cuts like butter and almost needs no sanding. Once finished it will cure from a Yellow color to a warm Cocoa color, same as Mulberry. For shaping with hand tools, I'd use rasps and files.

  9. #9
    Boolit Master Hannibal's Avatar
    Join Date
    Sep 2013
    Location
    East of KCMO
    Posts
    2,212
    I recently completed a single shot rifle and used Osage Orange for the butt stock and fore end. Mine had been air drying for about 10 years. I used a chain saw to cut the log into planks about 3" thick and traced the outline of the stock onto a plank. I don't have a bandsaw so I used a coping saw to cut it down to rough size. After that, I used a draw knife to thin it out. As others have said, you have to be careful doing that because if you go against the grain you'll wind up ripping out a large chunk. Very easy to do that and no fixing it after it starts. Anyway, I then used a wood rasp to do the majority of the shaping. Just one of the old school ones that are flat on one side and rounded on the other. The wood actually works pretty well with one of those. The new style rasp with the thin, replaceable rasp dig in too much and I broke one almost immediately when I tried to use it.
    The rest of it was done with sandpaper. I actually started with 90 grit and even that left a smoother finish than I expected. Anything finer than that was just too slow cutting for shaping. Eventually I worked down to 220 grit and it feels like glass.
    I'd post photos but apparently hosting software is required and I'm just not interested in doing that.

    As you said, the wood will force you to go slow which is a good thing. Just stop often, take a little break and check your progress before you take off more than you want too.

    I think you'll really like the results. I really like mine and it definitely has a unique appearance.

    Good luck!

    Edit to add - if you or someone else reading this would like a photo, PM me your email address and I'll send you one.
    Last edited by Hannibal; 03-24-2023 at 05:10 PM.

  10. #10
    Boolit Grand Master


    stubshaft's Avatar
    Join Date
    Apr 2009
    Location
    Southernmost State of the Union
    Posts
    5,879
    I have made a couple of self-bows out of Osage Orange. It is a very unique wood to work with and one thing that you have to keep in mind id that it WILL darken in color as it ages. One of the bows I made over 30 years ago started out as a beautiful golden yellow and is now the color of dark walnut!
    Old enough to know better, young enough to do it anyway!

    Men who don't understand women fall into two categories: bachelors and husbands!

  11. #11
    Boolit Master Handloader109's Avatar
    Join Date
    Jan 2014
    Location
    NW Arkansas
    Posts
    2,525
    Yep, a couple of good rasps and files, coping saw is inexpensive and would be good for rough cutting to shape. I've made some turned pens from one we cut down a couple of decades ago. I've got a bunch of fairly small pieces that are large enough for pens and knife scales.

    Sent from my SM-S908U using Tapatalk

  12. #12
    Boolit Master
    Join Date
    May 2022
    Location
    MPLS
    Posts
    1,486
    Sharp, files, rasps, rotary cutters, coping saws, time, lots of time...... And when you get a chance, get to the Pashance store and buy a bucket full...

  13. #13
    Boolit Man
    Join Date
    Dec 2015
    Location
    West Des Moines, Iowa
    Posts
    87
    As mentioned before, a good rasp is mandatory for your grip project. Rough cut the wood to approximate size and start rasping away. I find a cardboard cutout of the size I want to grips to be very helpful. You will need a way to hold onto the wood blank as you rasp it. I would not use a Dremel tool, It is a fast way to make a big mistake.

  14. #14
    Moderator Emeritus


    JonB_in_Glencoe's Avatar
    Join Date
    Mar 2010
    Location
    Land of 10,000 Lakes
    Posts
    15,873
    I'd post this in Special Projects
    ~~~~~~~~~~~~~~
    “If someone has a gun and is trying to kill you, it would be reasonable to shoot back with your own gun.”
    ― The Dalai Lama, Seattle Times, May 2001

  15. #15
    Boolit Master MarkP's Avatar
    Join Date
    May 2009
    Location
    Omaha NE
    Posts
    1,248
    I made a mantle out of Osage Orange and in the process of making thick slab steps.
    Sharp rasps to work. Ultra violet light darkens the wood from yellow to brown. Also the saw dust and chips will stain things yellow.

  16. #16
    Boolit Buddy Brokenbear's Avatar
    Join Date
    Jan 2017
    Location
    SE Mo
    Posts
    210
    First and foremost ..all your work will be for nought if you do not determine the wood's current moisture content which must be at no more than 8% ..It does not matter how old the wood is ..it is all about how the wood was processed to get it down to a moisture content that can be stabilized which is 8% or less ..so find a wood shop and ask then to stick it with a moisture meter ..won't take 2 seconds

    If the wood is higher than 8% find someone with a band saw and slice it like a loaf of bread in 1/2" thick "slabs" 5" long ..paint the ends with ANY latex paint (the ends are how the moisture escapes and the paint reduces the speed of the water departure thereby reducing the chance of the wood cracking as it dries)

    Then in an environmentally controlled room (AC & Heat) cribbage/stack up the slices of wood so air can flow thru it and put an electric fan on it for 48 hours or so

    Then find some one with a belt sander and smooth the side of the slab that you intend to place against the gripframe

    Next lay a piece of the grey paperboard like the backing cardboard of a paper tablet and lay the corner of the cardboard in the right angle up at the top of the gripframe then move it past the area of the right angle along the front and top of the angle by 1/4"

    Then draw a cardboard pattern of your gripframe keeping that 1/4' spacing of outside the gripframe all the way around the gripframe

    You now have your wood pattern ..draw the outline on your wood panel and saw it out ..begin the general contour at this point getting rid of overburden wood both outside the line as well as the contoured flow of the grip thickness n shape from top to bottom ..be sure to get rid of 99% of the excess wood from outside the wood as your first step

    From here the road forks with the fact that which course you take to final fit depends on whether the butt of the grip panels are anchored by pins or by internal block like an 1873 Colt Single action

    I'll just briefly say if pins are the butt anchors then drill your pin holes in your grip panels and then S-L-O-W-L-Y sand the right angle until fitment

    If the Colt one piece system build your perfect fit in the right angles first leaving wood stick out all around the gripframe except the right angle ..once both panels are fitted build your anchor block insuring it is the exact thickness of the gripframe and that the block is well mated to the bottom as well as the front and back strap ..if the block can move downward or forwards or backwards then you grips can to ..last make sure before gluing and with the block in it expected anchorage point ..insure that it does not interfere with the hammer spring when cocking the pistol

    Then sand the edges and contour to suit you and slather on 5 coats of TruOil 2days between coats using a 3M red scuffing pad to de-shine the prior coat ..and wallah grips !! simple really

    Good Luck

    Bear

  17. #17
    Boolit Master Bad Ass Wallace's Avatar
    Join Date
    May 2005
    Location
    Australia
    Posts
    1,966
    This year I'm having a block of Camphor Laurel milled ready for several gunstocks. It has been drying for 5 years and still has 12% moisture.


    It makes into exceptional jewel and ammo boxes. I rate it on a par with walnut for hardness and workability.


    Being located in Australia, I would like to see a picture or two of the woods that you describe.
    Hold Still Varmint; while I plugs Yer!

  18. #18
    Boolit Buddy

    Join Date
    Aug 2011
    Location
    west Tn
    Posts
    459
    Have made a couple of candy bowls out of it on my small metal working lathe and a walking stick cane,[river boat gamblers used these, loaded and set the fuse on fire with their cigar]. Made small shaped cannons for the grip of the cane. Also made small ram rods for the small cannons I used to make. Most of my cutting [turning] I used carbide tools. Rented a cattle farm for about 15 years that had some really big Osage orange trees. Hard on the chainsaw chains. Burns hot leaves few ashes. Pulled fence posts that had been in the ground for over 50 years and the heart wood was still good. Also used a small air powered hand sander to do most of the finish work. Have a pair of grips that was started about 10 years ago that will probable never get finished.

  19. #19
    Boolit Master
    Join Date
    Apr 2016
    Location
    NC
    Posts
    2,882
    I would not use the Japanese saw. They are designed for soft wood, the teeth will get bent. Other than that, everything above.

    i’ve only worked it on a lathe, it works great.

  20. #20
    Moderator Emeritus / Trusted loob groove dealer

    waksupi's Avatar
    Join Date
    Mar 2005
    Location
    Somers, Montana, a quaint little drinking village,with a severe hunting and fishing problem.
    Posts
    19,362
    Quote Originally Posted by Bad Ass Wallace View Post
    This year I'm having a block of Camphor Laurel milled ready for several gunstocks. It has been drying for 5 years and still has 12% moisture.


    It makes into exceptional jewel and ammo boxes. I rate it on a par with walnut for hardness and workability.


    Being located in Australia, I would like to see a picture or two of the woods that you describe.
    Your ambient humidity may be keeping the wood in that range. I found when I bought stock blanks from the east coast, I needed to dry them another year to have them fully stabilized if time permitted. It would usually drop the moisture content by around 4%.
    On the other hand, if I built a rifle here and sent it back east, I had to be sure to leave plenty of internal clearance, as the wood would gather moisture again, and caused function problems a couple times.
    The solid soft lead bullet is undoubtably the best and most satisfactory expanding bullet that has ever been designed. It invariably mushrooms perfectly, and never breaks up. With the metal base that is essential for velocities of 2000 f.s. and upwards to protect the naked base, these metal-based soft lead bullets are splendid.
    John Taylor - "African Rifles and Cartridges"

    Forget everything you know about loading jacketed bullets. This is a whole new ball game!


Page 1 of 3 123 LastLast

Posting Permissions

  • You may not post new threads
  • You may not post replies
  • You may not post attachments
  • You may not edit your posts
  •  
Abbreviations used in Reloading

BP Bronze Point IMR Improved Military Rifle PTD Pointed
BR Bench Rest M Magnum RN Round Nose
BT Boat Tail PL Power-Lokt SP Soft Point
C Compressed Charge PR Primer SPCL Soft Point "Core-Lokt"
HP Hollow Point PSPCL Pointed Soft Point "Core Lokt" C.O.L. Cartridge Overall Length
PSP Pointed Soft Point Spz Spitzer Point SBT Spitzer Boat Tail
LRN Lead Round Nose LWC Lead Wad Cutter LSWC Lead Semi Wad Cutter
GC Gas Check