I don't know if this is the correct place for this ?
What temperature do you anneal brass cartages at ??
For how long do you hold at that temperature ??
So what would happen if I put the hole case in a 500 deg oven for a while ??

|
   
   
|


|


I don't know if this is the correct place for this ?
What temperature do you anneal brass cartages at ??
For how long do you hold at that temperature ??
So what would happen if I put the hole case in a 500 deg oven for a while ??
Last edited by BLAHUT; 02-27-2023 at 11:13 PM.
Now ya done it... this gonna be Big!!!
I hold business end, to the Gas Flame till it burns my fingers then quench!!!

There are very precise methods for annealing-- then there is the 'good enough for most situations' way: Stand the head in water (about 1/2" will do) so that you do not soften the base of the case. Put heat only to the mouth of the case until it starts to glow a visible but dull reddish shade, then tip the case over into the water.
Hick: Iron sights!
I use a cordless drill and socket hold in flame till color starts to change, time depends on brass that I am working with, just don't go to red hot that will be dead soft, no need for quenching with brass from what the guys that study metals tell me . and the temp that brass anneals is around 650 degrees F, but I am no expert just what works for me.

This is going to be entertaining, and long once again. Hope y'all have thick skin.
Slim
JUST GOTTA LOVE THIS JOINT.


I do pretty much the same thing, but just hold the brass into the flame and count to four or five then drop into a stainless steel bowl.Originally Posted by Fitz

Old enough to know better, young enough to do it anyway!
Men who don't understand women fall into two categories: bachelors and husbands!

You don’t want to put your brass in an oven, because you only want to aneal the case mouth, not the entire case.
There are many ways to aneal brass. Some people dip them into molten lead. I have a mini lathe that I mount a bore cleaning brush in. I shove a case onto it while the lathe is turning at a slow speed, then heat with a propane torch. With a glove I remove the case and put on another. I don’t look for a specific color when heating. I look for a color the same as you see on military rounds, when they have cooled. This has always worked for me. I don’t think it’s as much like rocket science, as a lot make it out to be.


This is what I use. Easy to build and works great. https://duckduckgo.com/?t=ffab&q=diy...%3DMf6rYqtRrGY
NRA Benefactor Member NRA Golden Eagle
If not done properly, you can do more harm than good.
http://www.lasc.us/CartridgeCaseAnnealing.htm
Winelover

EXACTLY as winelover wrote! The OP (BLAHUT)'s line, "So what would happen if I put the hole case in a 500 deg oven for a while ?? " really caught my attention! If you anneal the bottom of a case it will soften the brass sufficiently to create a mini-bomb! To wit, the brass will no longer have the strength to contain the pressures from ignition -- and, from what I've read countless times -- an invitation to MAJOR consequences/damage/injury!
PLEASE -- do some reading on annealing -- there's LOTS out there -- and whatever you elect to do -- do NOT anneal case bottoms!!!
geo
Refining the grain structure of brass needs about 700 degrees to be effective. I also use the drill and socket system and watch for color change, usually 7-8 seconds, with the tip of the flame about 3/4 inch from the brass. I aim the flame at the junction of the neck and shoulder at a 45 deg angle. This is not precise but seems to work. There are also temperature crayons you can buy that can be used for more precision.

REESE on the RANGE is a member of our community and as a bonus, he works as a METALLURGIST ... a rare combination for us ole'Farts who cast hot metal and stuff brass for grins....
The link to his Y-Tube Channel https://www.youtube.com/@reeseontherange
Scroll down to his section on annealing, you won't regret it...
Reese has contributed more than anyone I can find as far as the educational 'hands on' end of this business of annealing. Much of what you get from the uninformed is just parroted warnings embellished over time with fiction. Don't get me wrong...if you intend to anneal and survive your work in total...get yourself educated first, REESE on the RANGE should be your 'ANNEALING 101 CLASS' along with the Article ( Cartridge Case Annealing with the BC-1000 Annealer...When, why, how and if to anneal...By Ken Light)
If you are handy and like to build your own tooling, you may end up building an annealer...having studied what exactly is required & getting the facts straight was just the impetus I needed to build one for myself...

a m e r i c a n p r a v d a
Be a Patriot . . . expose their lies!
�In a time of deceit, telling the truth is a revolutionary act.� G. Orwell
So, what should you know fundamentally, about what Annealing does?
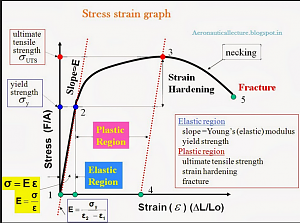
While the link in reply #10is very helpful, I think some explanation w/ pictures of stress strain curves would also help.
First: Annealing Relieves Strain Hardening, and returns the metallic grain structure to a point w/o internal dislocations. Internal grain dislocations are what result when a piece of ductile metal like brass is taken into a region of stress Above the Elastic Limit and Plastic Deformation is achieved.
Strain Hardening from this Plastic Work Offsets the Yield Point of the material, thus Increasing the Elastic Limit stress, and Does NOT affect the Ultimate Tensile Stress on an engineering stress strain curve.
Thus, a Fully Annealed Neck WILL expand More in terms of Permanent Offset than a Strain Hardened neck on cartridge brass. Strain Hardening Offsets (higher) the Yield Point in the curve where stress produces Plastic (permanent) deformation.
Momentarily I will edit this post to put the correct descriptors against the pictures. One of these is a Brass Stress-Strain Curve, and two are Generic Ductile Metal Stress-Strain Curves to show key aspects of metals regarding this discussion.
The First Curve is for Brass. The next Two Generic Ductile Metals. (Probably generated from testing on steel, as it is the where a lot of the engineering educational materials come from.)
I have used this for decades: 1/2 case water level in a flat baking pan, propane hand torch, light the torch, turn out the lights, the party is starting, point the torch flame to the neck/shoulder joint, when the neck turns orange, tip the case over with he torch face, next case. If the neck turns bight red you went too hot.
By the way, most metal work has been done for many centuries by colors while under heat.
�There is a remedy for all things, save death.�
Cervantes
�Never give up, never quit.�
Robert Rogers
Roger�s Rangers
There are three kinds of men. The one that learns by reading. The few who learn by observation. The rest of them have to pee on the electric fence for themselves.
Will Rogers
When you go to a dull red, about 1 to 2 seconds before the bright red...you haven't ruined the brass, you did get a full anneal though.
Then remember...when the case is sized we are again work hardening the case & neck after annealing. There's a couple points to keep in mind, to extend the life of the brass and avoid splits and to have a consistent enough amount of neck tension to keep the projectile in place long enough for the primer to adequately stoke the fire.
Our choice in neck expansion mandrels give us some control over neck tension on a fresh & fully annealed case...
a m e r i c a n p r a v d a
Be a Patriot . . . expose their lies!
�In a time of deceit, telling the truth is a revolutionary act.� G. Orwell
If you are doing the individual by hand annealing, check what has been written about doing it in the dark. When you are doing it in the dark, the color change is much more apparent, much earlier in the heating.
Brighter the background light, the hotter you have to get brass to see the color change. I use two propane torches set as low as they will go with out going out. Brass held in a pliers then put in the flame(s).
My shop is dark enough, at times it is difficult to pickup and put down the brass with the pliers.
Color change, dip and swirl the case about half way into the case. Usually get a little puff out steam out of the primer hole. Cases back in the wooden loading blocks, upsidedown to drain. When done, they all go in the polisher, takes the residual moisture out of the case and the little bit of tarnish from the torch off the neck. Ready to load in 20 minutes.
I've sized, trimmed to length, annealed, polished and loaded in one evening.
And I generally trim BEFORE annealing, harder brass cuts much better than annealed brass. Especially with the Lee trimmers, the design is great, sharpness out of the factory leaves a whole lot to be desired. Pretty sure Lee has their own version of dead soft steel for their trimmers.
Works for me. I don't sweat perfect annealing. I'm more interested in case longevity.
I have one friend who anneals after every firing. He has done testing and believes every time is necessary for the best accuracy. He has one of the pricier automatic annealing machine.
And he's probably right, this Saturday, I'll probably be donating my share of the pot to him at the varmint shoot.
Even without annealing, he'd probably beat me. He's just a dang good shot.
I still have fun, not much better way to waste a Saturday than out shooting with this bunch of rummies.
Last edited by 15meter; 03-01-2023 at 10:11 AM.
I always thought annealing with a candle flame was nonsense.......but I tried it,and it works .....actually worked too well ,the case neck was too soft and collapsed when sized.
I get the feeling that annealing cases is the shooting version of an oil thread.
That said, here is a vid of my homemade annealing machine. This is one of several as I worked thru building it. It is caveman simple. Uses rubberbands as drive belts. The can used as the cartridge drum is an old Seresto collar can. It's made entirely of scrap in my basement, including the motor.
https://www.youtube.com/watch?v=mOPt4OLVbwY
Last edited by Snakeoil; 02-28-2023 at 08:02 PM.
Regards,
Rob
I'm not going to get into a bunch of specifics because others have already done so. I'll just share the technique I've been using and that has worked well for me for many years.
I take a battery powered screwdriver and the appropriate adapter for a 1/4" drive deepwell socket that the cases to be annealed will fit in loosely but not jostle around in. I then get a pan with ample capacity to hold the number of cases that I want to anneal and add enough water to easily cover all the cases. I also get out a standard propane torch.
I take all these items into a room with no light. A closet or your loading room, bathroom, whatever you have that works and where you won't be bothered. Set up the torch and light it then completely darken the room. In a 5 minutes or less my eyes adjust and I can see perfectly well enough to do what I need to do.
Insert the first case into the socket base first and activate the screwdriver. Place the neck of the case to be annealed into the torch flame at about a 45� angle. Keep the case constantly rotating. Concentrate the hottest part of the flame just about the line of the neck/shoulder junction. The neck will heat faster than the shoulder so this has proven about right for me.
Continue with the case rotating until a definite orange color can be readily seen on the case neck. NOT bright orange but a bit more than dull red. Immediately dump the case out of the socket into the pan of water.
Grab the next case and repeat until all cases are annealed.
Dry thoroughly by whatever means work for you and resume your preferred reloading process.
A cordless drill can be used also. I only mentioned the screwdriver to provide a reference for the speed to rotate the case.
That's it.
I'm not a high volume shooter and I anneal every 3rd firing so this is simple, doesn't require that I buy anything special and really doesn't take long at all.
Last edited by Hannibal; 02-28-2023 at 09:08 PM.
I would second Greg. I used to do the dark room, dull red, tried tempilac , but now generally just spin them and go for the military color. It works fine for me for reforming or resizing. With annealing, too little is probably better than too much, especially in reforming. If it wasn't enough you can modify the method. If too much, the case may be junk. John
 Posting Permissions


| BP | Bronze Point | IMR | Improved Military Rifle | PTD | Pointed |
| BR | Bench Rest | M | Magnum | RN | Round Nose |
| BT | Boat Tail | PL | Power-Lokt | SP | Soft Point |
| C | Compressed Charge | PR | Primer | SPCL | Soft Point "Core-Lokt" |
| HP | Hollow Point | PSPCL | Pointed Soft Point "Core Lokt" | C.O.L. | Cartridge Overall Length |
| PSP | Pointed Soft Point | Spz | Spitzer Point | SBT | Spitzer Boat Tail |
| LRN | Lead Round Nose | LWC | Lead Wad Cutter | LSWC | Lead Semi Wad Cutter |
| GC | Gas Check |

 Reply With Quote

