


Gentlemen my friend wanted me to look at a win 94 30/30 that the action wouldn’t fully open . I told him I’d take a look at the ole gal . So I start to get it apart and I’ve found the issue, but the solution is making me scratch my head . It appears a screw that hold a “guide bar” in the inside of the action has backed the entire way out this bar is on the loading gate side and slightly above it the screw threads into a threaded hole right above the loading gate.
Here’s about the best pic I could take of it from the bottom of the receiver the screwdriver is pointing at the screw head. Anyone tell me how I can screw that back in. Without the tiniest of angled screwdrivers ? I’m at a loss on this but I’m not super familiar with lever actions and how to completely strip the receiver . And since it ain’t my rifle I am asking for some help .
Thanks Tim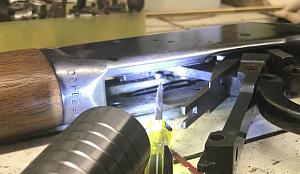

|
   
   
|


|

 Reply With Quote


