Load DataMidSouth Shooters SupplySnyders JerkyWideners
Inline FabricationTitan ReloadingRepackboxRotoMetals2
Reloading Everything Lee Precision
Page 1 of 2 12 LastLast
Results 1 to 20 of 22

Thread: Home made helicoil tool?

  1. #1
    Boolit Master bosterr's Avatar
    Join Date
    Dec 2011
    Location
    Western Pa.
    Posts
    789

    Home made helicoil tool?

    I want to put one 10-24 helicoil in one 1/2 inch deep stripped hole and don't want to buy an installation tool. Did anyone ever take a smaller screw or nail and cut a slot in the end to make a tool? There already was a helicoil in the hole at one time and somehow it got deformed and I pulled it out with a needle nose plyers a while back. Keep in mind that I'm the worlds biggest cheapskate.
    Last edited by bosterr; 02-24-2022 at 05:28 PM.

  2. #2
    Moderator Emeritus


    georgerkahn's Avatar
    Join Date
    Sep 2013
    Location
    South of the (Canada) border
    Posts
    3,087
    Quote Originally Posted by bosterr View Post
    I want to put one 10-24 helicoil in one 1/2 inch deep stripped hole and don't want to buy an installation tool. Did anyone ever take a smaller screw or nail and cut a slot in the end to make a tool? There already was a helicoil in the hole at one time and somehow it got deformed and I pulled it out with a needle nose plyers a while back. Keep in mind that I'm the worlds biggest cheapskate.
    That it had a heli-coil in it "says" a lot to me. You did not indicate in WHAT the repair is for? (As a matter of fact, my last Heli-coil was a spark plug hole at the top of a Kohler 181 8hp lawn tractor engine -- so there was/is heat, vibration, and pressure! Three years of heavy use since -- it has not failed!) My thoughts generally encompass entire worth of hopefully repaired project. In my dealing with this otherwise great engine, putting in the Heli-coil was a no-brainer. I was lucky as a friend who works at an auto-parts store lent me his tool, gratis.
    This said, you may wish to post a WTB on this site, explaining perhaps it may be as a loan? Or -- if what you're fixing will be worth it -- go for the tool. On an on-line auction site (links to it are quite ver boten here ) I saw one tool at $27.00? After you're done with it (save the box it came in) re-list -- hey, if you get two bucks less than you paid for the tool -- the net cost will have been two dollars. And, who knows? You may even come out a buck or two ahead?
    Some say I can squeeze the nickel such that the buffalo excrement drops out. But, sad but true -- some times even I have to suck it up...
    Just some ramblin' thoughts -- GOOD LUCK regardless of what you end up doing!
    geo

  3. #3
    Moderator


    Winger Ed.'s Avatar
    Join Date
    May 2007
    Location
    Just outside Gun Barrel City, Texas
    Posts
    9,664
    Have you seen the good, heavy duty, screw driver looking tool that is for taking out or putting in car tire valve stems?

    It's basically a screw driver shaft with a slot cut in the end of it.
    A heli-coil insert has that tang part/end of it for the tool to screw
    it down into the new threaded hole and breaking the tang off when it bottoms out.

    It shouldn't be a big project to make your own from a old junkie screw driver,
    or depending on the size needed- get the valve stem tool and maybe modify it.
    In school: We learn lessons, and are given tests.
    In life: We are given tests, and learn lessons.


    OK People. Enough of this idle chit-chat.
    This ain't your Grandma's sewing circle.
    EVERYONE!
    Back to your oars. The Captain wants to waterski.

  4. #4
    Boolit Man
    Join Date
    Apr 2007
    Posts
    81
    Just use a 10-24 machine screw and give it several strokes with a file first, or use a belt sander. Cut the slot with a hacksaw. Then use something smaller (nail, bolt, or small rod or screwdriver) to break the little tang off the helicoil.

  5. #5
    Boolit Master slim1836's Avatar
    Join Date
    Mar 2010
    Location
    Burleson, TX
    Posts
    2,123
    Have you checked with your local auto parts stores? They may have the tool for lending with a small deposit.

    Slim
    JUST GOTTA LOVE THIS JOINT.

  6. #6
    Boolit Master
    elk hunter's Avatar
    Join Date
    Jan 2009
    Location
    Central Oregon
    Posts
    1,550
    Depending on what the application is a heli-coil may be the proper repair. I generally opt for a little different method. If possible I drill and tap the hole a couple of sizes larger and install a threaded bushing with the interior of the bushing tapped for the original size thread. A steel bushing in an aluminum or zinc casting, secured with red loctite or something similar, makes a very strong repair.
    BIG OR SMALL I LIKE THEM ALL, 577 TO 22 HORNET.

  7. #7
    Boolit Master
    Join Date
    May 2013
    Posts
    3,599
    round piece of metal that will just about fit in 10-24 hole with slot cut in end. but it has to be just small enough so that when winding insert into hole the springing action will not bind the whole thing up.
    I know I bought a 10-24 kit before, not cheap but I went with the other brand that came in little red metal box.i think my thief brother may have made off with it but I could go check in tool box tomorrow to see if I have one too get you the insert tool diameter. btw I have surplus of larger helicoil insets up to 1" if any needs

  8. #8
    Boolit Grand Master jmorris's Avatar
    Join Date
    Aug 2007
    Posts
    5,277
    I want to put one 10-24 helicoil in one 1/2 inch deep stripped hole and don't want to buy an installation tool. Did anyone ever take a smaller screw or nail and cut a slot in the end to make a tool?
    Sounds like an excellent application of a dremel tool cut off wheel. You are going to need a 10-24 screw (good thing is you have one, that’s why you are fixing the threads, for it) notch the tip so it engages the tab. Thread into the hole to desired depth, remove screw, knock tab off with punch and your done.

    Last edited by jmorris; 02-27-2022 at 10:59 PM.

  9. #9
    Boolit Master bosterr's Avatar
    Join Date
    Dec 2011
    Location
    Western Pa.
    Posts
    789
    This project is repairing a thread on a Dillon Square Deal B. There's 3 10-24 screws holding the priming assembly to the front of the press frame. I bought the press used and I'd guess the previous owner sent it to Dillon and the helicoils were installed by them. I don't want to take the press out of service and send it to Dillon for who knows how long if I can do this myself. I do have a Dremel and thin cut off wheels. Thank you all for your replies. jmorris... Great idea to grind clearance in the end of the screw for it to release the helicoil. I'll try the local auto parts stores and Home Depot for the helicoils before I start looking online.

  10. #10
    Boolit Grand Master jmorris's Avatar
    Join Date
    Aug 2007
    Posts
    5,277
    I don’t know where in western PA you are but

    https://www.napaonline.com/en/p/BK_7...&gclsrc=aw.ds&

  11. #11
    Boolit Master 15meter's Avatar
    Join Date
    Feb 2017
    Location
    SE Michigan
    Posts
    2,535
    This is 45+ year old memory, as in the last time I used a Helicoil, but I thought I broke off the little tab before I even started it in the tapped hole.

    Threaded 2 nuts on the bolt and jammed them together with enough bolt protruding to thread the Helicoil on and used that as the insertion tool.

    Did it on a stripped bolt on an Italian Harley head.

    Or not. That was waaay before the winter camo showed up on my chin.

    I do know I never had a "Helicoil insertion tool". And I did fix the old Harley.

    After that, all bets are off.
    Last edited by 15meter; 03-01-2022 at 12:52 AM.

  12. #12
    Boolit Man
    Join Date
    Jan 2018
    Posts
    82
    I have taken paperclips and pieces of wire and 'tapped on the bolt head to start' and run them into stripped holes to git home. Po' man's helicoil.
    Don't want no one to git hurt, but if you're gonna have a wreck, I wanna watch.

  13. #13
    Boolit Master elmacgyver0's Avatar
    Join Date
    Nov 2010
    Posts
    2,023
    It seems like a very simple project.
    If you're too lazy to make a tool you could probably fudge it and just use a needle nosed plier to install it.

  14. #14
    Boolit Grand Master jmorris's Avatar
    Join Date
    Aug 2007
    Posts
    5,277
    Quote Originally Posted by 15meter View Post
    This is 45+ year old memory, as in the last time I used a Helicoil, but I thought I broke off the little tab before I even started it in the tapped hole.

    Threaded 2 nuts on the bolt and jammed them together with enough bolt protruding to thread the Helicoil on and used that as the insertion tool.
    The reason you want to turn a helicoil from the tip is it is like a stainless steel spring, Turing from the tip tries to reduce the diameter of the coil stack so it enters easily. Push it from the back as it enters and it tries to get larger in diameter than the hole you are trying to install it into.

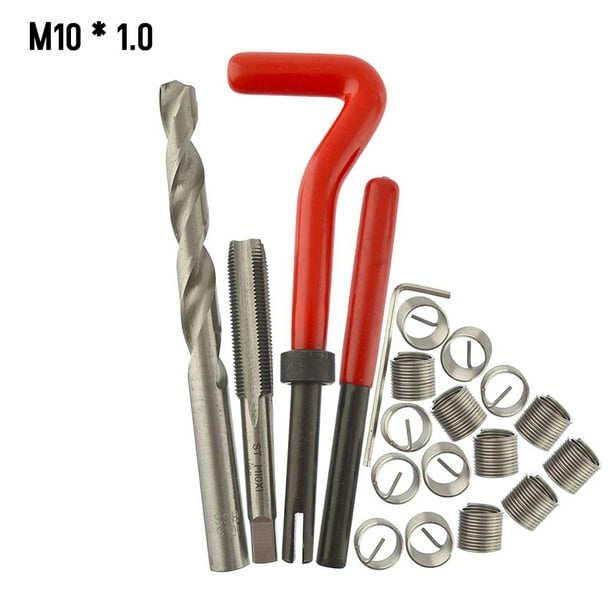
    One could also take rod or tubing and saw or grind a slot in the tip to go over the tab like the tool in the center.

    That is generally only possible on larger inserts. The OP is dealing with a #10 screw though with very little room for something like this. Thus the suggestion to just notch the tip of the fasteners he is going back with.


    Your method would be fine on solid thread inserts that used to be more common than the helicoil and copies.


  15. #15
    Boolit Grand Master jmorris's Avatar
    Join Date
    Aug 2007
    Posts
    5,277
    I had to repair a 10-32 thread today with a HeliCoil and thought of this thread and measured the diameter of the insert and diameter of the tap. The coil is larger than the tap, counting on the twisting from the leading end to reduce the diameter enough to enter the hole.

    I suppose if it were not trying to “spring out”, they wouldn’t stay in place as well as they do.

  16. #16
    Banned
    Join Date
    Jan 2010
    Location
    ohio
    Posts
    569
    If your using a helicoil in a shallow blind hole where you need every thread you can get it behooves one to use the right tool . You just can't get them screwed in and bottomed out using a bolt ground like above like you can with the tool .

    This was learned the hard way after having to remove 125 inserts that ended up being short of the bottom

    And do pay close attention to how the bolt is ground so he can back it out without bringing the insert righ back with it . This method works great 99% of the time .

  17. #17
    Moderator

    W.R.Buchanan's Avatar
    Join Date
    Mar 2011
    Location
    Ojai CA
    Posts
    9,882
    Quote Originally Posted by jmorris View Post
    Sounds like an excellent application of a dremel tool cut off wheel. You are going to need a 10-24 screw (good thing is you have one, that’s why you are fixing the threads, for it) notch the tip so it engages the tab. Thread into the hole to desired depth, remove screw, knock tab off with punch and your done.

    Just do this^^^^^^^^^^^^^^^^^^^^^^^^^^^^^^^^^^^^^^^^^^^^^^ ^^^^^^^^^^^^^^^^^^ It ain't that hard to file a step on the tip of the screw to make the tool. Use a longer socket head bolt so you can get ahold of it and put an Allen wrench in it to drive it.

    Randy
    "It's not how well you do what you know how to do,,,It's how well you do what you DON'T know how to do!"
    www.buchananprecisionmachine.com

  18. #18
    Boolit Grand Master jmorris's Avatar
    Join Date
    Aug 2007
    Posts
    5,277
    Quote Originally Posted by W.R.Buchanan View Post
    Use a longer socket head bolt so you can get ahold of it and put an Allen wrench in it to drive it.
    He doesn’t need a longer one just put the helicoil in, repairing the threads before installing the priming system. It will be long enough without the thickness of the priming system being there.

    Then when installed and clamped by the socket head cap screws and the tab having been removed from the helicoil, the screw tip modification and length will be non issues.

  19. #19
    Boolit Grand Master


    Larry Gibson's Avatar
    Join Date
    Jul 2005
    Location
    Lake Havasu City, Arizona
    Posts
    21,323
    Quote Originally Posted by elk hunter View Post
    Depending on what the application is a heli-coil may be the proper repair. I generally opt for a little different method. If possible I drill and tap the hole a couple of sizes larger and install a threaded bushing with the interior of the bushing tapped for the original size thread. A steel bushing in an aluminum or zinc casting, secured with red loctite or something similar, makes a very strong repair.
    bosterr

    If you will be changing the primer system from large to small or small to large frequently then I suggest elk hunter's solution. Helicoils can be just fine with a permanently installed screw. Taking the screw in and out can cause problems. Also, the screws holding the primer feed do not need to be over tightened, "Snug" is enough. If they work loose [mine never have] get a lock washer for the screws.
    Larry Gibson

    “Deficient observation is merely a form of ignorance and responsible for the many morbid notions and foolish ideas prevailing.”
    ― Nikola Tesla

  20. #20
    Boolit Master bosterr's Avatar
    Join Date
    Dec 2011
    Location
    Western Pa.
    Posts
    789
    I thank everyone for their replies. I don't change primer size on this machine. I have 2 SDB's both set up with large primer and have a 650XL set up for small primer. I still need to buy some helicoils. The depth of the stripped hole is about 1/2 inch so I assume I need 3D length helicoil? I can try making a "tool" out of a 10D nail by cutting a slot in the end of the nail after I grind the point into a flat. A 10D nail measures .148 in diameter and has plenty of diameter to cut a slot in the end with a .038" thick Dremel cut off wheel. A 3D nail just nicely slips into a helicoil already installed in my Dillon. I also have plenty of 10-24 allen head cap screws to try grinding a "lug" on the end like the illustration that jmorris posted as well. I bought this press used from ebay and found that the L-shaped "clip" that holds the powder measure in place on the powder funnel with a shorter 10-24 screw had been stripped out as well and a helicoil installed there too. The previous owner sure must have been pretty ham handed to strip out 4 screws, all of which needs only tightened to just making contact. I'll definitely let you guys know how this project turns out.

Page 1 of 2 12 LastLast

Posting Permissions

  • You may not post new threads
  • You may not post replies
  • You may not post attachments
  • You may not edit your posts
  •  
Abbreviations used in Reloading

BP Bronze Point IMR Improved Military Rifle PTD Pointed
BR Bench Rest M Magnum RN Round Nose
BT Boat Tail PL Power-Lokt SP Soft Point
C Compressed Charge PR Primer SPCL Soft Point "Core-Lokt"
HP Hollow Point PSPCL Pointed Soft Point "Core Lokt" C.O.L. Cartridge Overall Length
PSP Pointed Soft Point Spz Spitzer Point SBT Spitzer Boat Tail
LRN Lead Round Nose LWC Lead Wad Cutter LSWC Lead Semi Wad Cutter
GC Gas Check