WidenersRepackboxRotoMetals2MidSouth Shooters Supply
Titan ReloadingLee PrecisionLoad DataSnyders Jerky
Reloading Everything Inline Fabrication
Page 1 of 2 12 LastLast
Results 1 to 20 of 34

Thread: My newly fabricated smelting pot.

  1. #1
    Boolit Master MOA's Avatar
    Join Date
    Feb 2012
    Location
    Concho, Arizona. At home in the White Mountains at last. Formerly living in Mobile Alabama.
    Posts
    1,603

    My newly fabricated smelting pot.

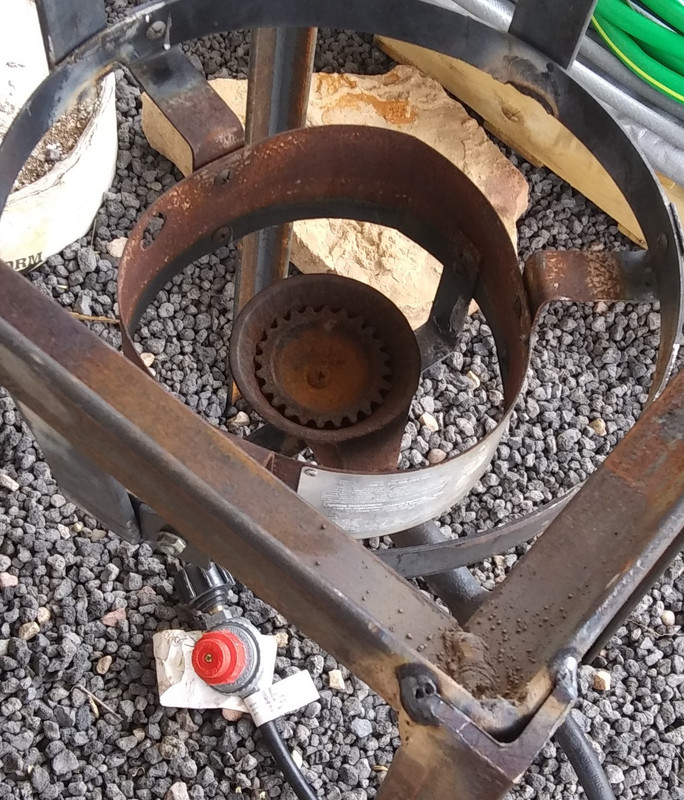
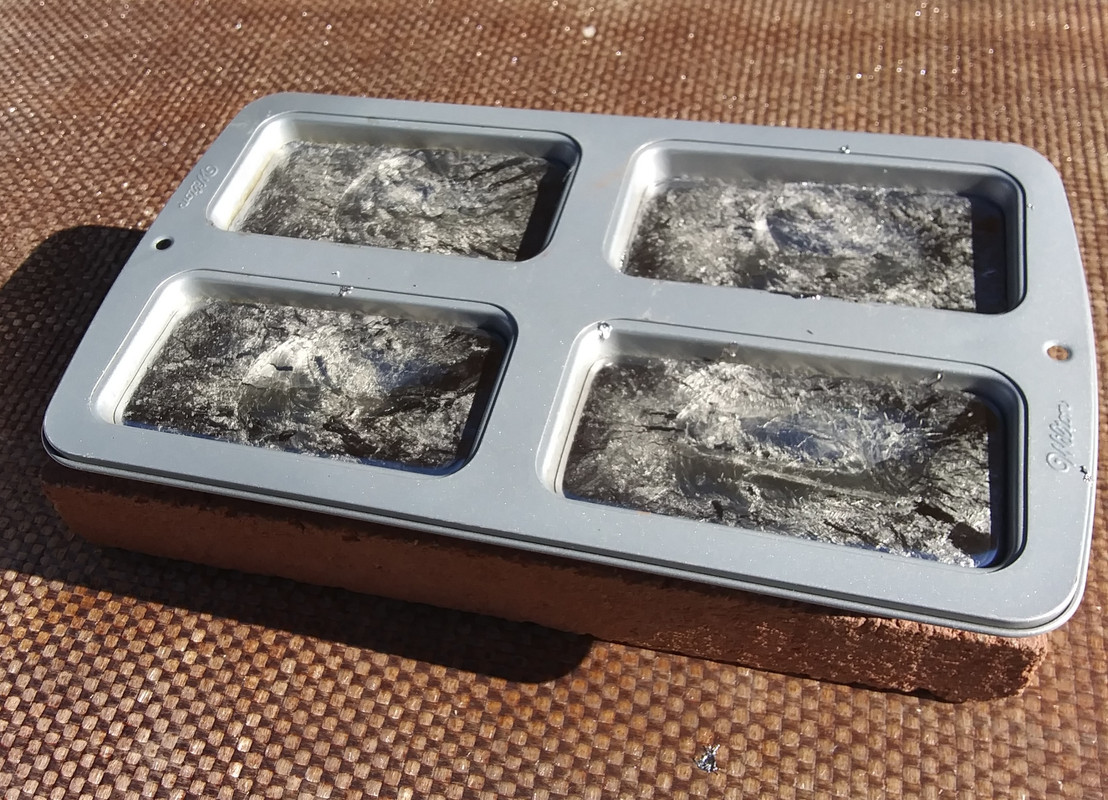
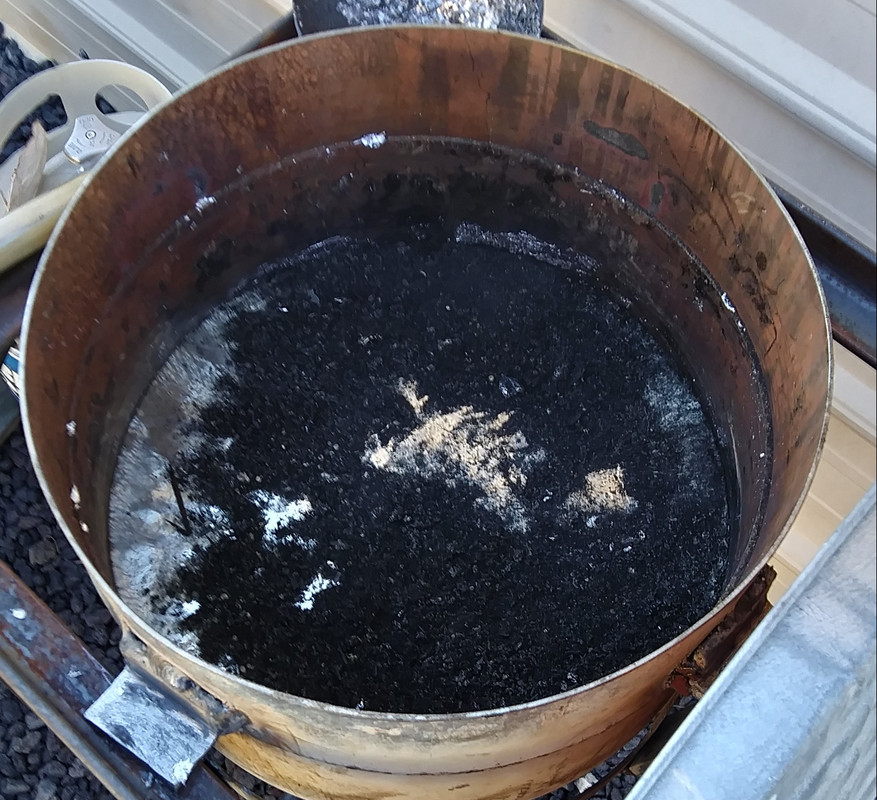
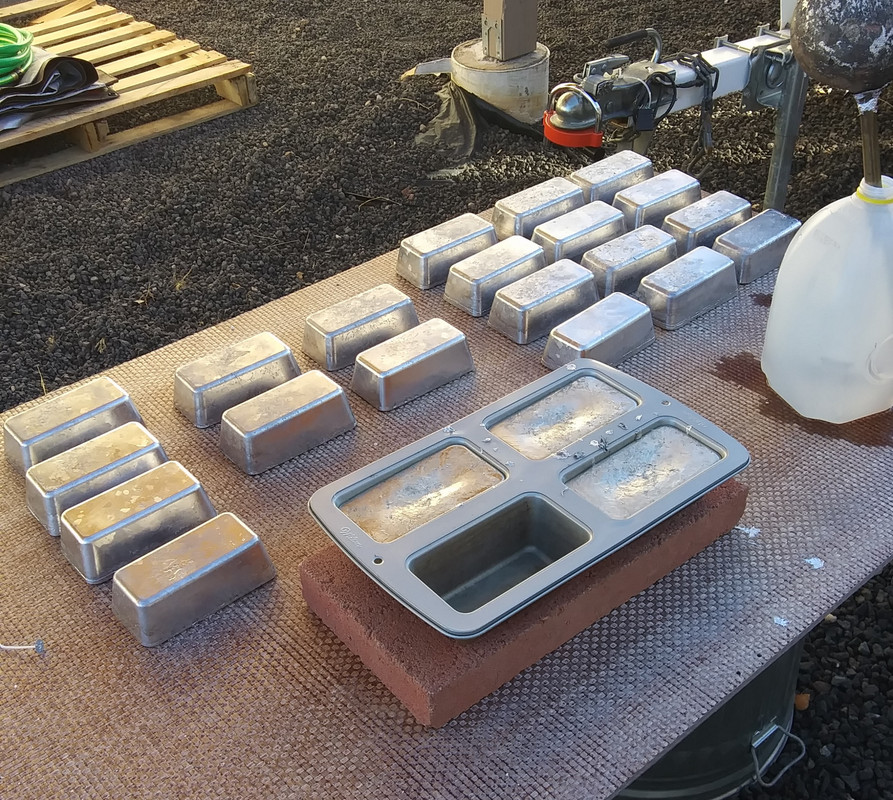
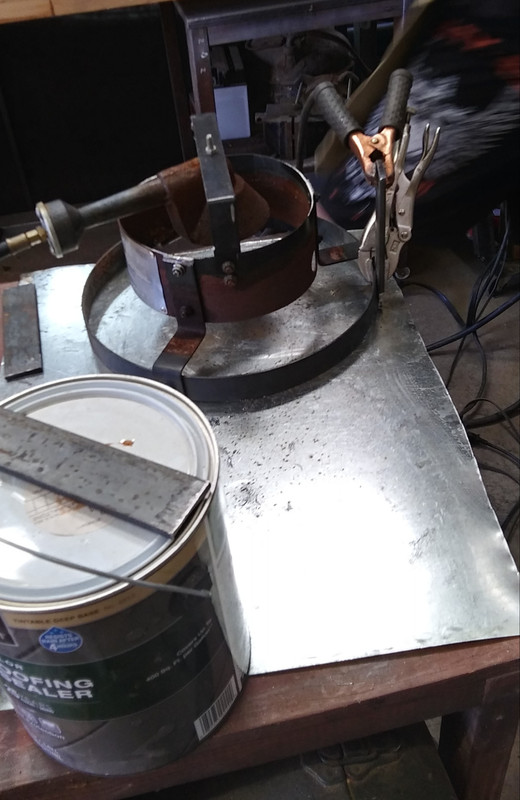
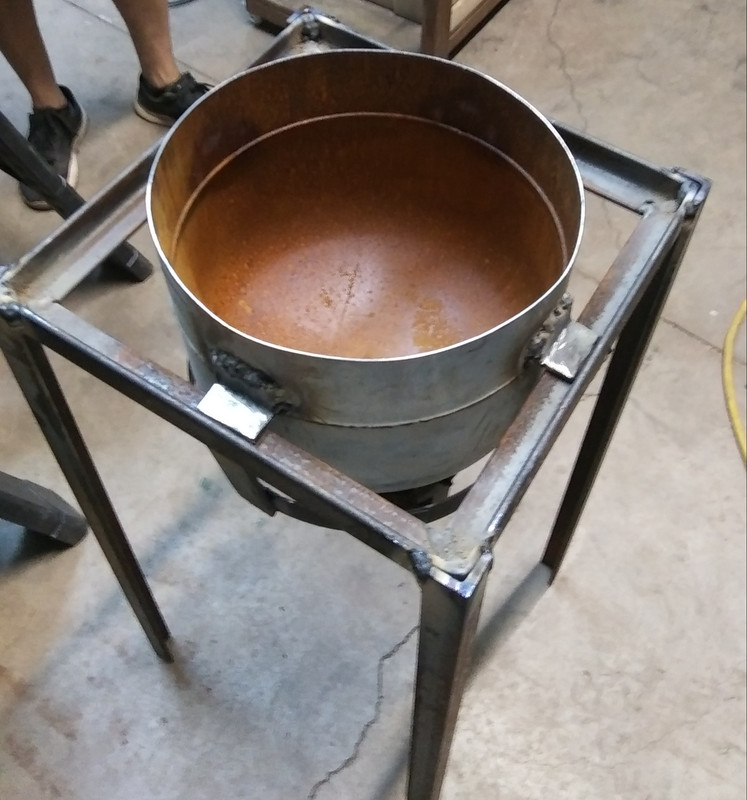
    I've been wanting to get this project done since the fall of last year when I came across an empty propane tank still with the old valve being thrown out by someone at the dump. I started with 20 feet of 1-1/4" x 1-1/4" angle iron. Cutting, wielding, took about 6 hours.cutting the tank about 10 minutes after filling it with water an dish soap and flushing it two or three times over the course of 2 to 3 days. Should hold well over 100 pounds. I'm looking forward to getting many 10 pound bricks out of this setup quickly and not having to be bent over either. Legs are 32 inches in height. Hope this project will be inspiring to many.


    Last edited by MOA; 11-08-2021 at 06:26 AM.
    [SIGPIC][/SIGPIC]

  2. #2
    Boolit Master Sasquatch-1's Avatar
    Join Date
    Jan 2012
    Location
    Martinsburg, WV
    Posts
    3,234
    Really nice. That looks like it will save a lot of back pain. Have you made a table for the molds to go with it?

    I have always wished I had learned how to weld.
    A vote for anyone other then the conservative candidates is a vote for the liberal candidates.

  3. #3
    Boolit Buddy
    Join Date
    Mar 2017
    Location
    Central AR
    Posts
    276
    Nice rig!

  4. #4
    Boolit Master MOA's Avatar
    Join Date
    Feb 2012
    Location
    Concho, Arizona. At home in the White Mountains at last. Formerly living in Mobile Alabama.
    Posts
    1,603
    Quote Originally Posted by Sasquatch-1 View Post
    Really nice. That looks like it will save a lot of back pain. Have you made a table for the molds to go with it?

    I have always wished I had learned how to weld.
    I've got a big work table that's 3x6 feet made out of old 2x6's that I'll cover with this 2x4 foot sheet of bullet proof fiberglass resin that was used in a check cashing business to shield the employees from bullets from the counter down to the floor behind the drywall. The table is just about waist high too so should be perfect. My biggest question I have right now is should I worry about cleaning up the light rust covering the inside of the pot before melting my first batch of raw roofing lead???

    [SIGPIC][/SIGPIC]

  5. #5
    Boolit Grand Master
    Join Date
    Nov 2008
    Location
    Central VA
    Posts
    5,542
    Looks good to me, MOE. That little bit of rust will probably have no effect during smelting. If you’re really worried about it, you could run a wire brush over it to knock off any loose stuff.

    What is you heat source going to be? I would suggest that as tall as that framework is, putting some sheet metal sides around it will probably give notably faster heating in the pot. I see lots of clean, beautiful lead ingots in your future.

    Froggie
    "It aint easy being green!"

  6. #6
    Boolit Master MOA's Avatar
    Join Date
    Feb 2012
    Location
    Concho, Arizona. At home in the White Mountains at last. Formerly living in Mobile Alabama.
    Posts
    1,603
    Froggie, I chopped down my original turkey fryer stand which is propane fueled and fabricated it into the bottom of the framework on the stand. It's not visable from these images. I'll snap a few more without the pot in place so you can see how it's fastened and the shielding of flame with the built in windscreen from the bottom of the tank base. It fits just inside the ring of the burner wind shield of the fryer. Yes, I'll grab one of my wire brushes an scrub the surface rust before I crank her up. Hope to do some today if not tomorrow for sure. I'll be adding a few new image over the next day or so.
    Last edited by MOA; 11-08-2021 at 01:28 PM.
    [SIGPIC][/SIGPIC]

  7. #7
    Boolit Master

    pworley1's Avatar
    Join Date
    Dec 2013
    Location
    Mississippi
    Posts
    3,262
    Nice work thanks for posting.
    NRA Benefactor Member NRA Golden Eagle

  8. #8
    Boolit Master

    jeepyj's Avatar
    Join Date
    Feb 2013
    Location
    Maine, Just north of Bangor
    Posts
    1,210
    Very nice Sir, It's always fun to make something to improve our hobbies. keep up the good work- jeepyj
    Sometimes it takes a second box of boolits to clear my head.
    Feed back thread http://castboolits.gunloads.com/show...?261449-jeepyj

  9. #9
    Boolit Master MOA's Avatar
    Join Date
    Feb 2012
    Location
    Concho, Arizona. At home in the White Mountains at last. Formerly living in Mobile Alabama.
    Posts
    1,603
    Froggie, here's a few images of the burner setup and the windscreen at the bottom of the tank and the burner.


    This last image shows one of the four flat welded plates that connect the burner unit to the underside of the top square that supports the tank. This was how we secured the burner unit close to the tank bottom ring that we are using as an additional wind screen. Should provide quick heating of tank and material. This is a closeup of the top image where the connecting strap is welded onto a section of the burner windscreen and the other end of the plate is welded to the underside of the tank support square.

    Last edited by MOA; 11-08-2021 at 10:28 PM.
    [SIGPIC][/SIGPIC]

  10. #10
    Boolit Master

    fivegunner's Avatar
    Join Date
    Aug 2005
    Location
    LOWELL Michigan
    Posts
    713
    Very nice, well down .

  11. #11
    Boolit Master MOA's Avatar
    Join Date
    Feb 2012
    Location
    Concho, Arizona. At home in the White Mountains at last. Formerly living in Mobile Alabama.
    Posts
    1,603
    We'll today turned out to be not too windy. Still more than ideal but the trash can lid fit perfectly on the right side of the smelter frame so the on an off 10 to 15 mph gusts were mitigated. Ingots are around 10-12 pounds each. It was a nice 230 or so ingot day.


    [SIGPIC][/SIGPIC]

  12. #12
    Boolit Master MOA's Avatar
    Join Date
    Feb 2012
    Location
    Concho, Arizona. At home in the White Mountains at last. Formerly living in Mobile Alabama.
    Posts
    1,603
    We'll I finished off all the ingots of pure lead today. 470 pounds roughly. 47 ingots ready to be alloyed to whatever hardness I need. I've still got some wheel weights to finish off tomorrow an then I'm done until next spring. With the smaller pot I'd be working on this for a week instead of just two afternoons.

    Well just finished the wheel weights. These squares are about 5 pounds. So another 120 pounds of 44 mag, 357 or 45acp ready to go.


    Last edited by MOA; 11-12-2021 at 03:06 PM.
    [SIGPIC][/SIGPIC]

  13. #13
    Boolit Buddy
    Join Date
    Jun 2014
    Location
    Northern California
    Posts
    488
    Well done MOA....and thanks for taking the time to take step by step pics and posting them.
    You have inspired me and probably others here.
    Excellent post(s).
    1A - 2A = -1A

  14. #14
    Boolit Master MOA's Avatar
    Join Date
    Feb 2012
    Location
    Concho, Arizona. At home in the White Mountains at last. Formerly living in Mobile Alabama.
    Posts
    1,603
    Thanks Rizzo. I enjoy prodding others to push themselves further in this endeavor. I just love this stuff.
    [SIGPIC][/SIGPIC]

  15. #15
    Boolit Grand Master


    GregLaROCHE's Avatar
    Join Date
    Feb 2018
    Location
    Southern France by way of Interior Bush Alaska
    Posts
    5,293
    Nice job! As already said, much easier on the back not having to reach all the way down to ground level.

  16. #16
    Boolit Master MOA's Avatar
    Join Date
    Feb 2012
    Location
    Concho, Arizona. At home in the White Mountains at last. Formerly living in Mobile Alabama.
    Posts
    1,603
    Quote Originally Posted by GregLaROCHE View Post
    Nice job! As already said, much easier on the back not having to reach all the way down to ground level.
    Now that's a fact. All that bending up an down especially when your doing 500 pounds one ladle at a time.

    Here's the old setup.


    Having legs that are 32" in height is great for saving a aging back.
    [SIGPIC][/SIGPIC]

  17. #17
    Boolit Grand Master
    Join Date
    Oct 2009
    Location
    Northern Michigan
    Posts
    8,992
    Very nice job!!

    Wish I could weld.
    Don Verna


  18. #18
    Boolit Master Cap'n Morgan's Avatar
    Join Date
    Jun 2008
    Location
    Denmark
    Posts
    1,458
    Nice work!

    If you really want to save on the propane gas, you should make a dedicated wind shield/skirt - about an inch or two larger in diameter than the tank. It will isolate the tank from the wind and at the same time guide the heat flow alongside the tank. Make the shield deep enough to shield the burner as well. You'll be amazed how much faster you can melt a full load.
    Cap'n Morgan

  19. #19
    Boolit Master
    Join Date
    Dec 2017
    Location
    Farmerville,Louisiana
    Posts
    1,358
    Very nice, your choice of tank excellent for melting pot will last many years. Mine is still going after 5+ years, just blow out the rust with air and wire brushing doesn’t seem to affect the ingots any even after a year of sitting in the shop.
    "The strongest reason for the people to retain the right to keep and bear arms is, as a last resort, to protect themselves against tyranny in government..... When the people fear their government there is tyranny, when the government fears the people, there is liberty." Thomas Jefferson

  20. #20
    Boolit Buddy Pablo 5959's Avatar
    Join Date
    Dec 2013
    Location
    Nor Cal
    Posts
    193
    Quote Originally Posted by Cap'n Morgan View Post
    Nice work!

    If you really want to save on the propane gas, you should make a dedicated wind shield/skirt - about an inch or two larger in diameter than the tank. It will isolate the tank from the wind and at the same time guide the heat flow alongside the tank. Make the shield deep enough to shield the burner as well. You'll be amazed how much faster you can melt a full load.
    I agree with this, cut off the bottom tank ring and use some flashing around the burner supports so the heat can travel up the side. Your pot will heat faster.
    It will get a lot hotter up top so you need to be careful.
    I cut mine at the ring so it’s shorter and use a rounded trench shovel instead of a serving spoon. This keeps face as far away as possible and saves my back.
    Range scrap has a lot of junk.

Page 1 of 2 12 LastLast

Posting Permissions

  • You may not post new threads
  • You may not post replies
  • You may not post attachments
  • You may not edit your posts
  •  
Abbreviations used in Reloading

BP Bronze Point IMR Improved Military Rifle PTD Pointed
BR Bench Rest M Magnum RN Round Nose
BT Boat Tail PL Power-Lokt SP Soft Point
C Compressed Charge PR Primer SPCL Soft Point "Core-Lokt"
HP Hollow Point PSPCL Pointed Soft Point "Core Lokt" C.O.L. Cartridge Overall Length
PSP Pointed Soft Point Spz Spitzer Point SBT Spitzer Boat Tail
LRN Lead Round Nose LWC Lead Wad Cutter LSWC Lead Semi Wad Cutter
GC Gas Check