


I have been a fan of Pat Marlins' products for a long time. A decade ago I went in on his Rock Dock system and it has served me well. The mounting system is flawless, convenient, and well made. I got bases for all my tools. Recently, I added a few tools and needed more bases. I was disappointed to learn that Pat has had to discontinue the Rock Dock - it's not clear to me if that's temporary or permanent.
I have never worked with metal, but did acquire a drill press in the last year. I decided to try to make the bases myself. I learned a lot through this project. Much below will be painfully obvious to the machinists and experienced folks of this good forum. But for those like me, here it is.
First I needed to source a 1/4" thick aluminum square base. McMaster-Carr did not disappoint. Their product number 9246k11 at https://www.mcmaster.com/catalog/127/3978 is an 8"x8" multipurpose 6061 aluminum 1/4" inch thick sheet. It looks like this (sans my markups):
The plate is too large, and my first order of business was to learn how to cut aluminum with a bench top table saw. There are blades for "non-ferrous" materials, and the recommended blade for this purpose is an 80 tooth (80T) non-ferrous blade (my saw is 10") and I went with this one from Amazon:
The blade cut like a hot knife through butter. That wasn't too hard. Once cut, I noticed the edge was much sharper than the stock, rounded edges. A file took it down until it was fine to touch.
The next issue was marking the plate for the holes of the new tool. There is a type of punch for this purpose called a "transfer punch". You select the size that fits the holes you are trying to mark, insert it in the positioned piece, hit it with a mallet, and the transfer punch transfers a little mark in the center of the hole via the nubbins at the top of the punches. This prevents having to measure or make a template. Very handy, and much easier to get an exact lineup for the holes. This is a set from LittleMachineShop.com, next to my tool centered and positioned on the cut aluminum base:
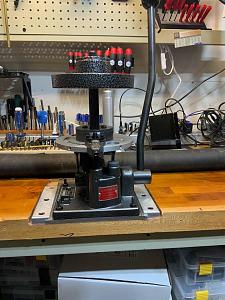
Once marked, I needed to dill the holes. An issue with longer drill bits is that they can wander off the mark when you start. There's a type of punch that can help with this, but I don't have it. Another solution is a drill bit called a "center drill". It's used on lathes, but it's really handy in a press as it is short, stout, and will not wander. I got a set from LittleMachineShop.com, and here it is in my drill press:
The starter holes were very nice, and exactly where I wanted them, so I put a drill bit the desired size into the press and went to town:
The bit did not wander, and the newly drilled holes were exactly where I needed them. The next issue was how to get a flat-head bolt "inset" into the base, so that the base sat flat in the mount (rather than like a table on four legs). To do this one needs something called either a counterbore, or a countersink. I went with a counter sink because that's what the original Rock Dock bases have. LittleMachineShop was out of stock, so I got a set on Amazon. The bits are triangular:
It is in this part of the project where I took a misstep. I eyeballed the bit I needed based on the hole in one of my other bases. I suspect there is a relationship between the holes and the screw head size. I'll have to figure that out before my next base. The other thing that went wrong was I couldn't get a nice, smooth finish on my countersinks. I even used the cutting fluid shown in the picture. And, I eyeballed how deep to go. Rookie move. I should have countersank a hole until it fit my particular bolt exactly the way I wanted, set the depth on the drill press, and drilled 3 other identical holes. I will do that for my next base.
If any machinists can tell me how to get a smoother cut, I'd appreciate it. I was over 2500 rpm with the cutting oil. Maybe I was too heavy on the handle? Maybe the aluminum is too hard for the bits? I simply don't know.
Anyway, the finished product was quite to my liking. After installing bolts, it sits flush in my inset mount. I expected I'd need a riser, so the bolts are long. I'll swap those out later.

|
   
   
|


|

 Reply With Quote


