Snyders JerkyWidenersRotoMetals2Load Data
Reloading EverythingInline FabricationRepackboxLee Precision
Titan Reloading MidSouth Shooters Supply
Page 1 of 2 12 LastLast
Results 1 to 20 of 29

Thread: Problems Casting 200 gr SWC Bullets

  1. #1
    Boolit Bub
    Join Date
    Jan 2021
    Location
    Southern California
    Posts
    46

    Problems Casting 200 gr SWC Bullets

    Hello Guys,

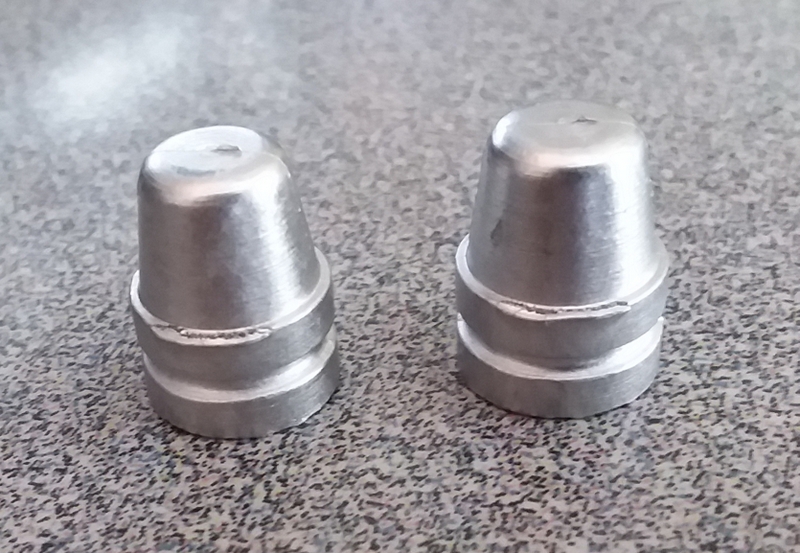
    Have been casting using my new RCBS 200 gr SWC mold. My first casting session had issues with tinning on the edge of the front band. I judiciously removed all the stuck lead and polished the edges using steel wool.

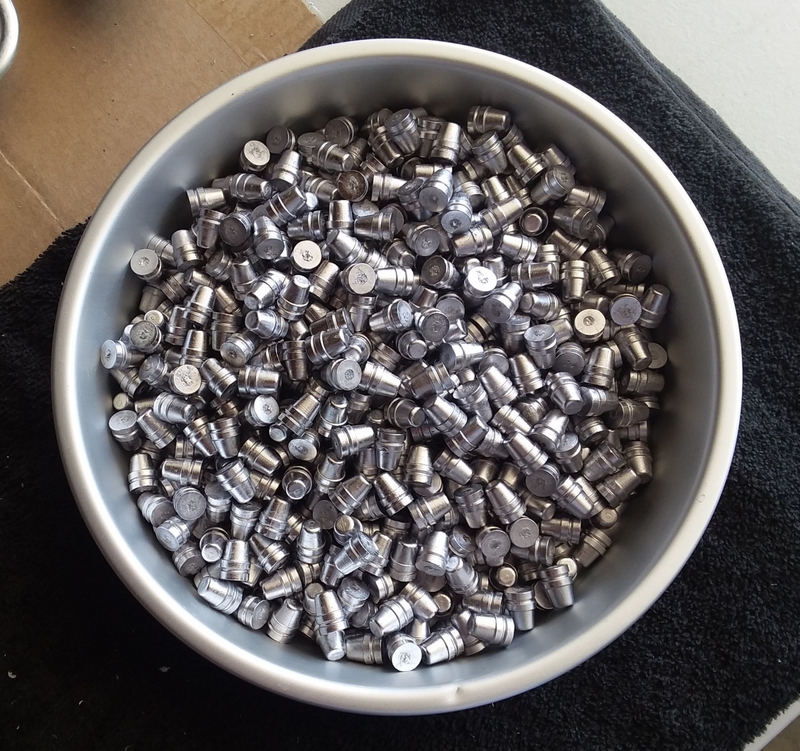
    During my 1st casting session over the weekend, I noticed that the edge of the front band of my bullets (around 20% of my yield) were ripping as the mold is opened. I thought this was caused by the bullets sticking to the tinned area of the mold.

    Cast for another couple of hours just now. No more tinning and the inside halves of the mold have stayed clean. However, the front corner of the front driving band is still ripping as the mold halves are opened.

    I tried casting faster vs slower, opening slower vs briskly, raising or lowering the temp of the lead between 700 to 800 degrees. But the problem persisted.

    Alloy is wheel weights + 1% tin added.

    Would you guys know what is causing this?

    This is enough to make a grown man cry. I'm ready to give up.

    Thanks in advance.


  2. #2
    Boolit Master

    Join Date
    Oct 2013
    Location
    JAX, FL
    Posts
    1,230
    waiting to hear what the more experienced casters have to say. In the meantime, the one on the right almost looks like a portion of the lip was broken or pushed down out of place. Is there a chance the bullets are sticking in the mold cavity and you are tapping/bumping the bullet to dislodge it?
    “Some people spend an entire lifetime wondering if they made a difference in the world. But, the Marines don't have that problem.” Ronald Reagan


  3. #3
    Boolit Master
    Join Date
    Dec 2012
    Location
    North West Ohio
    Posts
    688
    same position and i bet the same cavity.I would check the mold for some stuck lead adn or dirt in the coner of that cavity.

  4. #4
    Boolit Master
    Join Date
    Jan 2011
    Location
    NE Kansas
    Posts
    2,433
    I would be casting that bullet with an alloy temp of about 720 degrees. I suspect that the mold is overheating and you would be well served to cut the sprue, then wait a bit longer than you have been to let the alloy firm up. I would say the bullet is still pretty mushy when you try to drop the castings. If it continues to fracture at the band, give the mold handle a small tap on the end as you start to open the handles. That will sometimes help with opening the mold blocks allowing them to sort of pop apart.

    Make sure the mold blocks are correct for the handles so they do not tilt when opening the mold. Also make sure the mold mounting screws are not loose in the blocks. New mold, or pre-owned? Alloy?

  5. #5
    Boolit Grand Master

    Wayne Smith's Avatar
    Join Date
    Mar 2005
    Location
    Hampton Roads, Virginia
    Posts
    13,642
    What Dusty said. I have found that happens when the mold is opened too soon and the lead has not reduced/hardened enough. Hot mold and hot lead and you need to let the melt cool enough to shrink before you open the mold.
    Wayne the Shrink

    There is no 'right' that requires me to work for you or you to work for me!

  6. #6
    Boolit Buddy
    Join Date
    Dec 2005
    Location
    South Central Michigan
    Posts
    290
    Such defects in my experience are from alloys that have too much Antimony which makes them "hot short" (brittle when hot). You can either wait longer before dropping them (or cast with two molds) or add some more pure lead to the alloy to dilute the Antimony.

    Another possible solution is to use a lead pencil to coat the offending area with graphite.

    I have two of the very same RCBS molds, and have zero tearing of the bands with the soft alloy I use.

  7. #7
    Boolit Grand Master

    Join Date
    Mar 2013
    Location
    Northwest Ohio
    Posts
    14,540
    Use a new pencil eraser and lightly rub the edges / surfaces, then use the point to lightly coat the surfaces with graphite

  8. #8
    Banned
    Join Date
    Dec 2018
    Posts
    3,409
    I mostly agree with cg but I use a piece of wood.

    we think there might be a burr left when the mold was made.

    scrape that part of the mold with a pointy bamboo skewer

    you could check by lightly rubbing a q-tip around the cavity and see if any burs grab it.

    the second option is to do a quick polish of the cavities

  9. #9
    Boolit Master

    Join Date
    Mar 2005
    Location
    maine
    Posts
    1,010
    Bet the mold is being opened to soon.

  10. #10
    Boolit Master bruce381's Avatar
    Join Date
    Jul 2009
    Location
    SF Bay Area
    Posts
    823
    Quote Originally Posted by Wayne Smith View Post
    What Dusty said. I have found that happens when the mold is opened too soon and the lead has not reduced/hardened enough. Hot mold and hot lead and you need to let the melt cool enough to shrink before you open the mold.
    this is the answer 100% opening mold to fast and mold getting too hot slow down a little and maybe cool mold on damp cloth.
    The lead is not hardned and whwn falling from mold the band is pulled and cracks, slow down

  11. #11
    Boolit Grand Master

    gwpercle's Avatar
    Join Date
    Sep 2011
    Location
    Baton Rouge, Louisiana
    Posts
    9,298
    And ... make sure there isn't a tiny raised burr along that edge ... the raised burr/edge can pull / rip that leading edge off like what's in the photo .
    Do the Q-Tip test ... run cotton swab head around cavity edges ...tiny burr will snag cotten fiber , look carefully and use a magnifying glass to inspect edges .
    Once the mould is completely broken in ... and burrs removed ... it will cast like a champ .

    Be sure to hold your mouth right when casting ... that's important !
    Gary
    Certified Cajun
    Proud Member of The Basket of Deplorables
    " Let's Go Brandon !"

  12. #12
    Boolit Buddy
    Join Date
    Dec 2005
    Location
    South Central Michigan
    Posts
    290
    RCBS 201 is an iron mold. A damp cloth is a bad idea for Iron molds... it does work however, with Aluminum molds.

  13. #13
    Boolit Master bruce381's Avatar
    Join Date
    Jul 2009
    Location
    SF Bay Area
    Posts
    823
    I do not know been cooling my molds 45 years on a damp NOT wet cloth no problems.

  14. #14
    Boolit Master pjames32's Avatar
    Join Date
    Sep 2014
    Location
    NW New Mexico
    Posts
    707
    I cast a lot with straight COWW without the extra tin. I cast in the 720-740* range with steel molds. My suggestion is to be sure you wait long enough for the sprue to set, break the sprue then rap the mold handle bolt with a wood (I use a hammer handle) mallet BEFORE you open the mold. This method has worked for me over many years of casting.
    NRA Benefactor Member

  15. #15
    Boolit Master
    Join Date
    Mar 2020
    Location
    Texas
    Posts
    588
    Why is the boolit flat on the edge -like the mold too hot and then whacking to drop the boolits? <Just a thought.>

  16. #16
    Boolit Master
    Join Date
    Mar 2020
    Location
    Texas
    Posts
    588
    Be sure to hold your mouth right when casting ... that's important !
    Gary[/QUOTE]

    That is funny^^^^^^^^^^^^^^^^^^^^^^^^^^^^^^^^^

  17. #17
    Boolit Master mehavey's Avatar
    Join Date
    Aug 2012
    Posts
    1,539
    Too hot.
    Too soon....

    Classic crystalized structure in the break

  18. #18
    Boolit Grand Master

    gwpercle's Avatar
    Join Date
    Sep 2011
    Location
    Baton Rouge, Louisiana
    Posts
    9,298
    Quote Originally Posted by pjames32 View Post
    I cast a lot with straight COWW without the extra tin. I cast in the 720-740* range with steel molds. My suggestion is to be sure you wait long enough for the sprue to set, break the sprue then rap the mold handle bolt with a wood (I use a hammer handle) mallet BEFORE you open the mold. This method has worked for me over many years of casting.
    I Long Count to 7 before opening a steel mould ... 1001 , 1002 , 1003 ...to one thousand seven ...then open
    Certified Cajun
    Proud Member of The Basket of Deplorables
    " Let's Go Brandon !"

  19. #19
    Boolit Grand Master

    gwpercle's Avatar
    Join Date
    Sep 2011
    Location
    Baton Rouge, Louisiana
    Posts
    9,298
    Quote Originally Posted by 45DUDE View Post
    Be sure to hold your mouth right when casting ... that's important !
    Gary
    That is funny^^^^^^^^^^^^^^^^^^^^^^^^^^^^^^^^^[/QUOTE]

    My Dad would tell me that when I was doing something and it wasn't going exactly right ...
    ... He thought it was Funny Too ! I guess it was ... but at the time ... I didn't get it !
    Gary
    Certified Cajun
    Proud Member of The Basket of Deplorables
    " Let's Go Brandon !"

  20. #20
    Boolit Bub
    Join Date
    Jan 2021
    Location
    Southern California
    Posts
    46
    Thanks Guys for the tips. Here's an update.

    Given: mold is completely dry, polished the front band edges with steel wool and gray scotchbrite, used #2 pencil on the front driving band of mold, weather: ~65 to 70 degrees, lead running at 700-750, mold preheated in hot plate (medium-high heat before 1st hour of casting).

    1st hour: proceeded to cast, wait 3-5 seconds for sprue to harden; open sprue plate; wait another 5-8 secs to open mold.

    results: wrinkled bullets throughout first hour. The slow cadence of casting just didn't allow the mold and sprue plate to get hot enough.

    2nd hour: preheated mold again on hot plate (now at full heat), torched the sprue plate, wrinkles disappeared. Wait wait 3-5 seconds for sprue to harden, wait another 5-8 secs to open mold--with this method, mold begins to cool down and wrinkles appear.

    2nd variation: after sprue is cut, wait only 3 secs then open the the mold; still notice some stickiness when trying to open, small percentage of bullets still show tearing of the leading edge of the driving band as the mold is opened and not when it is dropped.

    3rd variation: same cadence as above, but I hold the mold sideways (with the bullets in a horizontal position.

    With this method, the mold halves open after a tiny snap or pop, and bullets looked perfect.

    Proceeded with 3rd variation all through the 3rd hour of casting. Made probably 300+ bullets. But a small percentage of the bullets still had tearing of the band upon opening but the tearing is not as severe.

    Other things tried: tapping the bolt hinge before mold halves are opened--didn't make any difference in making the mold easier to open; as long as the mold is held with the bullets in the vertical position, the mold gives resistance to being opened.

    vent lines are clean; no lead smearing inside bolt faces

    Head scratchers:
    1. With these steel molds, why is there this "stickiness" in opening the mold after the sprue is cut? With the mold opened but with the bullets in the horizontal position, mold opens easier and appear to produce way less tearing?

    2. Should I apply #2 pencil more frequently?
    3. Should I do more polishing on the mold?
    4. Or is all this part of the "personality" of the mold?

    Thanks so much for all your advice!

    Pic of my hard work after 3 hrs on Friday night.

Page 1 of 2 12 LastLast

Posting Permissions

  • You may not post new threads
  • You may not post replies
  • You may not post attachments
  • You may not edit your posts
  •  
Abbreviations used in Reloading

BP Bronze Point IMR Improved Military Rifle PTD Pointed
BR Bench Rest M Magnum RN Round Nose
BT Boat Tail PL Power-Lokt SP Soft Point
C Compressed Charge PR Primer SPCL Soft Point "Core-Lokt"
HP Hollow Point PSPCL Pointed Soft Point "Core Lokt" C.O.L. Cartridge Overall Length
PSP Pointed Soft Point Spz Spitzer Point SBT Spitzer Boat Tail
LRN Lead Round Nose LWC Lead Wad Cutter LSWC Lead Semi Wad Cutter
GC Gas Check