
 HATCH
HATCH


So I have seen a bunch of people ask about PIDs and order list so I will break down what I use.
PID
I prefer to use 1/32 DIN size PID. This is the smallest one they make.
You can order one from Auber (Model: SYL-1512A). Its $35 plus shipping.
What I recommend is you search ebay for "Universal 1/32DIN PID Temperature Controller, Red + 25A SSR".
Its sold by Golander and its $38 shipped. They are located in Atlanta so its a US stocking company
It is the same model as the Auber unit but comes with a SSR and is private labeled.
ENCLOSURE
The enclosure that I found that works fine is 150x105x55.
You can search EBAY or Amazon for that size and get one for about $20
SSR
If you didn't order from Golander then your gonna need a SSR. I recommend either a 25 amp unit or a 40 amp unit. Most pots only pull 7 amps anyway.
If you mount it down to a metal enclosure, you will not need a heatsink.
If you search for "SSR-25DA" you can get one for under $5 shipped if you need one.
SWITCH
You can do this one of two ways. You can get a switch that can handle the entire load (pid and pot) which means your gonna need a 20 amp rated switch or you can get one that can handle just the PID which is less then a 1/2 amp. I prefer to just control the PID. So I use car alarm switches. You can get them with wire already attached. I pay a couple dollars each for them but I also purchase them 10 at a time.
CIRCUIT BREAKER / FUSE
This isn't really required but I have started using them on my builds. To be totally honest you household electrical outlets are on a 15 amp breaker most of the time so its redundant to install one on the PID enclosure but I do it anyway. If you search for "12/24V Push Button Resettable Thermal Circuit Breaker Panel Mount Caps 5 -30 AMP" , you will find one for $3 on ebay. It says 12v/24v but the specs say 125/250 vac. I only install one because some one had a issue with their homebuilt PID catching their workbench on fire.
POWER CORD
I get a 6 foot extension cord. If you search on Amazon for "Cable Matters 2-Pack 16 AWG Heavy Duty AC Power Extension Cord (Power Extension Cable) in 6 Feet (NEMA 5-15P to NEMA 5-15R)" you can find it. Its a two pack for $12 but plan on spending $8 each if your gonna buy a single. Yes, 16 ga is plenty big for our application when you consider that most casting furnaces only draw about 7 amps anyway but 16 ga will handle 15 amps with no issues or risks.
THERMOCOUPLER
Most of the ones you see are rated to 400C. That is only 752F. I normally cast at 750F and that is also the set point I set the PIDs I build on. So when you are looking at them you need to verify that the one you get ISN'T the one that stops at 400C. Most of them are.
Funny story , over the years I have made multiple purchases from different China based Ebay sellers before I started using the supplier I using now and on several occasions I was sold units rated for 600 c but when they came in the documentation provided with each unit had the specs of 0c to 400C.
I requested a refund. They wanted me to ship them back to China on my dime, I refused so Ebay told me to keep them and I got a refund. I have like 50 of them now as I had ordered 15 to 20 of them at a time multiple times and they were wrong. So keep that in mind when you order on Ebay.
If you search on Amazon for "BQLZR New 3 Meter High Temperature -100~700 C Thermocouple K Type 100mm Probe Sensors" , you will find one for $8 shipped. 100mm is around four inches long and 3 meter cord is pretty long so you can have the PID a distance away from your pot.
MISC
Romex connector - I use a romex connector to pass all my wires thru the enclosure. I purchase them 100 at a time. 3/8 non-metallic. Home depot sells a 5 pack for $2
Spade connector - You will need 4 of them. You need to use them on the SSR for the connections. I solder the wires on my circuit breaker
Buttsplice connector - you will need 2 of them
When you all finished buying the basics you should be around $80 not including the misc parts.
This is using a quality PID. You can save yourself $20 and order something in from Ebay but you risk getting a unit that is a clone and may not work properly.
You can also make your enclosure out of wood or reuse any enclosure (like a computer power supply) and save your money there. If you use wood then I recommend you purchase a heatsink for the SSR. You should be able to get one for around $6 give or take.
I will be honest that I have about $70 in parts on the units I build. That is buying parts in large quantity to not only negotiate a better cost per item but to also spread out the cost of shipping.
You do not need to switch the ENTIRE load off with the toggle switch so you don't need one rated for 20 amps.
A basic $3 switch will work just fine. You just want to switch the power to the PID off.
In my 25 years in dealing with SSR and building varous panels, I have found that 99% of the time that SSRs fail off. I have never found one to fail to where it always made a connection. If it were to ever fail in the on position then I would just unplug the unit from the wall.
Cut the extension cord about 6 inches from the outlet side (where you would plug the pot in).
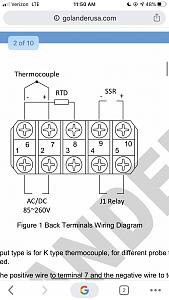
Strip and buttsplice the the green wires together with a 18 ga wire. Take this wire and run to PID #3 connection. This is optional as the manufacturers instructions don't show this connection yet the PID itself has a marked terminal for ground.
Strip and buttsplice the white wires together with a 18 ga wire. Take this wire and run to the PID # 2 connection. This is your neutral connection.
The plug in cord black wire goes to SSR #1 terminal and the outlet cord black goes to SSR #2 terminal.
Switch connects SSR #1 terminal and PID #1 connection.
PID SSR output #9 and #10 goes to the SSR # 4 and #3 (polarity sensitive)
Thermocouple connects to PID terminal 6 and 7. The TC should have a red and a blue connector. Red connector is + so it goes to PID # 7. Blue goes to #6
If you run into any issues then just ask me. If I don't respond in a day or so send me a PM and I will respond. I get busy.
I don't know everything about PID setups, but I have built and sold a couple hundred and only had a handful of issues reported from customers.
The reported issues have been broken on/off switch (x 2 got damaged in shipping), faulty connection on the TC wires (x 1 - if you shook the wires at the connector they would break connection, I do that now as part of my testing procedure), and lastly I had one wire slip out of a crimp connector (totally my fault, I didn't tug on it).
I power up every unit and test the temperature with a glass of ICE WATER. I also set the set point to 750F. The default is 80F

|
   
   
|


|

 Reply With Quote


