The way i figure it, if it's not being used commercially, you can live with the possible early failure of cheap parts. Just keep a spare on hand, as they are so cheap for "just in case".

|
   
   
|


|


The way i figure it, if it's not being used commercially, you can live with the possible early failure of cheap parts. Just keep a spare on hand, as they are so cheap for "just in case".
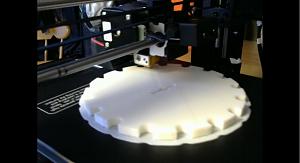
The printer is working away. Already made a few of the smaller parts, working on the plate right now. So slow!
You need to make sure you have the latest files.Originally Posted by Mark2215

Sent from my iPhone using Tapatalk
Don't like being hammered by the Cast Boolits Staff, then don't be a nail.
The rules are simple to follow.
I check for updates before I start any print. I almost missed the update to the bullet plate.

Since starting this thread I have learned a lot about fill, percentage of fill the the thickness of the layers and it is quite interesting. It has taught me so far that what may look good may also hold flaws. There have been some amazing break thrus this week in the progress of the collator. The plates have been addressed and I have learned that very slight differences in the plates are and can be the difference between the unit working correctly and me getting upset and vowing I would dump the collator in the garbage.
So far my particular unit has received some help via some updated plates with a newer plate on the way from what I understand. It would seem that with the newest plate and some tighter fitting bullet collator wheels I will be able to obtain my goal of 100% operational capability running nose down.
It was my goal to have a collator that would run base down to my Dillon 650 and nose down to my Star and Magma bullet sizers. This is just one step closer to obtaining my goal of automation in my bullet casting, sizing, and loading operations.
Charles, (Hatch) has been instrumental in keeping this thread on track and as a source of valuable information. Its not often that you find someone so intent on getting a viable working project going here on Cast Boolits. Personally speaking he has kept me from walking to the garbage bin with the collator and simply dumping it. He tells me its a work in progress have some faith and patience. Normally I wouldn't have listened but Charles has also purchased a 3D printer and has dove in head first because of his belief in the technology and current projects. So, it looks like I'm in it till the end and will keep volunteering information that might help things to progress a little better.
My hat is off to ammoMike83 the originator of this particular project and whos dedication is not stopped or slowed dispite being roughly 1/2 a world away.
Lets keep this thread running and hopefully the spirit of DIY will have all of us wishing to have an affordable collator to the point of being able to obtain something here on the Cast Boolits forum with a price point that is affordable and functional.
Last edited by 6bg6ga; 02-26-2018 at 07:58 AM.
@6bg6ga Thank you for these words! Don't give up. If you can see in several videos now its working, but it's a project for advanced 3D printers. Here is a new update I came up with (thanks to General Hatch for some helpful hints !)
For those who want to use proximity sensors. I don't understand why to use them, because light barrier works fine withouts any adjustment, if you change caliber.
If there are any ideas let me know.
Mike
I am not sure what the testing and tuning that�s needed is but if it takes 17 hrs to print out the collator, what about just printing out the bottom part where the work is done and fastening sides to it to hold your bullets?
I guess I am not seeing the problems but never messed with 3D printing except back in the �90s with machines that would wax modle.
The Crimson bullet collator had a base that sides cut from a sheet material screwed into.
If you have a machine for it, let her do the work. You have a .45 ACP sorter. Why not sorting them by hand? Don't get me wrong, I really love your machines, but I think that discussion about printing the wall or not, is stupid. The wall needs 5h the base 22h to print, btw.
I agree to let the equipment do the work for you, maybe it’s me not understanding the problem that is occurring.
If it takes 5 hours to print the wall, make two versions of the base to test and you just saved 10 hours of manufacturing. For just R&D cardboard and duct tape could be the wall. I may just be impatient, carry on with the neat project.
The base piece works fine.
The adjustments are being made on the slider.
The slider takes a couple hrs to print which isn't that bad.
It could be printed in a hr with less fill and thicker layer.
Joe, I think this product is something that is needed.
It is also something that ANYONE can make with a $200 investment
And the cool part is your not spending $200 just to make this one item.
There are TONS of items that you can print up.
I printed out a bookmark for my daughter this morning. Took 45 mins. She was HAPPY as can be.
My son has something he wants printed but I told him he had to wait because it would tie the printer up for a full day (24hrs)
Don't like being hammered by the Cast Boolits Staff, then don't be a nail.
The rules are simple to follow.


$200? What machine do you have Charles that is only $200? I've been tempted before, but have held out due to the initial cost of close to $1000.
If I read through my emails and comments, I think it's better to have walls
Anet A8.
You can buy the Anet A8 for about $160 off of eBay.
I recommend that you purchase a mosfet which costs about $10 also.
This basically is a SSR that will allow you to take the high current for the bed and put it remotely.
It took me 10hrs to assemble it. If I had to build it again it would be 2/3 that long.
There are some upgrade parts that you can print once your machine is together.
If you get a A8, I can print them so you can install them when you assemble the machine.
Also the A8 doesn�t have a on/off switch. The cord plugs into the wall.
Which is almost fine as your gonna keep it printing 24/7 once you see what it can print.
I installed a switch on mine. Took five minutes.
It comes with a little bit of filament but not enough print the sample code they tell you to print to test the printer out.
Don't like being hammered by the Cast Boolits Staff, then don't be a nail.
The rules are simple to follow.
Really....... I didn't realize that they really were that cheap. Might have to spring for one. I've about a dozen projects that are small and I've wanted to try. I've a makerspace that is down in Fayetteville, but they cater mainly to students and I don't think running long items works for them. (yeah, nothing is 5 minutes though).
I'm using a monoprice maker select plus. They are 275 new. I'll probably buy this one off my friend, he upgraded so doesn't use it much anymore.
My first bullet plate was a failure and I know why. The plate ended up warping and not being flat. The problem is the plate on the printer is not perfectly flat. I leveled it in the corners but then the middle hits, if I level closer to the middle the edges are further down which caused the print to not adhere. I'll be putting a piece of glass on it before trying again.
I'm almost done all the small parts.
Happen to know what he upgraded to? Just curious.
Is this the one you are using?
THIS IS THE ONE I AM USING - ANET A8
Last edited by HATCH; 02-26-2018 at 03:23 PM. Reason: edited to correct link
I believe I see your point. Your looking (my opinion here) at making the unit a little more simple and probably looking at say Kidex as a wall material to attach to the base like another unit that tried to go into production and was stopped cold by the MBF lawyers.
This unit is different than the MBF design and if all the bugs can be worked out in my opinion it will be superior and at a better price point.
My unit hasn't received the newest designed plate that will transform it to 100% nose down operation. I am hopeful that I will get it this week and possible some better fitting bullet collator wheels. My current wheels raise up allowing bullets to get underneath it starting a jam and then an all out stopage.
 Posting Permissions


| BP | Bronze Point | IMR | Improved Military Rifle | PTD | Pointed |
| BR | Bench Rest | M | Magnum | RN | Round Nose |
| BT | Boat Tail | PL | Power-Lokt | SP | Soft Point |
| C | Compressed Charge | PR | Primer | SPCL | Soft Point "Core-Lokt" |
| HP | Hollow Point | PSPCL | Pointed Soft Point "Core Lokt" | C.O.L. | Cartridge Overall Length |
| PSP | Pointed Soft Point | Spz | Spitzer Point | SBT | Spitzer Boat Tail |
| LRN | Lead Round Nose | LWC | Lead Wad Cutter | LSWC | Lead Semi Wad Cutter |
| GC | Gas Check |

 Reply With Quote
 HATCH
HATCH


