MidSouth Shooters SupplySnyders JerkyTitan ReloadingRotoMetals2
RepackboxReloading EverythingInline FabricationWideners
Load Data Lee Precision

Thread: Making that Bullet Collator

  1. #6521
    Boolit Master GWS's Avatar
    Join Date
    May 2019
    Location
    New Mexico
    Posts
    1,366
    Which slicer are you using.....

    I guess I must be an odd ball, as it seems most use different slicers than I do (IdeaMaker)....yeah not the usual people pick....I just like the menus system better, and I get great prints 98% of the time. And there ARE a few things you can do with it to modify .STL files on the fly........not like a cad program to be sure, but it's convenient for some things.

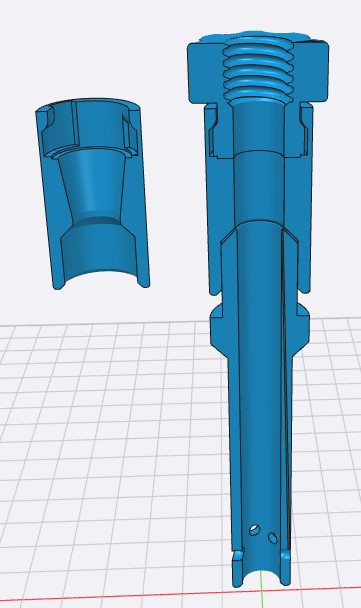
    For example, I was able to take this .stl in TylerR's collection (#11 spring top adapter), and cut off the twist connect just leaving the "handle" with the threads inside....using the "free cut" command....and moving the cutter plane just right. When I did this, it leaves two models instead of one....both with errors since doing such a cut leaves raw edges and holes. But IdeaMaker has an "autorepair" feature that repairs the cut edges.


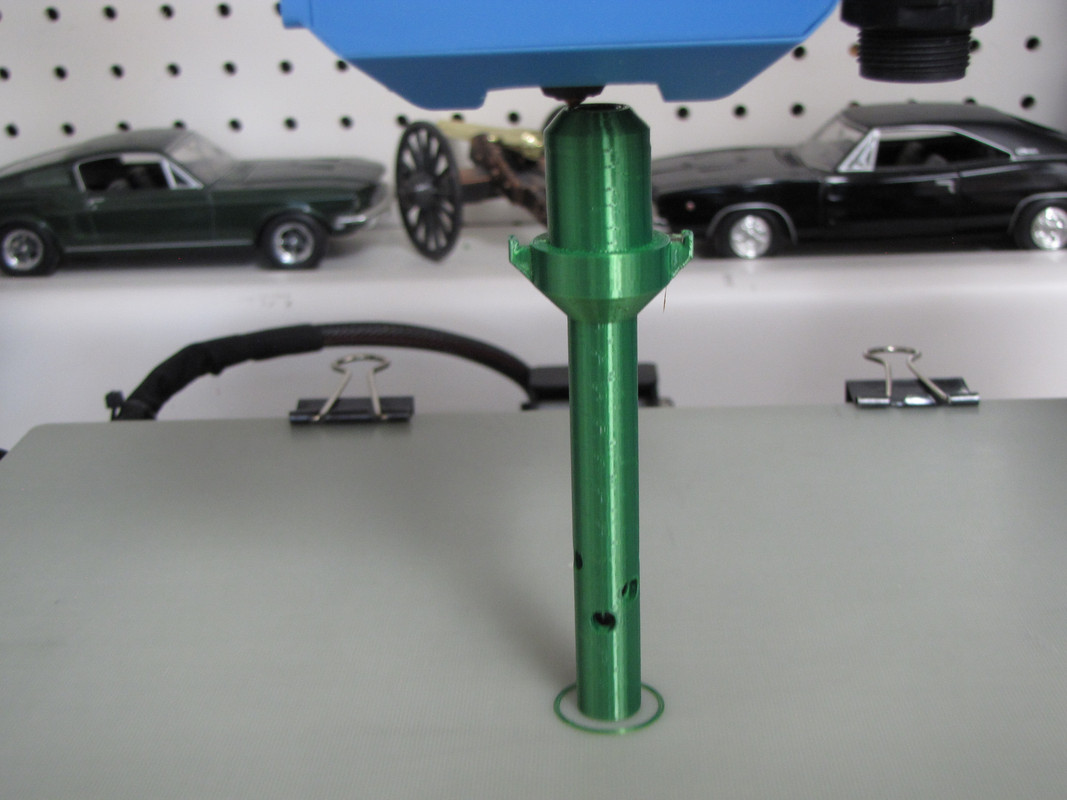
    So I erased the half of the model I didn't want.....should have exported it...to maybe use that twist connect for something else....but I didn't. Then I "auto-repaired" the handle/threads, and exported it to it's own .stl file. Now it looks like this:


    To this, the slicer can import another model and combine that model with these threads.....a slightly dirty process, but it can be done. Pay attention to the x,y,z locations to center and connect them.

    Can other slicers to the same thing.....most likely.....but I have never used them so you'll have to experiment with yours, or others reading this, using other slicers will surely chime in soon....

    That said, a better way is to make new source code....cad drawing....that you then convert to a .stl to print. Then you have a source code to change spring size and/or add new drawing files for each spring size or thread application.......there....clear as mud....here's just the thread and handle in .stl, you can join with something else if you want to try that.....

    11.zip
    Last edited by GWS; 07-14-2023 at 10:11 PM.

  2. #6522
    Boolit Buddy Gillie Dog's Avatar
    Join Date
    Dec 2011
    Location
    Down South California
    Posts
    207
    This is GWS's #11 threaded part stuffed on top of a #11 drop tube removing twist lock in TinkerCad. TylerR's Spring Adapters are to large to import into TinkerCad but GWS's modified part worked fine. I am just learning TinkerCad and might not stick with it, we will see.

    Really do not know what you are looking to do but this is an example.

    Click image for larger version. 

Name:	11 Drop Tube Threaded 11.jpg 
Views:	11 
Size:	10.4 KB 
ID:	315982


    GD
    #2 member of the 10%ers

  3. #6523
    Boolit Master GWS's Avatar
    Join Date
    May 2019
    Location
    New Mexico
    Posts
    1,366
    So you used the little half part I just posted?....and got rid of the finger grip around it? Didn't know you could do that with a stl file in Tinkercad.
    Last edited by GWS; 07-15-2023 at 08:33 AM.

  4. #6524
    Boolit Buddy Gillie Dog's Avatar
    Join Date
    Dec 2011
    Location
    Down South California
    Posts
    207
    Quote Originally Posted by GWS View Post
    So you used the little half part I just posted?....and got rid of the finger grip around it? Didn't know you could do that with a stl file in Tinkercad.
    Sort of, real simple but took several steps. Yes the half little part would import into TinkerCad. Probably because however you saved it to stl made it small enough to import. I tried making TylerR's smaller in Cura slicer and was still to big to import into TinkerCad.

    Took yours, made a male thread from your part by making your part a "hole" and grouping it with the correct size solid to match the drop tube. Then made a new female threaded part the correct size by making the new male thread a "hole" and grouping it with another 22mm solid. Then set it on top of TylerR's drop tube, moved it down to fill in the twist lock to just touch the cone and grouped those together and that made the part shown. It is a smidge taller than TylerR's drop tube to keep the threads the same length/height (probably not needed but was size started with)

    Once I had done it could be done again in probably less than 5 minutes, first time probably took 15 minutes figuring out how to do it with the limitations of TinkerCad. Changing solids to a "hole"/negative of the part is a function of TinkerCad. Any selected part can be changed to a "negative" and then added ("grouped") to a "solid" to make a new female part/object. It is nice slicing a part open to look at it by grouping it to a hole, inspecting the part, ungrouping the part, deleting the hole and you have the original part again. TinkerCad saves all the pieces until exported as stl it looks like, you can ungroup a part several times and end up with all the original parts needed to make the new part/object.

    Long winded answer but that is how it was done.

    Edited to add: Writing this made me think of a better/faster way to make the threaded part to set on top of the drop tube. Took one minute and just two steps to remove the outside/finger grip of your little part................................. Whole thing could be done in a couple minutes now.

    Fun and games for an old guy, keeps mind active you know.

    GD
    Last edited by Gillie Dog; 07-15-2023 at 11:21 AM. Reason: added to
    #2 member of the 10%ers

  5. #6525
    Boolit Master TylerR's Avatar
    Join Date
    Dec 2008
    Posts
    2,012
    Quote Originally Posted by Gillie Dog View Post
    Sort of, real simple but took several steps. Yes the half little part would import into TinkerCad. Probably because however you saved it to stl made it small enough to import. I tried making TylerR's smaller in Cura slicer and was still to big to import into TinkerCad.

    Took yours, made a male thread from your part by making your part a "hole" and grouping it with the correct size solid to match the drop tube. Then made a new female threaded part the correct size by making the new male thread a "hole" and grouping it with another 22mm solid. Then set it on top of TylerR's drop tube, moved it down to fill in the twist lock to just touch the cone and grouped those together and that made the part shown. It is a smidge taller than TylerR's drop tube to keep the threads the same length/height (probably not needed but was size started with)

    Once I had done it could be done again in probably less than 5 minutes, first time probably took 15 minutes figuring out how to do it with the limitations of TinkerCad. Changing solids to a "hole"/negative of the part is a function of TinkerCad. Any selected part can be changed to a "negative" and then added ("grouped") to a "solid" to make a new female part/object. It is nice slicing a part open to look at it by grouping it to a hole, inspecting the part, ungrouping the part, deleting the hole and you have the original part again. TinkerCad saves all the pieces until exported as stl it looks like, you can ungroup a part several times and end up with all the original parts needed to make the new part/object.

    Long winded answer but that is how it was done.

    Edited to add: Writing this made me think of a better/faster way to make the threaded part to set on top of the drop tube. Took one minute and just two steps to remove the outside/finger grip of your little part................................. Whole thing could be done in a couple minutes now.

    Fun and games for an old guy, keeps mind active you know.

    GD
    That is very cool Gillie. I have not taken the time to learn Tinkercad to do any of that. I did not realize it was that capable. Unfortunately Design Spark has forced everyone to upgrade to a new version, and from what GWS has told me, and I have read, the new version kinda sucks. So I have not upgraded or done any design work in months.

  6. #6526
    Boolit Master GWS's Avatar
    Join Date
    May 2019
    Location
    New Mexico
    Posts
    1,366
    Quote Originally Posted by TylerR View Post
    That is very cool Gillie. I have not taken the time to learn Tinkercad to do any of that. I did not realize it was that capable. Unfortunately Design Spark has forced everyone to upgrade to a new version, and from what GWS has told me, and I have read, the new version kinda sucks. So I have not upgraded or done any design work in months.
    Tyler....I've gotten used to the new version.....not quite as bad as I first thought. It still works, but once you upgrade, the old files save to a new format that the old version won't load and there is no going back. So keep a copy.....and they no longer support the old version. I get the feeling they are going the direction of other companies, trying to weed out those using the free version. Do pay attention to the setup.....some things have changed.....some even for the better. They still have file size issues. Something's wrong with those guys....they actually think they need to make money!

    Gillie.....so TinkerCad works with the .stl? directly?......as in "editable"? If so I may have to look at it......cloud software?....or do you download it?
    Last edited by GWS; 07-15-2023 at 01:40 PM.

  7. #6527
    Boolit Buddy Gillie Dog's Avatar
    Join Date
    Dec 2011
    Location
    Down South California
    Posts
    207
    Quote Originally Posted by GWS View Post

    Gillie.....so TinkerCad works with the .stl? directly?......as in "editable"? If so I may have to look at it......cloud software?....or do you download it?
    Sort of. You do not actually "edit" the stl. Not like AutoCad I used to run. You can "manipulate" it.

    You can remove/delete sections/pieces, punch holes of any shape in it, add solid pieces shaped to what you want, is what I have learned so far. You build what you want and group/add it to existing part. Like you can make a negative of TylerR's twist lock and put it in any part you want. I am sure there is a lot more you can get it to do also.

    Free cloud based software.

    Below on left is TylerR's Small Spring Drop Tube, next one is adapted to 30 cal Lee bullet feeder, the others go through 45 cal. The cone was changed on each to match Lee bullet feeder size and changing cone size took seconds for each size. Made a solid to fit into drop tube, put a truncated cone in it as a "hole" and changed top and bottom radius of cone to make each size. Hard part was putting the number/lettering on the front replacing the letters there (not shown) Like said, just learning...

    Click image for larger version. 

Name:	Spring Drop Tubes.png 
Views:	12 
Size:	24.1 KB 
ID:	315994


    GD
    #2 member of the 10%ers

  8. #6528
    Boolit Master GWS's Avatar
    Join Date
    May 2019
    Location
    New Mexico
    Posts
    1,366
    I've used Autocad for 50 years now....so that's what I turn to most naturally. But I also gave Fusion 360 a shot and found it to be powerful, but not any easier than Autocad. Then I joined TylerR's forum when AmmoMike quit the project.....and in the interest of helping out here, I started to learn the free version of DesignSpark so I could collaborate better with Tyler's effort. Apples and Oranges different in every way.....so for this old salt, it's hard to learn and remember, being programmed to design the Autocad way. Never tried TinkerCad....thinking it was too limited. I'll most likely download it to see what I'm missing......sometimes simpler is the right tool.


    As you can see, I also played with Spring Drop Tube inside beveling trying to make my 9mm's drop 100% into the 3D printed bullet feeder. I was having small bullets lean where the bevel is wide and causing some hanging.

    So looking at the illustration above, since you're having to make so many Spring Drop Tubes for different calibers anyway, I can see merit in combining the spring adapter and the Spring Drop tube into one part. But then you'd have to take apart the spring tube for every caliber.....always a "but then". I'm always looking for ways to use multi-use parts in various calibers. I use the same springtube, certainly, for more than one caliber.....
    Last edited by GWS; 07-16-2023 at 07:32 PM.

  9. #6529
    Boolit Buddy Gillie Dog's Avatar
    Join Date
    Dec 2011
    Location
    Down South California
    Posts
    207
    Quote Originally Posted by GWS View Post
    As you can see, I also played with Spring Drop Tube inside beveling trying to make my 9mm's drop 100% into the 3D printed bullet feeder. I was having small bullets lean where the bevel is wide and causing some hanging.
    "I was having small bullets lean where the bevel is wide and causing some hanging."

    You are exactly correct, that is why I made one spring drop tube for each caliber Lee bullet feeder. I was having 9mm bullet hanging in the medium spring drop tube cone. I made top of cone in the spring drop tubes match spring adapter hole size and bottom match bullet feeder ID hole size. Just like your picture shows. I made the rest because it took a minute or so to do each successive one after doing the first.

    Made the #9 spring adapter work with the spring drop tube for the 30 cal (I think a#10 will work also), the #10 spring adapter work with the spring drop tube for 35 and 40 cal Lee bullet feeders and made the #12 spring adapter with the spring drop tubes for the 44 and 45 cal Lee bullet feeders by matching the cones in the spring drop tubes just like your picture shows starting with the spring adapter, through the spring drop tube to the bullet feeder.

    I did exact same thing you did but for the Lee bullet feeders caliber sizes I have. No more hanging of bullets in the spring drop tube cones or snagging on top of bullet feeder because of cone angle. The Lee bullet feeders have a "small" OD, 13.4mm. We both did same thing for different bullet feeders, you printed, me Lee. Think I will leave the twist lock top for now.


    GD
    #2 member of the 10%ers

  10. #6530
    Boolit Master GWS's Avatar
    Join Date
    May 2019
    Location
    New Mexico
    Posts
    1,366
    And all with the TinkerCad Software. Very Good! I haven't got a Lee bullet feeder to try, but it is so similar to the printed one, that I'm convinced they came up with the internal spring idea to make it their own. Fine by TylerR I'm sure, since he's never has had any intention to patent or to commercialize any of this.

    I'm going to have to try the Tinkercad.....it's really got me more curious than anything. Like you said, we got to stay busy.........or become worthless and die.

  11. #6531
    Boolit Buddy Gillie Dog's Avatar
    Join Date
    Dec 2011
    Location
    Down South California
    Posts
    207
    Quote Originally Posted by GWS View Post
    And all with the TinkerCad Software.
    So your nice picture made me do one with Lee bullet feeder. This is current thought of desired end point. Printing spring drop tube now with dreaded supports to make mating surface with bullet feeder flat, will see how it turns out.

    Lee bullet feeder has bevel at top but should be no issue.

    Click image for larger version. 

Name:	tube.jpg 
Views:	12 
Size:	12.2 KB 
ID:	316030

    GD
    #2 member of the 10%ers

  12. #6532
    Boolit Master GWS's Avatar
    Join Date
    May 2019
    Location
    New Mexico
    Posts
    1,366
    What? You didn't get TylerR's wonderful Polypropylene bed that can do this with NO supports?


    In one day 3D printing became a pleasure....No glue needed either:

    https://www.amazon.com/gp/product/B0...?ie=UTF8&psc=1
    Last edited by GWS; 07-16-2023 at 07:33 PM.

  13. #6533
    Boolit Buddy Gillie Dog's Avatar
    Join Date
    Dec 2011
    Location
    Down South California
    Posts
    207
    Quote Originally Posted by GWS View Post
    What? You didn't get TylerR's wonderful Polypropylene bed that can do this with NO supports?

    Of course I did. Didn't fall of the turnip truck yesterday, you know. Some guy named GWS told me about it. Here is a 270 mm tall #9 drop tube.

    Click image for larger version. 

Name:	IMG_1562.jpg 
Views:	10 
Size:	34.8 KB 
ID:	316070


    I added supports for the large flat circle where the Lee bullet feeder inserts into spring drop tube, worked out fine. Support stayed on bed when part was removed also. I might try without support but have some idea it will be a spaghetti factory in there if I do.

    GD

    PS: They do not appear to be making the 320 X 310 mm bed we need any more though.
    Last edited by Gillie Dog; 07-16-2023 at 09:06 PM. Reason: PS:
    #2 member of the 10%ers

  14. #6534
    Boolit Master GWS's Avatar
    Join Date
    May 2019
    Location
    New Mexico
    Posts
    1,366
    I'm getting really old....can't remember who I told what anymore........but from that last picture.....you may have the record tall skinny success. I don't know what I was thinking.....well yes I do....raft, not supports. Just read your post wrong in my head.....see....senility is after me.

    Yeah now I understand. For that Lee part, I might even be tempted to print a third little dome piece rather than that really tall support. Done that and it's just a pain to clean up. (of course that was a starwars helmit for my grand son...life size!) The third piece would be a little cone top to allow the 3D adapter to be printable without support, with its inside beveled dome....then the print could be faster printing. Maybe.....so how much longer did it take to print with the inside support?

    Here's the third part I'm thinking about....just something to rest on the Lee flat top and make it like TylerR's printed ones.....I'd probably just glue it inside the adapter.......


    If the support works okay, and doesn't add too much time......you probably have the better, simpler idea.
    Last edited by GWS; 07-17-2023 at 01:53 AM.

  15. #6535
    Boolit Buddy Gillie Dog's Avatar
    Join Date
    Dec 2011
    Location
    Down South California
    Posts
    207
    Quote Originally Posted by GWS View Post
    Yeah now I understand. For that Lee part, I might even be tempted to print a third little dome piece rather than that really tall support. Done that and it's just a pain to clean up. (of course that was a starwars helmit for my grand son...life size!) The third piece would be a little cone top to allow the 3D adapter to be printable without support, with its inside beveled dome....then the print could be faster printing. Maybe.....so how much longer did it take to print with the inside support?

    Here's the third part I'm thinking about....just something to rest on the Lee flat top and make it like TylerR's printed ones.....I'd probably just glue it inside the adapter.......


    If the support works okay, and doesn't add too much time......you probably have the better, simpler idea.
    Yes, the little cone part would/will work well just super glued in. I have remade the spring drop tube completely accept for the twist lock in the top which is from TylerR's part and sticking a 45 degree bevel inside and adding a little flat bottom cone will be simple to do. Might have to do one just to see.

    The support is about 14mm tall and takes an extra 14 minutes to print on a 30 cal one, 15% longer, and 4 minutes on the 45 cal one, 4% longer, because of hole size in drop tube being different. Only need to print one each to make a set and at this point do not know which I might use as have only tested/played with the 35 cal/9mm one.

    Have made all of them because of the miniscule amount of time needed to produce each. Probably two or three minutes. First one might have taken 20 to 30 minutes once I stopped modifying TylerR's and made one from scratch (except the twist lock). All good learning exercises.

    GD

    PS: Printing a 300 mm collator now dedicated to/for pistol brass as suggested................
    #2 member of the 10%ers

  16. #6536
    Boolit Master GWS's Avatar
    Join Date
    May 2019
    Location
    New Mexico
    Posts
    1,366
    Quote Originally Posted by Gillie Dog View Post
    PS: Printing a 300 mm collator now dedicated to/for pistol brass as suggested................
    I think it's the perfect size for brass period. One can get by with pistol brass in the smaller one just fine.....but the 300 is big enough to handle about anything. Mongo? Even bigger, but my printer won't print one that big. Good thing the 300 is ample.....and thanks to TylerR for having mercy on us with smaller printers than his 350x350mm bed version.

  17. #6537
    Boolit Mold
    Join Date
    Apr 2021
    Posts
    3
    Tyler,

    I know this is ancient history for you but new for 67 year old me, just got a Lee App and I’m only looking for the 4 hole case feeder and upgraded case slider, I don’t shoot enough to justify building a complete electronic feeder. I haven’t bought a 3d printer, but considering an Elegoo Neptune 3 just don’t know if I would use it for anything other than reloading.

    Thanks
    Mike

  18. #6538
    Boolit Mold
    Join Date
    Aug 2022
    Posts
    16
    Solved: Drilled out to nearly 6.5mm. It took a lot of material out. Works now but not so sure why ID was so small. Should have been 6.3mm.

    Anyone have issues with #6 drop tube not
    accepting 6mm bullets? My print looks really good and has no defects that i can see, but my Berger 109 LRHT bullets will not pass - either from the top or the bottom. I tried a #7 but because of the very long pointy tip and long boa tail, the bullets have just enough room to wedge in there. Next plan is reaming them w a drill bit but that may not be easy either.
    Last edited by Mbeavers1; 07-23-2023 at 02:52 PM.

  19. #6539
    Boolit Buddy Gillie Dog's Avatar
    Join Date
    Dec 2011
    Location
    Down South California
    Posts
    207
    Quote Originally Posted by Mbeavers1 View Post
    Solved: Works now but not so sure why ID was so small.
    Have you calibrated your printer?

    Calibrated my printer per link in the collator manual and it makes the holes in drop tubes a tiny amount larger than nominal from the manual, close to 0.1 mm larger which is a really small number, 0.003937".

    Just a thought.

    GD
    #2 member of the 10%ers

  20. #6540
    Boolit Buddy Gillie Dog's Avatar
    Join Date
    Dec 2011
    Location
    Down South California
    Posts
    207
    Quote Originally Posted by Shooter74 View Post
    I’m only looking for the 4 hole case feeder and upgraded case slider
    Page 16 of the collator manual has an explanation of the available APP parts to print from the download and connection(s) on the APP.

    GD
    #2 member of the 10%ers

Posting Permissions

  • You may not post new threads
  • You may not post replies
  • You may not post attachments
  • You may not edit your posts
  •  
Abbreviations used in Reloading

BP Bronze Point IMR Improved Military Rifle PTD Pointed
BR Bench Rest M Magnum RN Round Nose
BT Boat Tail PL Power-Lokt SP Soft Point
C Compressed Charge PR Primer SPCL Soft Point "Core-Lokt"
HP Hollow Point PSPCL Pointed Soft Point "Core Lokt" C.O.L. Cartridge Overall Length
PSP Pointed Soft Point Spz Spitzer Point SBT Spitzer Boat Tail
LRN Lead Round Nose LWC Lead Wad Cutter LSWC Lead Semi Wad Cutter
GC Gas Check