RepackboxSnyders JerkyRotoMetals2Inline Fabrication
Titan ReloadingWidenersMidSouth Shooters SupplyLee Precision
Load Data Reloading Everything

Thread: Making that Bullet Collator

  1. #6361
    Boolit Master GWS's Avatar
    Join Date
    May 2019
    Location
    New Mexico
    Posts
    1,355
    Quote Originally Posted by Corbindallas View Post
    Thanks
    What does this mean? I need to print the plate higher?
    I'll do my best to explain.....

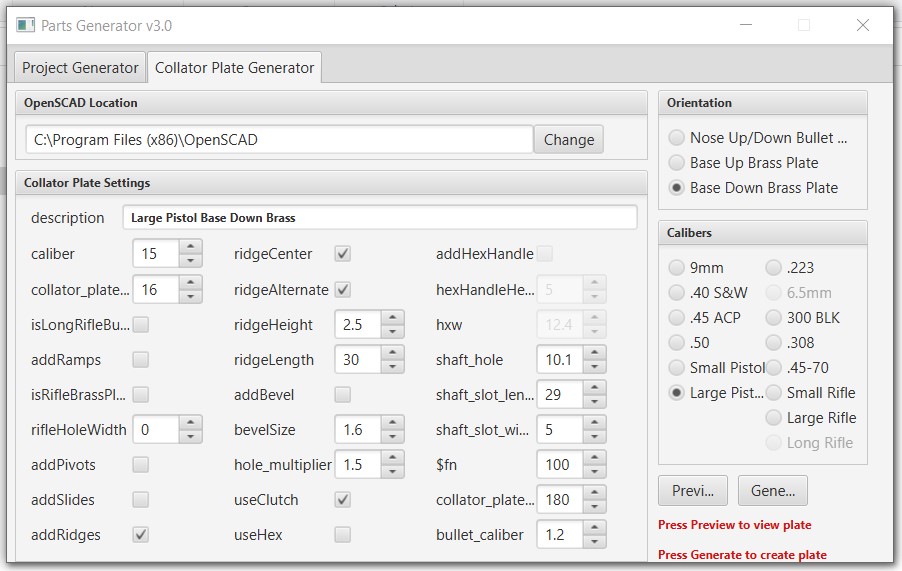
    1. First go to and open the Parts Generator.....then click on the right tab which says, "Collator Plate Generator." You should see the picture below:


    2. Then on the right under "Orientation", pick "Base Down Brass Plate."

    3. Under "Caliber", pick "Large Pistol." (below that you'll see red print....that describes how to preview your plate...go ahead and preview it before you make the height change......then "X" out of that and get back to the previous screen.)

    4. Then on the LEFT side it lists the parameters for the plate design.....first one says caliber 15....second one says Collator_Plate... 8. That second one means the plate will print 8 millimeters high.....a .357 case is 32mm high! Too low for a tall wobbly case....so change that # to 16 as shown in my illustration....it'll work MUCH better! Now preview it again and it should look like the picture below:


    Notice the next to the last parameter..... should say, "collator_Plate....180" This time it's Plate diameter and 180 is the normal size plate which is plenty big for pistol bullets.....if you want it for 300 size or Mongo base, you'll need to change that number.

    Then just save to a .STL by pressing "Gen" next to where you did the previews......make your G-code file, and print.

    .357/.38 wasn't included in TylerR's list of plates because he doesn't shoot that....so he wouldn't want to print one for it.

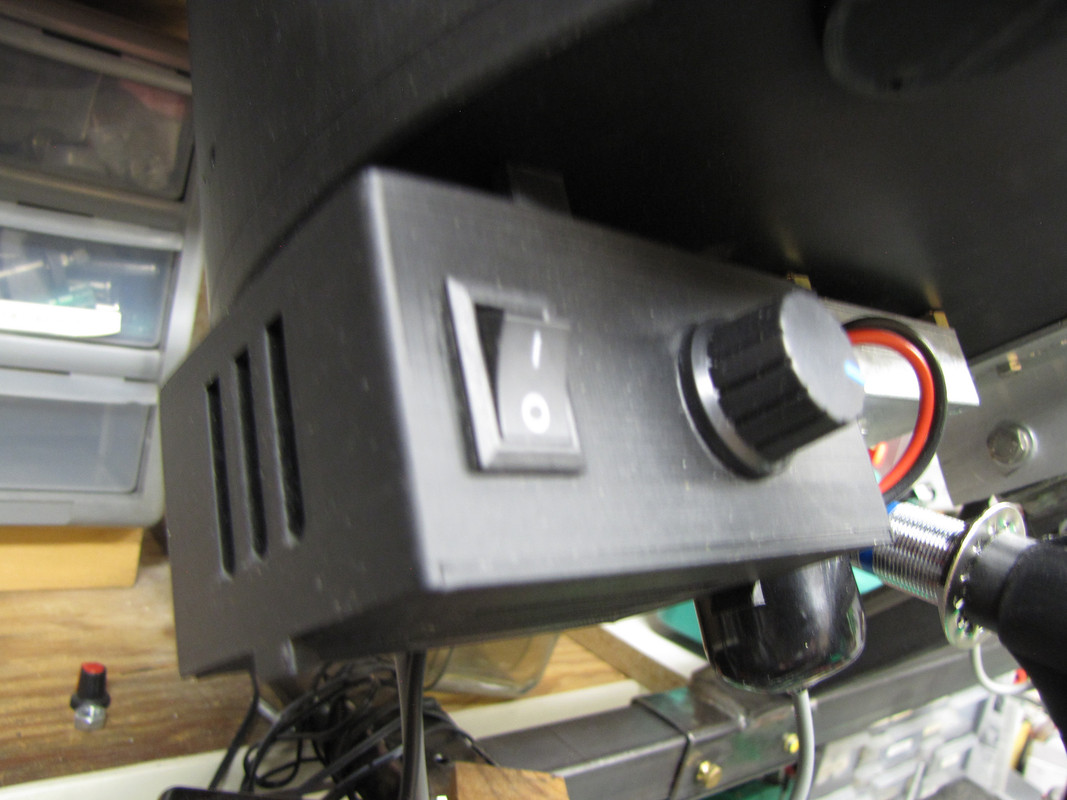
    You will also want to print a brass slide and drop tube....and a short plug for the normal bullet drop hole. Somewhere is a brass slide that doesn't have the opening adjustable....it's just wide open. You can use the adjustable one, but use the tightening screw to hold it wide open or you will not drop them fast enough not to hang.

    Food for thought......You really can choose the "small pistol" rather than "large pistol" as the holes in the small one are 12mm diameter and the large one's holes are 15mm. But what I found is that sometimes longer cases get hung up, when they don't drop fast enough....IOW's a smaller hole's trailing edge may beat the long case to the edge of the drop hole.....leaving you with the choice to slow it down to a crawl. The 15mm hole doesn't seem to cause problems and that edge doesn't come as fast. I suppose if 2 cases doubled together you might have a problem, but I just haven't seen that. But nothing wrong with trying the small pistol size, but why if the large one works.....and you can also use it for .45. IOW's why print 3 plates when one or two work for what you shoot.
    Last edited by GWS; 02-22-2023 at 12:46 AM.

  2. #6362
    Boolit Mold
    Join Date
    Nov 2017
    Posts
    10
    Quote Originally Posted by r4ndy View Post
    In the contributors section of the files see Tander’s Dillon…

    There are files to connect a 1” square tube to the post on the Dillon. Works awesome! Please ignore my bad cable dressing.
    Nice, this would absolutely work for me as well. Is that the small or large electronics box that you printed?

  3. #6363
    Boolit Mold
    Join Date
    Nov 2017
    Posts
    10
    Thanks GWS
    I understand much better now. I´ll go for the large one as I in that case also can use it for 44 Mag (I only reload revolver calibers as that is what I mostly shoot).

    How about the plate for the bullet feeder, do I need to use the collator plate generetor also for this one as 38/357 is missing, or do any of the other work?

  4. #6364
    Boolit Bub
    Join Date
    Apr 2018
    Posts
    58
    Quote Originally Posted by JStuhlmiller View Post
    r4ndy,

    Great setup. I see you are using the photosensor did you have an issue getting the bullet feeder die to sit on the DAA feeder die? Mine doesn't fit.
    I had to file and sand it to get it to fit.

  5. #6365
    Boolit Bub
    Join Date
    Apr 2018
    Posts
    58

    Making that Bullet Collator

    Quote Originally Posted by Corbindallas View Post
    Nice, this would absolutely work for me as well. Is that the small or large electronics box that you printed?
    IIRC this is an alternate box someone else created. I believe it is in the contributors folder. If you can’t find it I can do some searching and come up with more info. I definitely got it either from the contributors or someone on this forum thread. I did drill a hole to add the middle switch for the press light.

  6. #6366
    Boolit Bub
    Join Date
    Apr 2018
    Posts
    58
    @corbindallas and @JStuhmiller - apologies - I got my wires crossed. I should have waited until I was in front of the PC rather than trying to use my memory.

    The box I used is from Tanders Dillon Setup in the contributors files.

    The mount is from KC10 Kevin Double Dillon Mount in the contributor files

  7. #6367
    Boolit Master GWS's Avatar
    Join Date
    May 2019
    Location
    New Mexico
    Posts
    1,355
    Quote Originally Posted by Corbindallas View Post
    Thanks GWS
    I understand much better now. I´ll go for the large one as I in that case also can use it for 44 Mag (I only reload revolver calibers as that is what I mostly shoot).

    How about the plate for the bullet feeder, do I need to use the collator plate generator also for this one as 38/357 is missing, or do any of the other work?
    No. For .357, just use the very good Small Pistol Bullet Plate #5. The critical part there is the angle of the collator and the slide plate and its distance out from the base......use the hole in the back of the slide and screw in a hex bolt. That will give you the fine adjustment needed to keep your bullets that are base down from falling off the edge and flipping like the nose down bullets are supposed to do.

    The slide is the #5 BNU. (bullet nose up)

    Last edited by GWS; 02-22-2023 at 01:49 PM.

  8. #6368
    Boolit Mold
    Join Date
    Nov 2017
    Posts
    10
    Sorry for all the newbie questions, but when using the Collator Plate generator and use preview, a window pops up, but nothing is shown. If I press "generate", it lets me know that a plate is generated with name as per description, but I can not find the file.
    So I´m guessing I´m doing something wrong. I did download and install OpenScad without changing anything.

  9. #6369
    Boolit Master GWS's Avatar
    Join Date
    May 2019
    Location
    New Mexico
    Posts
    1,355
    Go up to my post with the illustrations of the program.

    The first line says "OpenScad Location" make sure that location is really where your OpenScad download resides. If not change that line to where it is.

    The generated files should appear in the folder where your TylerR download is. The generation of a plate takes a little time....be patient.

    TylerR may have more to add. He has a lot more experience and insight on this.

  10. #6370
    Boolit Mold
    Join Date
    Nov 2017
    Posts
    10
    Got it to work now, Thanks!

  11. #6371
    Boolit Buddy
    Join Date
    Sep 2014
    Location
    Houston, TX
    Posts
    212
    GWS, I need a favor. I want to re-print the main body "Main_Body_ETZGMP38" because I am tired of my cases getting stuck in the screw holes on the side of the body. I have tried putting screws in the holes but the tip of the cases always get stuck in the holes. Can you modify the body and remove the holes for the screw so I can re-print.

    I added a picture with the holes that I would like removed on the sides, I don't use those holes for anything.

    Click image for larger version. 

Name:	Capture.JPG 
Views:	16 
Size:	35.6 KB 
ID:	310819

  12. #6372
    Boolit Master GWS's Avatar
    Join Date
    May 2019
    Location
    New Mexico
    Posts
    1,355
    That wouldn't be hard to do, but it's a lot of trouble and time for you to print another one. if it were me, I'd get some black epoxy putty from Home Depot and fill the holes.

  13. #6373
    Boolit Buddy
    Join Date
    Sep 2014
    Location
    Houston, TX
    Posts
    212
    Quote Originally Posted by GWS View Post
    That wouldn't be hard to do, but it's a lot of trouble and time for you to print another one. if it were me, I'd get some black epoxy putty from Home Depot and fill the holes.
    Let me give that a shot and see what happens.

  14. #6374
    Boolit Mold
    Join Date
    Jan 2023
    Posts
    8
    Quote Originally Posted by GWS View Post
    No. For .357, just use the very good Small Pistol Bullet Plate #5. The critical part there is the angle of the collator and the slide plate and its distance out from the base......use the hole in the back of the slide and screw in a hex bolt. That will give you the fine adjustment needed to keep your bullets that are base down from falling off the edge and flipping like the nose down bullets are supposed to do.

    The slide is the #5 BNU. (bullet nose up)

    Any chance you could post a picture of the screw and angle of the collator? I think I know what you're saying

  15. #6375
    Boolit Master GWS's Avatar
    Join Date
    May 2019
    Location
    New Mexico
    Posts
    1,355
    Quote Originally Posted by johnpcace View Post
    Any chance you could post a picture of the screw and angle of the collator? I think I know what you're saying


    The #5 slider above.....below is the backside of the slider showing the hole made for a hexhead machine screw. I Think an M3 will self thread into the hole....it's recessed so you can screw it in flush to start....then back it out until it works right.


    The angle of the collator is set by trial & error.

    Notice the raised surface part of the slider in the first picture. When you insert it all the way into the base, the plate may or may not have enough of the raised slider surface showing under the holes to keep the base of the bullet on that raised surface. So you adjust the plate out until it does.....but at the same time not so much that the points of the bullets refuse to fall down to the lower level where they can turn and flip base side down.

    Now for the collator angle: You want the minimum amount of raised surface showing because too much and bullet tips wont fall, too little and even the basedowns fall....not a good thing either, because then they also flip. So to get that "minimum" you want enough angle where base down bullets will lean into the inside edges of the holes and not require very much raised surface under them (so they don't lean the other way and fall).

    Clear as mud right? But you can see why it's trial and error because every bullet shape and size will be different.
    Last edited by GWS; 02-24-2023 at 01:02 AM.

  16. #6376
    Boolit Mold
    Join Date
    Jan 2023
    Posts
    8
    Quote Originally Posted by GWS View Post


    The #5 slider above.....below is the backside of the slider showing the hole made for a hexhead machine screw. I Think an M3 will self thread into the hole....it's recessed so you can screw it in flush to start....then back it out until it works right.


    The angle of the collator is set by trial & error.

    Notice the raised surface part of the slider in the first picture. When you insert it all the way into the base, the plate may or may not have enough of the raised slider surface showing under the holes to keep the base of the bullet on that raised surface. So you adjust the plate out until it does.....but at the same time not so much that the points of the bullets refuse to fall down to the lower level where they can turn and flip base side down.

    Now for the collator angle: You want the minimum amount of raised surface showing because too much and bullet tips wont fall, too little and even the basedowns fall....not a good thing either, because then [I]they[I] also flip. So to get that "minimum" you want enough angle where base down bullets will lean into the inside edges of the holes and not require very much raised surface under them (so they don't lean the other way and fall).

    Clear as mud right? But you can see why it's trial and error because every bullet shape and size will be different.
    thank you! I got it..

  17. #6377
    Boolit Mold
    Join Date
    Nov 2017
    Posts
    10
    Took me a few days, but now I have read through the whole thread. Interesting to find out how it all has developed, great job!
    I have discovered that I might “need” an APP press as well though. I did not know that before this thread …
    I’m guessing that it would be possible to use an APP both for bullet sizing and de-prime without to much trouble changing whatever needs to be changed between those tasks?

  18. #6378
    Boolit Mold
    Join Date
    Jan 2023
    Posts
    8
    Ok, So during the process of making a few of the Collators I have run into a few problems that annoyed me to no end. One being the electrical box template having a ton of unnecessary holes in it for the amount of heat the 2 little boards produce and that the slide lid in my opinion was terrible. I wanted a lid that screwed on and a box that was easy to adjust and service if needed. I have completely redesigned the box and lid. I have included the file here for others to use. I have tested this and it works fantastic.

    The other thing that was annoying was that the drop tubes for the light sensor setup the center holes were a tad tight and the bottom hole was not big enough for the DAA bullet feeder dies. I don't want to spend 5 or 6 hours printing a drop tube to have to modify it, besides that I didn't have the proper size drill bits to modify anyways. So I spent the time with tinkercad and Fusion 360 modifying the files.

    I also labeled the tube with caliber instead of MM. 12mm and 12.2 mm doesn't mean anything to most of us Yanks but 45 ACP is pretty clear. you will have to print these drop tubes with a brim because of the reduced meat at the bottom of the die. They work flawlessly. I also print 100% infill because I think the extra weight on the BF die works in your favor.New Files.zipClick image for larger version. 

Name:	IMG_3309.jpg 
Views:	29 
Size:	52.3 KB 
ID:	311147Click image for larger version. 

Name:	IMG_3311.jpg 
Views:	25 
Size:	49.7 KB 
ID:	311148

  19. #6379
    Boolit Master GWS's Avatar
    Join Date
    May 2019
    Location
    New Mexico
    Posts
    1,355
    I have printed several electrical boxes....only the first one with screws. I much prefer the tool-less sliding top.

    I also choose to mount them under the collators...probably has a lot to do with my shorter stature. Pictures below show the one I like now, for my preferred proximity sensor drop tubes. I find them much more trouble-free than light sensors. But we are all different....float your boat the way you see fit.


    The above box does require a tiny hole conversion part to align holes under the base to the two holes in the box that are aligned with holes in the little electronic switch and speed control board that I like. The three files, box, lid, and mount are in my little folder in the "contributors" folder. I also list all the electronic parts I like to use. TylerR has his favorite boxes and parts too. The best part is we can all choose and buy what works best for us.

    Sorry you've had some annoyances.....guess I was luckier.....no annoyances yet, accept those caused by the 3D printer learning curve.
    Last edited by GWS; 03-02-2023 at 08:20 PM.

  20. #6380
    Boolit Master GWS's Avatar
    Join Date
    May 2019
    Location
    New Mexico
    Posts
    1,355
    Quote Originally Posted by Corbindallas View Post
    Took me a few days, but now I have read through the whole thread. Interesting to find out how it all has developed, great job!
    I have discovered that I might “need” an APP press as well though. I did not know that before this thread …
    I’m guessing that it would be possible to use an APP both for bullet sizing and de-prime without to much trouble changing whatever needs to be changed between those tasks?
    I've never sized a boolit in my life, so I wouldn't know, but I have looked at the product, and it seems to be just a move from case feeding to bullet feeding and the bullets are pushed down instead of primers and pushed through the sizer.

    I have used the primer pocket swager tool and if you take the time to go through the instructions carefully, it works better than any other such tool.....especially in that it has a case feeder and the other tools don't.

    Others who do use the bullet sizer, need to answer your question better than I have. Just don't have the experience with it.
    Last edited by GWS; 03-03-2023 at 07:09 PM.

Page 319 of 361 FirstFirst ... 219269309310311312313314315316317318319320321322323324325326327328329 ... LastLast

Posting Permissions

  • You may not post new threads
  • You may not post replies
  • You may not post attachments
  • You may not edit your posts
  •  
Abbreviations used in Reloading

BP Bronze Point IMR Improved Military Rifle PTD Pointed
BR Bench Rest M Magnum RN Round Nose
BT Boat Tail PL Power-Lokt SP Soft Point
C Compressed Charge PR Primer SPCL Soft Point "Core-Lokt"
HP Hollow Point PSPCL Pointed Soft Point "Core Lokt" C.O.L. Cartridge Overall Length
PSP Pointed Soft Point Spz Spitzer Point SBT Spitzer Boat Tail
LRN Lead Round Nose LWC Lead Wad Cutter LSWC Lead Semi Wad Cutter
GC Gas Check