Here are my speed settings.
Perimeters 25
Infill 50

|
   
   
|


|


Here are my speed settings.
Perimeters 25
Infill 50
Current progress
The option I was referring to should be in the infill settings, not the speed settings. At least that's how Cura is anyway. Your speed settings look normal I think. Your top solid infill is probably the same as Cura's top skin setting. Don't think mine is quite that fast.
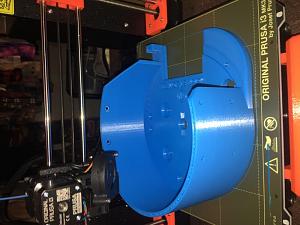
Main bodies do take some time to print. My mongo body took 92 hours. Made sure the weather forecast was clear before starting that one.
Yeah, I just wanted to post my speeds incase they were off.
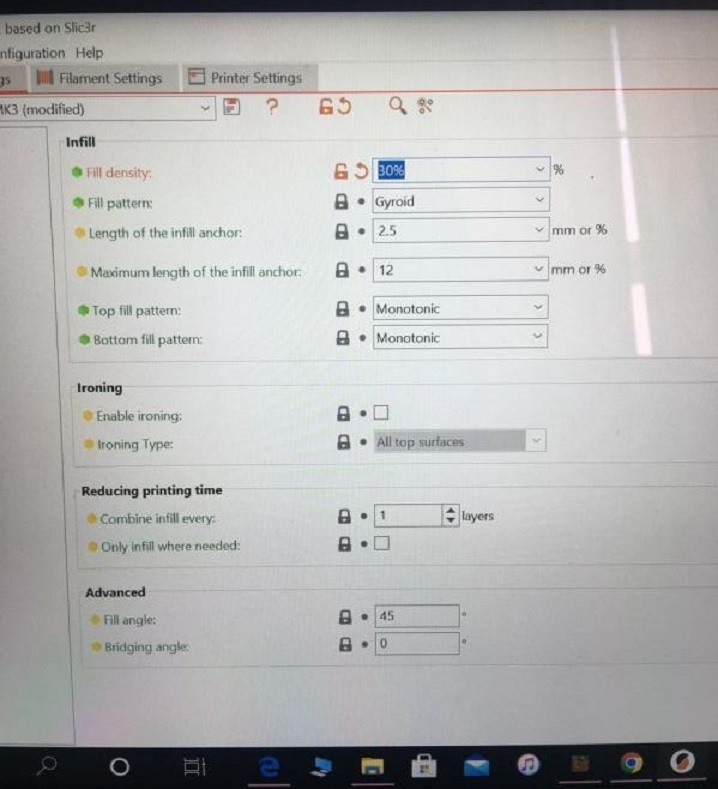
Here is my infill page.
Not sure why its sideways?
Last edited by Huntinherrington; 09-04-2022 at 05:01 PM.
Based on what I have seen from others, My time is somewhat normal but when I was asked why it was such a long time because theirs was 14 hrs....Originally Posted by M500

A mk3 can handle much higher speeds. Those aren't the stock settings because the undo button is showing that they've been changed.
Perimeters and external perimeters can be set to at least 60, the volumetric settings will limit the speed. Infill can go 200mm/s. Even on the . 20 SPEED settings, I always go and adjust the slower perimeter settings to 70.
I changed them to what the user manual for this collator stated.
I will speed everything up on the next one. Maybe even change to .3 layer height.
I noticed that the user manual settings were a bit slower than the factory .20 quality default setting but didn't want to mess anything up.
This is my first print other than the test prints and I did print the ramp just to test the settings.
That's fair. The stock settings in prusa slicer are dialed in exactly for that printer though, so in that regard, it's easy to trust them.
Thank you for your input!! I really do appreciate it!! I would be pulling it off the printer now if I would have known that lol
You might find it easier when you print your second body! If you do go to .3 layer height, then I recommend printing the slide plate at the same layer height or smaller, and it will fit no issues into the body.
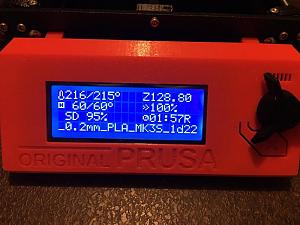
AM Progress Report!!
On the home stretch!!

I see that a lot on this forum, but it never happens to me. Interesting.
I downloaded your picture, turned it right side up, added it to my Postimage account, then tried reposting....using the following line:
I don't even know what they mean by "infill anchor"????
As for infill percentage though, I always use 18 percent infill, and I've been plenty happy with mine.
I've never trying printing layers more than .2. I do print .12 layers for small parts, especially bullet feed dies.....they seem to work better than .2 with those ball bearings.
Your base print looks great from here! It took how many hours?
Last edited by GWS; 09-05-2022 at 11:44 PM.
It turned out amazing!
I’m going to lower the infill to 20% and use the factory default .2mm speed settings.
I have the small pistol plate on right now with that setting to see how it does. Using 10% infill on the collator plate
Small pistol plate is complete. Quality is lacking on bottom layers. Its like it is to high but my first layer calibration looks perfect.
I started a rifle plate.
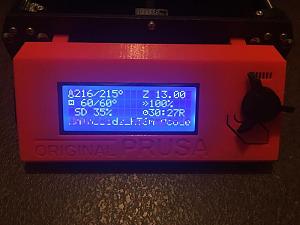
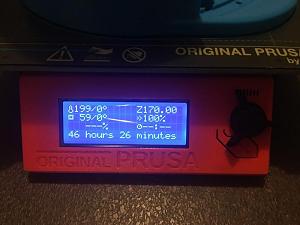
Now it is alternating the remaining time and some other timer on the screen.
What is the other timer?
It has a C instead of an R after the time.
EDIT: Lowered Nozzle down another -.100 and its perfect so far. Still on the first layer though.
Still trying to google what this timer is with a C. I hope it doesn't shut my print down mid print!
Last edited by Huntinherrington; 09-06-2022 at 08:52 AM.
The timer thing may be a Prusa thing....never seen two. The only timer I see in "IdeaMaker"on Creality is elapsed time....and percentage complete. Maybe that's another form of the same thing?
Maybe the 10 percent infill is a bit low, and caused quality problems. The lower infill may cause spaces too large that the filament has to bridge, causing the problems.....but you are saying bottom layers???? The bottom layers are usually 0% infill!....solid! So why quality problems there?
You lowered the nozzle down another -.100? If you mean baby stepping during the first layer, down .100, that's a normal for me....I lower and while looking with good light and magnifier drop the nozzle until the layer is a bit flat on top, more or less as required. That squeeze is what allows the layer to fill-in smooth between.
I try to "babystep" during the brim lay down, but on small prints you can't see under the nozzle well enough so I repeat the last babystep on the previous print.....if it's .1 down so be it. Usually works fine that way.......but keep in mind that filament brands are different. Some require more and some less.
But a too high nozzle off the bed, can ruin the whole print...won't be smooth, may not adhere. Too low....ditto, the filament has no room to lay down a good layer....and the nozzle can clog. (done it all) Perfect is a little flat on top.
Last edited by GWS; 09-06-2022 at 09:42 AM.
The main body printed wonderfully but I was printing at alot slower speed. Once I sped it up I started having the bottom layer issue. The nozzle was to high. I slowly stepped it down during the print until it looked good.
Just a lesson for a new user that things change with different speeds. What looks perfect with slow speeds can show errors when bumping the speed up!
It was a good learning experience.
As far as the timer is concerned, both timers are counting down.
It has a separate percentage completed on the display as well.
I cancelled the previous print after I adjust the nozzle height to start a new print with it dialed in.
Maybe it's some sort of timer for the remaining time that that print had? I have no idea.
Well, It's for color change.... I unknowingly added several different colors in the slicer!!
Glad you figured that mystery out. I don't feel the need for more than one color for what I print thank goodness! Now my "IdeaMaker" software does "textures".....I'm totally ignoring that, too.
However RedlegEd sent me a copy of his two-color clutch cap with cannons!......neater than hell!.....but still not enough to influence this old dog to learn how to do that. Here's a picture of it......so you may be inspired since yours does that.

(the files are probably in TylerR's downloads under "contributions", RedlegEd.)
Don't print that small rifle plate tho....it was custom using the plate maker and I put WAY too many risers. Tyler's rendition probably feeds faster even with fewer holes. (pictured below)

Last edited by GWS; 09-06-2022 at 11:30 PM.
I printed the body, small pistol & Large Rifle plates.
I also printed all the bullet nose up plates, flipper, sweepers, & angled adapter.
I just have the wall extension, the rest of the collator plates, and Dillon hang mounts left.
Unfortunately I am out of town for 2 weeks.
 Posting Permissions


| BP | Bronze Point | IMR | Improved Military Rifle | PTD | Pointed |
| BR | Bench Rest | M | Magnum | RN | Round Nose |
| BT | Boat Tail | PL | Power-Lokt | SP | Soft Point |
| C | Compressed Charge | PR | Primer | SPCL | Soft Point "Core-Lokt" |
| HP | Hollow Point | PSPCL | Pointed Soft Point "Core Lokt" | C.O.L. | Cartridge Overall Length |
| PSP | Pointed Soft Point | Spz | Spitzer Point | SBT | Spitzer Boat Tail |
| LRN | Lead Round Nose | LWC | Lead Wad Cutter | LSWC | Lead Semi Wad Cutter |
| GC | Gas Check |

 Reply With Quote