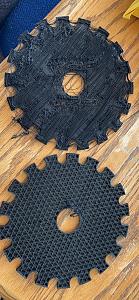
Just a quick question. I am getting ready to mount the drop hole adapter to the main body. Do you guys pre-drill the holes at all, or does an M1 or M2 screw fit in nice without stripping or cracking?

|
   
   
|


|


Just a quick question. I am getting ready to mount the drop hole adapter to the main body. Do you guys pre-drill the holes at all, or does an M1 or M2 screw fit in nice without stripping or cracking?

I'm sure others have varied from my screwing in M2's directly in the holes, but they worked, tightened right up. No tapping was necessary, no cracking either. They seemed to self-tap.Originally Posted by RedBarachetta


I am interested in the mount for round tube.
Sent from my SM-N981U using Tapatalk

No pre-drilling necessary. A machine screw will thread right in.
Attaching stl files here that I messaged you about...since I can't attach in pm's
Attachment 295600
Also have stls for LED lighting if you have an interest....
RCBS went setscrew crazy on that press....the die plate holddowns I replaced with brass thumbscrews as pictured above.....you only snug them (take the play out) .... PC7's have been broken from people using a wrench on those setscrews.
Last edited by GWS; 02-01-2022 at 01:08 PM.


Here are the electronics box mount files if anyone wants them.
Electronics Box Mounts.zip
USAF Retired
WAR EAGLE!
"A government that does not trust its law abiding citizens to keep and bear arms is its self unworthy of trust."
- James Madison
I can add to contributors folder if you like.
Sure thing sir.
Sent from my iPhone using Tapatalk
USAF Retired
WAR EAGLE!
"A government that does not trust its law abiding citizens to keep and bear arms is its self unworthy of trust."
- James Madison
https://github.com/BF556/Feeder/blob..._Box_Mount.zip
Hi Tyler, feel free to add this one to the contributors folder as well...
postmount.zip
Last edited by silahtar; 02-02-2022 at 05:04 PM.
Done!
https://github.com/BF556/Feeder/blob..._Box_Mount.zip
Hello all! This is my first post here, and thanks for all of the R&D y'all have put into this ambitious endeavor.
Anyone care to help with diagnosing a print? I printed most of the main body parts just fine. I haven't seen this particular type of failure before. The first photo is effectively what I detached from the bed. The second is a 180 degree flip of the top surface from the bottom surface. It seems that the top layer failed to bond to the infill, but I'm not sure why. Happy to share the gcode or Cura project as well. Thanks for any insight!
Can't imagine what went wrong without more info. What brand and material is your filament? What temperature was your nozzle printing at? Nozzle size? Bed temperature? Bed material? Which printer?
You said other parts printed fine? Even the base? Using the same filament and temperatures? Same slicer gcode as the good prints?
There are lots of surprises with 3D printing.....I've had a few....it gets better. The Cura using guys will be along soon, so you might post a few screen shots of at least the first couple of pages of the slicer settings......and make dang sure you didn't change anything there from first prints that worked.
Last edited by GWS; 02-04-2022 at 04:49 PM.
Was the bottom still adhered to the bed? I sorta looks like you might have had a clog of some sort for nearly a while, or some other anomaly that lead to a few layers missing, then it took a lot of spaghetti laid on top of too large of a gap until it settled and "finished" the print.
These aren't the craziest geometry or require any crazy settings.
What could do this: temporary clogs, heat creep (though usually this is fatal so it wouldn't print anymore following a clog in the hot end), cracked extruder arm (this leads to a lot of random issues and frustration).
Are you running the stock extruder? Have you run other long prints recently with success?
Sent from my Pixel 5 using Tapatalk
Another question: is the bottom before it went haywire good quality? Is it there issues there also?
Sent from my Pixel 5 using Tapatalk
esun pla pro; bed at 60, nozzle at 220, bed surface is the standard synthetic magnetic mat that comes on an ender3pro. Same slicer (Cura)
I'm thinking there is more to it. I releveled just incase, (also has an auto-leveler, but I did it manually to just to be sure). I tried printing a temp tower as another test print, and it came out way worse:
Clearly, the temp tower didn't attach.
On the case plate, the bottom was fine before it went crazy. Clog is possible. Nozzle is .4 from a stock ender3pro. I'll see if I can't declog. Stock extruder. I printed the main body a couple days ago, and it came out pretty much flawless. I printed the balance of the main body parts individually yesterday, and they're fine too. Very strange.
This link is a good one to check out. De-lamination can happen for all those reasons. For that .4 nozzle size .2mm layer height is the max height I would do for plates.....for smaller parts I like .12 mm layer height. Flow rate at 100%.
https://all3dp.com/2/3d-print-delami...er-separation/
New nozzle is usually the first thing I change if quality goes down....another thing to check is first layer. Visually the top of the layer should be mashed a little.....if not baby step it down a little or the first layer may not stick well.
I have never seen a top layer discolored like that one.....doesn't make me want to try that PLA brand.
Last edited by GWS; 02-04-2022 at 08:41 PM.
Thanks for the link -- looks like some solid info there. I cleaned the nozzle and successfully printed a temperature tower, so now I'm going again at the case plate (with periodic checking). Printing again at .2 height, same as the main body I printed previously. We'll see how it goes.
I am not a 3d printing expert, but I have to agree with MSUICEMAN and GWS, it seems like maybe a clogged nozzle that then resolved itself. the middle layers of the print are just all messed up based on your pics. Not something I have ever run in to myself. Usually if I get the first 3 layers down well its a done deal.
 Posting Permissions


| BP | Bronze Point | IMR | Improved Military Rifle | PTD | Pointed |
| BR | Bench Rest | M | Magnum | RN | Round Nose |
| BT | Boat Tail | PL | Power-Lokt | SP | Soft Point |
| C | Compressed Charge | PR | Primer | SPCL | Soft Point "Core-Lokt" |
| HP | Hollow Point | PSPCL | Pointed Soft Point "Core Lokt" | C.O.L. | Cartridge Overall Length |
| PSP | Pointed Soft Point | Spz | Spitzer Point | SBT | Spitzer Boat Tail |
| LRN | Lead Round Nose | LWC | Lead Wad Cutter | LSWC | Lead Semi Wad Cutter |
| GC | Gas Check |

 Reply With Quote

