This diagram helped me: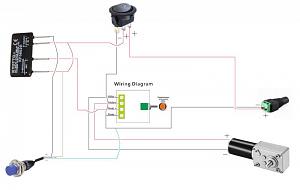

|
   
   
|


|


This diagram helped me:

I like that one as well. I did not create it. Unfortunately its the old setup and I have not bothered to fix it.Originally Posted by wbbh

I'm honestly terribly with circuitry. I did pick up a raspberry pi and a few kits to kinda get better at it all. Soldering is my nemesis. Though maybe it's due to crappy equipment.
Sent from my Pixel 5 using Tapatalk

Soldering is not that hard as long as you apply the iron to the wires, heat the wires, then apply the solder to the hot wires (never to the tool first, if you can help it). Hopefully you are using resin-core solder that's about 1 mm in diameter...not the thick stuff.
I just drafted the wiring diagram for my new box and components, using the New circuit design. (so I can rewire mine) Now nobody better come up with a better circuit!
I will probably add another wirenut so I don't have to have such a long lead to the on/off switch from the 12V power supply, too.
Last edited by GWS; 01-22-2022 at 11:34 PM.
Thanks GWS and TylerR for your help with my wiring issues! I'm happy to say I finally have the issue sorted, and my solution was totally unexpected!
After rewiring my setup using every different wiring diagram in this thread, and still having my NC Proximity sensor sensing a cartridge but not stopping the motor, I ordered and installed a new relay and new speed controller. Same result! So I decided to try the "wrong" NO proximity sensor I had planned on returning to Amazon. Decided to try it to rule in/out the NC proximity sensor, expecting it to react in the exact wrong way (turn motor on when tube full, off when empty.)
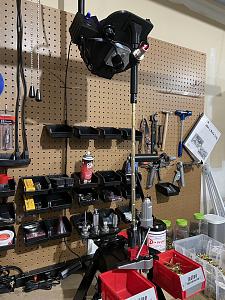
For reasons I cannot explain, that NO sensor did the trick! So I then properly wired everything up in the box, mounted it to a ceiling pole I fashioned, and it works great! The ceiling mount allows me to swap presses on my Inline Fab quick mount and share the feeder with other presses.
This project is definitely going to save me a ton of reloading time!
Here is my setup for when I bulk swage 556 brass:
There's been a few reports of Amazon selling NO sensors on one site, and they turn out to be NC sensors. It appears you got one of those.....glad you found out before you sent it back. The collator looks awesome! Ha! It looks like it is in mid air and gravity free.
Thanks for all of your help!
Here are some more pics that better show the mount. (I'm new to this site so not having the best luck attaching pics)
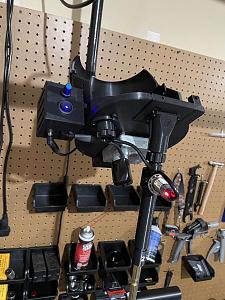
Looks great. I did something very similar to you. I have a case and bullet feeder mounted from a bar so they can be moved to any press on the bench.

That is the diagram I followed. Everything works as best I can tell after 400 rounds. Is there an issue leaving it wired this way?
Most likely not. I am not re-wiring any of mine.
Then I have to ask.......did you try the new wiring to see if it works?.......or is that My job now that I changed my box's wiring diagram!
Full disclosure. I did not. All theoretical. But so was my original relay design. Please let us know if you see any smoke. haha. JK
I doubt with 12 volts there will be smoke.....broken sensor, broken speed control, maybe. Maybe it will sing to me....that could be cool....and actually the word cool might be the important one. Electronics too warm die early.
I have a question about the print recommendation the area that says "walls" it'll say 2 is that for the wall thickness or the wall count. sorry if its a dumb question but when I go to assemble some of the adapters I've been cracking a few. thanks
Wall count
Sent from my Pixel 5 using Tapatalk
Thank you!
If you've been cracking a few, are you printing .2mm high layers? Most of us have found that .12mm high layers makes them fit better. If that doesn't help then maybe you need to calibrate your printer? Didn't TylerR have a calibration link he shared some time or another?
Maybe this one?
https://teachingtechyt.github.io/calibration.html
I think this video explaine it real good for e-steps and flow.
https://www.youtube.com/watch?v=xzQjtWhg9VE&t=444s
No smoke.....works great.....and now I can rest knowing Murfy's Law has been dealt with, and the electronics engineers are satisfied. But will I redo the other three?..............ah, um, no.
My turn for full disclosure: I did discover today that my Proximity tee for small diameter bullets and cases can't be vertical and be 100% at detection. I always leaned my collators so falling bullets are falling against the sensor, but I did make a .223 insert for it.....bullets at least worked fine with bigger calibers. But today .223 cases had trouble too, sense my new rifle case collator drops them vertical.
Perfectly vertical will work better with Tyler's caliber specific downtubes. The only downside is having to change them out when changing calibers.....
I'm playing with the idea to just drop a clear thinwall tube inside.....but then that's changing things too.....so 6 of one.....or half a dozen of the other, is the same, I believe is the saying. For my rifle case collator I may just use Tyler's Drop over Tee on the short version caliber specific downtubes and be done with it. Will try that when I get a downtube for .223 printed....
The thing with case feeders....at least with most rifle calibers is they are long.....and vertical dropping is faster dropping. Faster dropping a long case means they can get out of the way and not be as likely to hang up and test the clutch.
Last edited by GWS; 01-22-2022 at 06:34 PM.


I've been working on designing a PCB (circuit board) that the relay could be soldered onto along with terminal blocks for the connection to the switch, Power supply, motor control, sensor and motor. My thinking is this would make connecting everything simpler and eliminate some of the need to solder wires together and reduce the rats nest in the box. It would also allow things like the sensor to be swapped out easily in the event of a component failure.
I had layed it out based on the old schematic. Trying to determine if it is necessary to change it based on the new wiring diagram.
looks like I could get 20 PCB printed in China pretty cheap. Not sure how long they would take to get here though. I may get a batch of them printed when I finalize things and offer a few of the extras here if there is interest.
Here is what it might look like. Demension are approx 61mm X 47mm

Last edited by ranger391xt; 01-23-2022 at 01:54 AM.
 Posting Permissions


| BP | Bronze Point | IMR | Improved Military Rifle | PTD | Pointed |
| BR | Bench Rest | M | Magnum | RN | Round Nose |
| BT | Boat Tail | PL | Power-Lokt | SP | Soft Point |
| C | Compressed Charge | PR | Primer | SPCL | Soft Point "Core-Lokt" |
| HP | Hollow Point | PSPCL | Pointed Soft Point "Core Lokt" | C.O.L. | Cartridge Overall Length |
| PSP | Pointed Soft Point | Spz | Spitzer Point | SBT | Spitzer Boat Tail |
| LRN | Lead Round Nose | LWC | Lead Wad Cutter | LSWC | Lead Semi Wad Cutter |
| GC | Gas Check |

 Reply With Quote