Titan ReloadingReloading EverythingWidenersRotoMetals2
Load DataMidSouth Shooters SupplySnyders JerkyLee Precision
Inline Fabrication Repackbox

Thread: Making that Bullet Collator

  1. #3601
    Boolit Buddy
    Join Date
    Sep 2011
    Posts
    145
    Quote Originally Posted by TylerR View Post
    I think that is my next project. I am going to create a slip clutch for these plates. Always something new to do
    I posted pics of the slip clutch on the Hornady plates a couple of pages back.
    I can disassemble for better pics if you like.

  2. #3602
    Boolit Buddy
    Join Date
    Mar 2019
    Location
    North Carolina
    Posts
    129
    Quote Originally Posted by bigmike111 View Post
    Are you doing that in Cura? I'm currently using Prusa and thinking about learning cura just for the plates.

    I jumped on cura with a plate the other day and the print time was nearly twice as long for .2 detail on the stock settings.
    Interesting... Yes I am using Cura.... I've read it can be done in prusa with "Modifier" box or cylinder, then change it to 0% infill in the modifier.

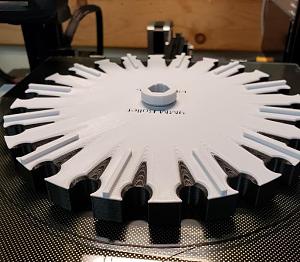
    Printing another 9mm plate, and I was about to run out of filament..... so I cut off the black flush, and with a little panicking and forcing new filament in... This was the end result.... I kinda like how it came out!
    Click image for larger version. 

Name:	20210128_060304.jpg 
Views:	43 
Size:	63.3 KB 
ID:	276254

  3. #3603
    Boolit Master

    Rcmaveric's Avatar
    Join Date
    Jul 2017
    Location
    Jacksonville, FL
    Posts
    2,356
    Depending the printer and most can. You could of just paused the print. Then replaced the filament. Looks cool though.

    Sent from my SM-N970U using Tapatalk
    "Speak softly and carry a big stick; you will go far."
    ~Theodore Roosevelt~

  4. #3604
    Boolit Buddy
    Join Date
    Mar 2019
    Location
    North Carolina
    Posts
    129
    Quote Originally Posted by Rcmaveric View Post
    Depending the printer and most can. You could of just paused the print. Then replaced the filament. Looks cool though.

    Sent from my SM-N970U using Tapatalk
    I saw videos on two methods.... I choose the risky one!

  5. #3605
    Boolit Master GWS's Avatar
    Join Date
    May 2019
    Location
    New Mexico
    Posts
    1,367
    Good to know you can do that......I was wondering what you do with all the "short" spools of filament.....Thanks for the education....

  6. #3606
    Boolit Master

    Rcmaveric's Avatar
    Join Date
    Jul 2017
    Location
    Jacksonville, FL
    Posts
    2,356
    Quote Originally Posted by GWS View Post
    Good to know you can do that......I was wondering what you do with all the "short" spools of filament.....Thanks for the education....
    https://www.google.com/amp/s/amp.rig...ament-together

    Fuse them together.

    Sent from my SM-N970U using Tapatalk
    Last edited by Rcmaveric; 01-28-2021 at 12:20 PM.
    "Speak softly and carry a big stick; you will go far."
    ~Theodore Roosevelt~

  7. #3607
    Boolit Buddy
    Join Date
    Mar 2019
    Location
    North Carolina
    Posts
    129
    Quote Originally Posted by GWS View Post
    Good to know you can do that......I was wondering what you do with all the "short" spools of filament.....Thanks for the education....
    Something else to note... I tried the "pause" method this am.... using the onboard control panel.... But Octi-pi crashed when i did that... I'm doing a smaller print today, and I'm going to try and do the pause from within Octi-pi and see what happens....

  8. #3608
    Boolit Master TylerR's Avatar
    Join Date
    Dec 2008
    Posts
    2,012
    Quote Originally Posted by Anuccite View Post
    Something else to note... I tried the "pause" method this am.... using the onboard control panel.... But Octi-pi crashed when i did that... I'm doing a smaller print today, and I'm going to try and do the pause from within Octi-pi and see what happens....
    On my Ender 5 I just use the change filament option that is part of the stock firmware. I use octoprint as well but have never tried it that way.

  9. #3609
    Boolit Master TylerR's Avatar
    Join Date
    Dec 2008
    Posts
    2,012
    My slip clutch is coming along nicely. Think you guys will like the final product.

    Only issue is, and I hate to admit this, but it may require some support when printing the collator plate. Just no good way to add bevel to the bottom side of the "rotor disk".

  10. #3610
    Boolit Master TylerR's Avatar
    Join Date
    Dec 2008
    Posts
    2,012
    Quote Originally Posted by bigmike111 View Post
    On another note, I think this may be Tyler's photo but I wanted to see if anyone had the STL for the adapter pictured below for the dillon casefeeder.
    I only ever designed the large version, but it should work with a 13mm spring and their large tube. Posted.

  11. #3611
    Boolit Buddy
    Join Date
    Mar 2019
    Location
    North Carolina
    Posts
    129
    Quote Originally Posted by TylerR View Post
    My slip clutch is coming along nicely. Think you guys will like the final product.

    Only issue is, and I hate to admit this, but it may require some support when printing the collator plate. Just no good way to add bevel to the bottom side of the "rotor disk".
    I will volunteer to test

  12. #3612
    Boolit Buddy
    Join Date
    Sep 2014
    Location
    Houston, TX
    Posts
    212
    Quote Originally Posted by GWS View Post
    Good to know you can do that......I was wondering what you do with all the "short" spools of filament.....Thanks for the education....
    Personally I think this is the best filament runout sensor you can get. If your filament jams the extruder will move to the side and wait for you to fix it, it you run out of filament the same will happen. I got tired of failed prints or the electricity going out in the middle of long prints so I use that sensor now. Just today (no clue what happened) my nozzle said it was warming up when I got home, I thought my print completed this morning when I was at work but it didn't. When I got home and saw the extruder parked on the size waiting I wondered what happened. The bed was still hot so the print didn't dislodge. My filament was stuck inside the nozzle, once I fixed that problem the print completed within 1-1/2 hrs. That was a 14 hour print.

    https://www.google.com/aclk?sa=L&ai=...gQIBxBB&adurl=

  13. #3613
    Boolit Buddy
    Join Date
    Sep 2014
    Location
    Houston, TX
    Posts
    212
    Quote Originally Posted by TylerR View Post
    On my Ender 5 I just use the change filament option that is part of the stock firmware. I use octoprint as well but have never tried it that way.
    Tyler, is that the pro or plus? I have been seriously considering getting an ender 5 but the only think that stops me is I already have 4 printers. Plus, if I get another printer I have a bad habit of tearing everything apart then replacing the system board, extruder, pretty much everything on the printer with better parts. And this is even before I use it for the first time.

  14. #3614
    Boolit Master TylerR's Avatar
    Join Date
    Dec 2008
    Posts
    2,012
    Quote Originally Posted by stanford View Post
    Tyler, is that the pro or plus? I have been seriously considering getting an ender 5 but the only think that stops me is I already have 4 printers. Plus, if I get another printer I have a bad habit of tearing everything apart then replacing the system board, extruder, pretty much everything on the printer with better parts. And this is even before I use it for the first time.
    It just a stock Ender 5 that I upgraded the power supply on.

  15. #3615
    Boolit Master TylerR's Avatar
    Join Date
    Dec 2008
    Posts
    2,012
    Quote Originally Posted by Anuccite View Post
    I will volunteer to test
    Are you using pin thru shaft or hex mount?

  16. #3616
    Boolit Master TylerR's Avatar
    Join Date
    Dec 2008
    Posts
    2,012
    Quote Originally Posted by djinnpb View Post
    So excited about the new 2mm wall drop tubes. And I did the one in clear and took some pics and a video. kinda cool to see the infill in there. Might try to light them or something fancy to see the goods in there.

    Thanks again on those. Made all the difference. I've also got the preferred sensor still on the way.. looking like Friday delivery. But now I see why it's absolutely preferred over the photocell. For me it was dreading the time to make another cable where as these are ready to go.

    I want to see some kind of multi color reloading session. Now that would be cool!

  17. #3617
    Boolit Master

    Rcmaveric's Avatar
    Join Date
    Jul 2017
    Location
    Jacksonville, FL
    Posts
    2,356
    Quote Originally Posted by TylerR View Post
    I want to see some kind of multi color reloading session. Now that would be cool!
    Couple of different ways to do that. You can buy multicolor filament. You can splice the colors you want together your self with the link I posted earlier. Or use the manual pause and then swap out. There is a way to program the slicer to pause at various heights for color swaps. You program it the same way you do a temp tower.

    Sent from my SM-N970U using Tapatalk
    "Speak softly and carry a big stick; you will go far."
    ~Theodore Roosevelt~

  18. #3618
    Boolit Master GWS's Avatar
    Join Date
    May 2019
    Location
    New Mexico
    Posts
    1,367
    Quote Originally Posted by Rcmaveric View Post
    Couple of different ways to do that. You can buy multicolor filament. You can splice the colors you want together your self with the link I posted earlier. Or use the manual pause and then swap out. There is a way to program the slicer to pause at various heights for color swaps. You program it the same way you do a temp tower.

    Sent from my SM-N970U using Tapatalk
    Very interesting and informative link, Rcmaveric.....had no idea you could do any of that. Thanks!

  19. #3619
    Boolit Mold
    Join Date
    Jan 2021
    Posts
    4

    Worm Drive Motor Orientation?

    Hey, I have a question. I searched through the many pages here and didn't see it asked yet. I built the AmmoMike bulletfeeder using the 370 motor. So far, so good. I am planning to print the larger case feeder and was thinking of using the larger version of the 370 I found. It has about double the torque. One thing I see now (and in the documentation) is the motor orientation is such that it will block one set of mounting holes. I see there are three choices (90, 180 and 270 degrees).

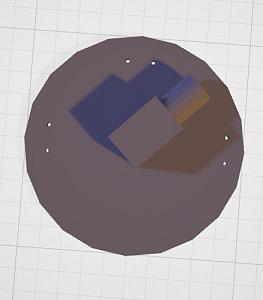
    My question is why only orient the motor over the holes. Has anyone tried orienting the motor at 135 or 225 degrees? I did a (poor) tinkercad example of what I'm thinking. If the motor was oriented this way, it appears it should't interfere with the various mounting options. At least the holes are all exposed. This would be the same principle for the larger case feeder. Mainly, it would allow some of us to use the cheaper motor like THIS. The linked motor seems to have similar torque specs to the recommended one (40kg/cm) at half the cost.

    Forgive my poor tinkercad attempt at illustrating my suggestion. It's not properly scaled, but you should get the idea.
    Click image for larger version. 

Name:	370MotorOrientation.jpg 
Views:	21 
Size:	16.3 KB 
ID:	276325

  20. #3620
    Boolit Master

    Rcmaveric's Avatar
    Join Date
    Jul 2017
    Location
    Jacksonville, FL
    Posts
    2,356
    Probably the perfectionist in us likes things straight.

    With Tinker CAD it's pretty easy to fill in the holes with a block and create your own mount holes.

    TinkerCAD has some pretty powerfull abilities that are hidden. Once you learn them it makes doing things like mount holes quick and easy.

    I keep trying to learn FreeCAD. But those programs aren't easy or intuitive. Tinkercad is easy and I can do some pretty nifty functional pieces and designs.

    Sent from my SM-N970U using Tapatalk
    "Speak softly and carry a big stick; you will go far."
    ~Theodore Roosevelt~

Posting Permissions

  • You may not post new threads
  • You may not post replies
  • You may not post attachments
  • You may not edit your posts
  •  
Abbreviations used in Reloading

BP Bronze Point IMR Improved Military Rifle PTD Pointed
BR Bench Rest M Magnum RN Round Nose
BT Boat Tail PL Power-Lokt SP Soft Point
C Compressed Charge PR Primer SPCL Soft Point "Core-Lokt"
HP Hollow Point PSPCL Pointed Soft Point "Core Lokt" C.O.L. Cartridge Overall Length
PSP Pointed Soft Point Spz Spitzer Point SBT Spitzer Boat Tail
LRN Lead Round Nose LWC Lead Wad Cutter LSWC Lead Semi Wad Cutter
GC Gas Check