Do you have a link to that mount?

|
   
   
|


|


Do you have a link to that mount?
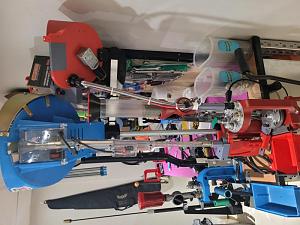
i WAS THINKING A STAND LIKE THIS.Originally Posted by calgarysparky

I have not seen a compatible mount yet, would have to design one.
Attachment 308316
Also Made this today since I havn't been able to find one.
Adapts a rcbs/other primer tray to Lee system.
Just in case I don't make it back by Sunday I want to wish everyone a very MERRY CHRISTMAS!!!!!!!!!
I can't thank everyone enough for all the help and guidance that you all have given me to get this project off the ground... it is greatly appreciated!
well here she is!! Runs flawlessly. Did a 100 round run last night and not a problem. Vid coming this weekend.

Well TylerR, I was bored today.....so I took your short downtubes ( the ones for use below the collator) and filled the light switch holes since all I use is proximity switches. First one is on the printer.......No not at all necessary.....just cosmetic and anal and needed more time on DesignSpark. Don't think I'll ever get comfortable with it....too dumb to learn new tricks well. Here's a screen shot...
Looks like a really slick pivot!I didn't want to change how the sensor Tee fits.....
This is the Drop-Hole-Drop-Tube-Adapter listed in adapters, and I think the manual shows it used with the short down tubes illustrated in my last post (designed for switching off feeding just below the collator). But I'm a little confused what this is for.....especially since the twist lock on the bottom is different than the twist lock on the top. Maybe TylerR could enlighten me here. This is my first serious attempt to replace my own prox tee which uses a sleeve insert for .223 only, with your dedicated #6 downtube and proximity switch tee. Looking forward to trying this method for feeding .223.
What I do now works fine, but you see I have this new winter project.....Lee's 6000 press. Got it doing 9mm great, but I thought I'd venture over to rifle just for fun, and Lee's stock feeding tubes, just don't satisfy when you've been making electric collators does it?
Last edited by GWS; 12-31-2022 at 12:36 PM.
Looks good. I did modify a few of the regular drop tubes to get rid of the light sensor. It does not really change the functionality of them, but a little simpler design for sure.
That adapter is designed to go from the drop hole twist lock to a drop tube. I created it prior to the modified drop tubes (alt) that you posted above. When using the drop tube alts it is un-necessary.
Okay.....now it makes sense! That's good.....one less part to print.
Is it best to print the modified drop tubes upside down with its single ring on the base? Or top up and add inside supports?
I print them with the number upside down, which is how they are designed. Some people have issues with them sticking to the bed that way, but with your poly print surface it should be a piece of cake.
That's what I figured.....3d printers for the most part do as they are told.....except when they don't.
Bottom's Up!
As you can see, the Polypropylene bed Tyler recommends is exceptional to use....the model sticks even when it's top heavy....and easy enough to remove. No masking tape, no bed adhesive needed or wanted. Link follows: https://www.amazon.com/3103103mm-Mam...5802575&sr=8-1
The important steps are, when you first get it home, to use 220 grit sandpaper and buff the bed surface for the proper amount of "tooth." And then wipe the surface dust and contaminate-free before each print with 99% isopropyl alcohol. https://www.amazon.com/dp/B08QDJXCQ1...T1zcF9kZXRhaWw
Proximity switch is now mounted to the #6 alternate drop tube for .223 rifle bullet feeding on the Lee Pro 6000....ready to screw lock under the collator.
Last edited by GWS; 01-01-2023 at 10:43 AM.
Looks awesome GWS! It's funny how many people I have recommended poly beds have not taken me up on it. They still try to use glass, or the stock magnetic bed, or expensive pei beds. But they still can't seem to print a part like you just demonstrated above.
Before I bought a poly P. bed, I spent more time trying (mostly in vain) to find a way to print without lifting than printing. In the case demoed, I decided since there was so little model touching the bed, that I would lower the nozzle a just littttle lower to make it even flatter......ha! it was right already....so I raised it back to where it was. You see the trouble is.....if the nozzle is too low one "glob" on the head will scrape the previous layer off.....and that's worse than too high.
The tape and spray glue methods are just a gigantic PIA. What a waste of valuable time. Never tried pei beds....not necessary imo....and I'd be surprised if there's any merit over these cheap and effective poly P. beds.
What poly p plate are you using? Where did you get it?
GWS posted a link to it up above.
Attachment 308843
I printed a couple and had some weak points, reworked.
Be carfull of the Feed tube size, make sure you give enough clearance.
Interesting concept. Which case are you modeling in this sample? (nevermind....308...reread your 8th post) Would be nice to have a way to name it. (emboss it like TylerR's) But I don't know enough about Scad to do what you've done already let alone that!
I did create the 30-06 and a few others like .270, .308 and .223 in TylerR's cad program, DesignSpark Mechanical, just by creating a square version of a case...slightly oversize to prevent hanging....inserting it in the insert the proper height, in as far as the center point, then removing it and anything that intersected it. In effect....what you did....but I like the concept of being able to set case dimension parameters and do it for most bottleneck cases. I'm too old to learn a programmable cad, Keep up the good work!
Last edited by GWS; 01-04-2023 at 11:39 PM.
I hear you on the label, I'm pretty new at it too, but have a programming background, I am pretty sure I saw a way to do text. Hold my beer!
This is the function in the plate generator
description = "Text to Add";
translate([0, 25, collator_plate_h/2 -0.99 ])
rotate([0, 0, 0]) letter(description,6,1);
module letter(l, letter_size, letter_height) {
font = "Liberation Sans";
linear_extrude(height = letter_height) {text(l, size = letter_size, font = font, halign = "center", valign = "center", $fn = 16);}
}
Last edited by TylerR; 01-06-2023 at 02:47 PM.
 Posting Permissions


| BP | Bronze Point | IMR | Improved Military Rifle | PTD | Pointed |
| BR | Bench Rest | M | Magnum | RN | Round Nose |
| BT | Boat Tail | PL | Power-Lokt | SP | Soft Point |
| C | Compressed Charge | PR | Primer | SPCL | Soft Point "Core-Lokt" |
| HP | Hollow Point | PSPCL | Pointed Soft Point "Core Lokt" | C.O.L. | Cartridge Overall Length |
| PSP | Pointed Soft Point | Spz | Spitzer Point | SBT | Spitzer Boat Tail |
| LRN | Lead Round Nose | LWC | Lead Wad Cutter | LSWC | Lead Semi Wad Cutter |
| GC | Gas Check |

 Reply With Quote


