Could it be a printer calibration problem.....I didn't have any problems like that at .12mm layers.

|
   
   
|


|


Could it be a printer calibration problem.....I didn't have any problems like that at .12mm layers.
That's what I'm thinking too. Although a while ago I did go through and make the calibration squares and calibrated all the e steps, to make sure things were coming out dimensionally correct and it extruded the amount of material it was told. But what's odd is everything else fits together fine. The die screws in(a bit on the loose side though) the die fit together well, and other things I've made all fit correctly. I've spent probably 20-30 minutes sanding with 120 grit emery and it's just now starting to barley fit.Originally Posted by GWS

Sent from my SM-G996U using Tapatalk
Well, after about 45 minutes and burning though about 6 inches of 120 grit emery, I decided it might be faster to Chuck it up in my drill and go at it that way. Until I put too much pressure on it and it snapped...
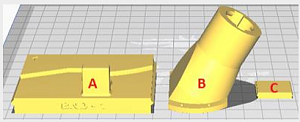
I can't imagine that my printer could be printing things THAT far off, especially since everything else I've printed, even printed on separate days, fit together, like that ammo box I had modified. I also find it odd that every other part between these pieces fit fine. What's the inner diameter of the drop tube, and the outer diameter of the die insert supposed to be?
Sent from my SM-G996U using Tapatalk

OD of die = 16.46mm. ID drop tube = 16.56mm. I assume you have the latest design, not that anything has changed recently.
Last edited by TylerR; 12-01-2021 at 10:28 PM.
It's the 300 blackout one, and yes, I'm using the new one.
Sent from my SM-G996U using Tapatalk
Just to make sure, I downloaded the .stl files off github and measured in 3d cad. Listed numbers above confirmed. It is either an issue with your slicer or printer. 3-4mm is off by a lot. I would start by taking a measurement of the feed die and make sure that is correct. That will at least narrow it down for you.
Cool. I guess I'll reprint the two and hopefully that fixes it.
Sent from my SM-G996U using Tapatalk
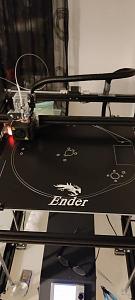
Hopefully it does, but this hobby is full of surprises. Every time I get cocky and think I got it all figured out I have a little reminder that I don't. Take tonight.....I've never had a print fall over and make spaghetti....then....I decide to print with supports, the rifle brass down tube....
Now I'm going to plant that sucker flat on the bed like I did last time instead of how the .stl came....angled. I did it flat on the bottom last time and it worked perfectly.....and it wasn't the bed.....the bed stuck.....the support didn't stick to the model. Go figure....
TylerR....do you happen to remember the angle it's tilted? 30 degrees maybe?

Last edited by GWS; 12-01-2021 at 11:00 PM.
That sounds about right yes. That part does not need support to print.
Last edited by TylerR; 12-02-2021 at 09:25 AM.
On the first one I printed months ago I did rotate the .stl and it printed fine. But the .stl is angled on the bed to make the top vertical, so I "assumed" you had a reason for that, maybe to print the top twist lock better???? So, I decided to try printing it the "right way".Really hard to read my wife's mind.....much harder to read one many miles away.....I know shoulda emailed a question. Maybe I needed to experience spaghetti for the first time.
Anyway will print it again today....hope I have enough Overture Pro black left.
It is designed to be printed like shown here. You know I am not a support guy. There is only one part out of about 270 that requires supports in the whole project.
Unfortunately, what threw me off was opening the .stl file for to slice it, and it was placed on the bed like this:
So I over-thunk it obviously. Maybe this exchange will prevent the next dummy from trying supports....this dummy is printing.....again.
And so it begins.
This is a BIG collator.
Ok so, i think I might have it narrowed down. I think it's over extruding. Even though when I tell it to extrude 10 cm of filament, it extrudes 10cm. I now recall that to get things looking better, I had to turn the flow percentage down 5% ish. Last night I printed both the 10 drop tube and the die insert, and it's still far too large to fit, but I didn't turn down the flow. I should have measured, but my calipers are in the garage and I don't really want to go out and get thembut, I did find the first die insert I got to print, that I think I had the flow turned down for... And guess what, it fits perfect!
Sent from my SM-G996U using Tapatalk
Ok guys, I'm getting confused about which springs I should order...I want to load 9mm and .45
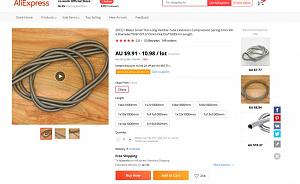
I recommend you go with the 12mm OD(10mm ID) and 15mm OD(13mm ID). You can take care of most anything with those.
Awesome! Thanks Tyler!
I�ll definitely give that 220 a try when I sand the plate down.
Well, I think I've found my issue with my dies not fitting together, and why the older insert fit, but my newer ones did not. Last night I couldn't find the spring adapter that sets into the feeder body. Even with the flow rate set at 90%, it was incredibly tight. After that I decided to go through and check my e steps and flow rate calibration, and the e steps were way off. Not long ago I got a bad nozzle jam and had to replace the nozzle, and I went with a different nozzle, that just must have had different flow characteristics, because my esteps were way too high. Reran an e step calibration and checked my flow rate calibration and reprinted the die insert, drop tube, and adapter, and the parts actually fit! Albeit pretty tight, they actually fit!
I guess what I'm trying to say is, if you change nozzles to a different manufacturer, etc, not, you bought a pack of all the same nozzle and you replaced one with the same nozzle, it would be a good idea to verify your e steps are the same.
Sent from my SM-G996U using Tapatalk
Glad to see you got to the bottom of the issue. That is a good lesson for all of us when swapping out a nozzle.
I'm just wanting to verify this from a bit ago, the 9mm die set will fit a case like 357 sig? or would I need to use the 40 s&w body?
I'm finally getting everything ready and running... kind of with 300 blackout, but realized i printed the wrong slide plate. I think I've been working on this thing for about 2 years now, and hoping the feed plate is my last hurdle!
now all i have to do is get primers...
 Posting Permissions


| BP | Bronze Point | IMR | Improved Military Rifle | PTD | Pointed |
| BR | Bench Rest | M | Magnum | RN | Round Nose |
| BT | Boat Tail | PL | Power-Lokt | SP | Soft Point |
| C | Compressed Charge | PR | Primer | SPCL | Soft Point "Core-Lokt" |
| HP | Hollow Point | PSPCL | Pointed Soft Point "Core Lokt" | C.O.L. | Cartridge Overall Length |
| PSP | Pointed Soft Point | Spz | Spitzer Point | SBT | Spitzer Boat Tail |
| LRN | Lead Round Nose | LWC | Lead Wad Cutter | LSWC | Lead Semi Wad Cutter |
| GC | Gas Check |

 Reply With Quote
