WidenersSnyders JerkyMidSouth Shooters SupplyInline Fabrication
RepackboxLoad DataLee PrecisionReloading Everything
Titan Reloading RotoMetals2
Page 1 of 3 123 LastLast
Results 1 to 20 of 53

Thread: Dry Tumbling

  1. #1
    Boolit Buddy
    Join Date
    Feb 2007
    Location
    Parkersburg, WV
    Posts
    105

    Dry Tumbling

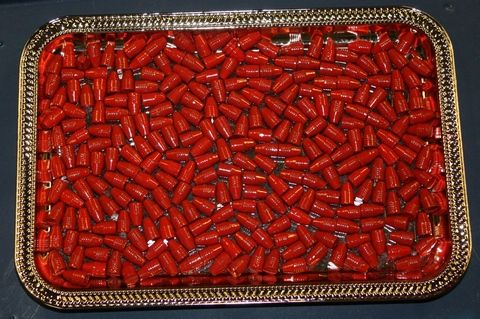
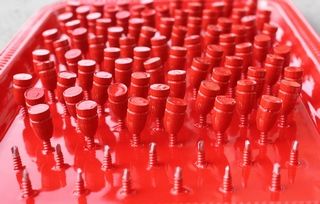
    So far my favorite powder coating method is HF ES using NOE hollow point bullets held on "pegs" made by using self drilling screws driven thru dollar store metal serving trays. This gives me evenly coated bottoms that have no smoke (or leading but a little plastic "fouling" after a couple hundred rounds) with Titegroup and Longshot powders which seem to be the most readily available powders I can find at the moment. Plus I can flip the trays over and they work well making small "pedistals" for non HP bullits. I will try to post pictures.
    Next I want to try Dry Tumbling but have questions. I have looked however there ALOT of information here but I have not found step by step instructions. It looks like I should start with clean warm sized (?) boolits (I use a heat gun to warm them before ES Spraying) then tumble them in a plastic tub, about 50 at a time for 5 min or so. Then bake for about 20 min at 400 degrees. I would think on some sort of screen. I use Walmart aluminum grill trays for screen. So far should my plan work? Should the boolits be dampened with paint thinner or acetone before tumbling?? Once tumbled should they be stood or just be left on their sides or stood upright???
    I am off for a trip to Harbor Frieght for more powder and China-Mart for some (if I can find it) non-stick aluminum foil to play with plus heavily caffeinated soda. Then I will check back before a coating/casting session unless I get rained out.

  2. #2
    Boolit Master


    Walter Laich's Avatar
    Join Date
    Aug 2005
    Location
    Cypress, Republic of Texas
    Posts
    3,500
    use something like 1/2 teaspoon, you can add more as you go. Try 20 bullets first--work your way up.
    Some will clean first with acetone or like liquid--I don't. No liquid inside tub
    Plastic tub needs to have a '5' on the bottom. This is the recycle number usually inside a triangle. Other numbers aren't going to work. Cool Whip seems to be the most suggested plastic tub to use.
    I get good coverage in as little as 30 seconds some time. No more than 2 minutes at longest for me. If you do it too long you start knocking the powder off the bullets.
    Don't use lid and you can monitor the covering.
    20 min at 400 works--be sure to use something to check accuracy of temp in oven. Most ovens are off a bit. If you start melting the bullets you are too warm
    I use forceps to put them on the non-stick aluminum foil. Takes some time. If you do it lightly you don't knock the powder off.
    I try to remove from foil while a bit warm as it's easier to do. When fully cool I end up tearing foil.
    .
    go for it--you can always give them another coat if the first one isn't good enough.
    NRA Life
    USPSA L1314
    SASS Life 48747
    RVN/Cambodia War Games, 2nd Place

  3. #3
    Boolit Grand Master
    bangerjim's Avatar
    Join Date
    Apr 2013
    Location
    out of here, wandering somewhere in the SW.
    Posts
    10,163
    Walter just gave you the step-by-step. I and many others have played around with this method since it was 1st introduced several months ago and have found some things are needed and some are not.

    I do as he does, but bake only for 10 min @400F in a convection oven that I KNOW is dead on temp. Start you 10 min cycle when the boolits turn shiny in the hot oven. I pre-head the oven.

    Doing it that way with RED, I need only one coat.

    I pick them up with medical curved hemostats and set on non-stick foil. Some dump on a piece if 1/4" hardware cloth, but I find it leaves lots of lay marks and uncoated divots.

    ESPC is still the smoothest and bestest, especially if you like matte black as I do. But DT works very well if you follow the above steps closely.

    banger

  4. #4
    Boolit Bub brow_tines's Avatar
    Join Date
    Oct 2010
    Location
    SouthEast Kentucky
    Posts
    47
    Subbed, I would love a step by step tutorial for this
    James 1:19 Wherefore, my beloved brethren, let every man be swift to hear, slow to speak, slow to wrath:

  5. #5
    Boolit Grand Master
    bangerjim's Avatar
    Join Date
    Apr 2013
    Location
    out of here, wandering somewhere in the SW.
    Posts
    10,163
    Quote Originally Posted by brow_tines View Post
    Subbed, I would love a step by step tutorial for this
    Read post #2. That IS a step by step. What more do you desire???????????????????

    banger

  6. #6
    Boolit Grand Master

    mdi's Avatar
    Join Date
    Jun 2008
    Location
    So. Orygun
    Posts
    7,240
    Can't add anything to bangerjim's post, just a but of experimentation will help you find exactly what works for you. I don't heat, I do clean bullets, and I use non-stick alum. foil. I also pick up my coated bullets with needle nose pliers, with tips dipped in powder, to set the bullets on the foil lined pan and cook. I have found red is the best color for dry tumbling, as I couldn't get any black, orange, or yellow to stick to the bullets during tumbling...
    My Anchor is holding fast!

  7. #7
    Boolit Buddy
    Join Date
    Dec 2008
    Location
    Central Arkansas
    Posts
    437
    I've tried the DT method but I'm not getting the results most are. I've been doing as every one suggest just not getting coverages I've seen in photos. No. 5 cool whip container, very little HF red and only have enough boolits to almost cover the bottom. I've even tried machine tumble but not getting a smooth complete cover. The only thing I can come up with is all my cast are at least 1-2 years old. Do you think oxidation could be my problem preventing coating. I'm ready to just get a spray gun cause what I'm doing is a waste of time, even for a retired fart.

  8. #8
    Boolit Grand Master
    bangerjim's Avatar
    Join Date
    Apr 2013
    Location
    out of here, wandering somewhere in the SW.
    Posts
    10,163
    Lead oxide could cause non-sticking problems. I have some raw boolits that are 12+ years old and I will test it.

    Do NOT use any machines to tumble! Just the #5 container...lid off.....and SWIRL around in a gentle circular motion. Do not toss up or shake. SWIRL!

    The heavier the boolits, the worse the impact divots will be. That is why you need to go slowly and not use fast actions....and no mechanical vibrators and tumblers. You will NOT see 100% coverage. I am happy with a 90-95% coverage. Remember.....the powder melts and runs and spreads out when cooking in your oven at 400F. Those little bits of bare lead peeking out will be pretty much gone when you are done! Just watch for bare lead on the TOPS of the grease grooves. That indicates another coat and bake.

    Now that I have discovered and refined the Coolwhip swirl method, I am getting coatings that meet my stringent QC as compared to ESPC. I still use ESPC, especially for black and to coat tools and other items around the shop.

    Pick up your coated slugs and sit them on NS foil. Use a curved medical hemostat or bent nose needle nose pliers. Dip the tips in powder before starting your pick-up.

    Give it another try and skip all the mechanical contraptions! I started out that way and was totally turned off to this method until figuring out what was going on in that little round tub.

    bangerjim

  9. #9
    Boolit Buddy
    Join Date
    Feb 2007
    Location
    Parkersburg, WV
    Posts
    105
    I was very pleased with this method - it worked better than I expected!


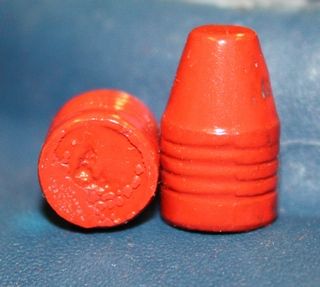
    These are about 250 9MM 125gr Lee TC TL boolits coated with Harbor Freight Red. I did those a couple of hours ago

    I first sized my boolits then cleaned in alcohol and warmed them with a heat gun. Then swrled them in a #5 cool whip container until they were covered with powder then picked them up with needle nose pliers and stood them on a nonstick baking sheet. Baked for 20 min at 400 like I do ES coated boolits. Even the bottoms are nicely covered and the over all coverage is almost as good as the ES coated 9mm in the picture below.


    9MM Lee TC TL boolit top & bottom

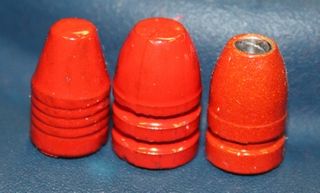
    Below is from left to right 9mm Lee TC I did tonight, 40 Cal I did last night and last one of the 9MM HP ES coated


    I find with either method the coating is about .002" thick so I size again after coating. For me ES is slightly better but more work and messier so I will definately be working with this method more in the future!!!
    Last edited by LubeckTech; 03-31-2014 at 11:35 PM.

  10. #10
    Boolit Buddy
    Join Date
    Feb 2007
    Location
    Parkersburg, WV
    Posts
    105
    What is special about the #5 container?
    Is it because of the way it does or does not generate static electricity?

  11. #11
    Banned


    Join Date
    Jan 2011
    Location
    Color Me Gone
    Posts
    8,401
    Belief is that it does create static electricity.

  12. #12
    Boolit Grand Master
    bangerjim's Avatar
    Join Date
    Apr 2013
    Location
    out of here, wandering somewhere in the SW.
    Posts
    10,163
    It IS the bowl that creates the right amount of static. I have found tupperware and other kinds of plastic do not work well at all. Also the round shape is perfect for swirling....not tumbling!

    How do I know? Try mixing moly with powder and swirling it. ( I was experimenting with white powder and moly to make moly coating) Moly coats the bowl completely and eliminates ALL the static. Similar to why powder manufacturer's mix graphite in gun powder to make it flow WITHOUT static cling!

    banger

  13. #13
    Boolit Buddy
    Join Date
    Dec 2008
    Location
    Central Arkansas
    Posts
    437
    Thanks, this is a photo I took with my phone .I will try to get some better ones and post later. This is my first
    Try at attaching a photo so bare with me.Click image for larger version. 

Name:	image.jpg 
Views:	85 
Size:	21.9 KB 
ID:	101116
    It may be older boolisa as a friend did some that were just cast then washed with lacquer thinner and looked really nice.

  14. #14
    Boolit Master
    a.squibload's Avatar
    Join Date
    Mar 2010
    Location
    CO
    Posts
    2,160
    Lookin good!

    I use as cast boolits and size after baking
    so I don't have to clean 'em. Or you can size first
    then add a couple thousandths with the PC.

  15. #15
    Boolit Buddy
    Join Date
    Dec 2008
    Location
    Central Arkansas
    Posts
    437
    First is 38 as cast then hand swirl then rotary tumble .310 - 160 and .310 - 220 both hand swirl all with 2 coats. Top is a smash test with sledge hammer on anvil. Y'all like Close now and give you best idea. Why are they not bright and pur'dy.

    I'll edit and say I think they should shoot OK but still not bright shiny and look like they are encapsulated like they should be. Carroll
    Attached Thumbnails Attached Thumbnails IMG_20140401_155217.jpg  
    Last edited by kfarm; 04-01-2014 at 05:30 PM.

  16. #16
    Boolit Master
    a.squibload's Avatar
    Join Date
    Mar 2010
    Location
    CO
    Posts
    2,160
    Yep, shooters.
    Did you measure the temperature in your oven?
    Mine are all fuzzy lookin' (of course) after tumbling, the heat smooths it out.

    They look like my first batch when I tried solvent, kinda lumpy, they shot fine though.
    Somebody said the boolits should be warm when you dry tumble.

  17. #17
    Boolit Buddy
    Join Date
    Dec 2008
    Location
    Central Arkansas
    Posts
    437
    Tried to do everything right, warm to the touch and oven preheated to 400 with thermometer. Got storms a coming in today so I'm a gonna take off and go to HF.

  18. #18
    Boolit Buddy
    Join Date
    Feb 2007
    Location
    Parkersburg, WV
    Posts
    105
    The #5 container is made of Polypropylene!
    Found the information here;
    http://www.babygreenthumb.com/p-122-...ers-guide.aspx

  19. #19
    Boolit Buddy
    Join Date
    Dec 2008
    Location
    Central Arkansas
    Posts
    437
    I do believe that it must have been oxidation causing the coating not to cover as well as I'd liked. I cast a hand full of 38's and some 22's and coated them yesterday. Good coverage and shot well with clean barrels. Those 22 37ge NOE's cast well, coated completely looked good and shot great out of a hornet.

  20. #20
    Boolit Grand Master
    bangerjim's Avatar
    Join Date
    Apr 2013
    Location
    out of here, wandering somewhere in the SW.
    Posts
    10,163
    Quote Originally Posted by LubeckTech View Post
    The #5 container is made of Polypropylene!
    Found the information here;
    http://www.babygreenthumb.com/p-122-...ers-guide.aspx
    Yes..............is says right on the bottom in the recycle symbol "5" and "polypro". There are many MANY items made from polypro, just so happens a coolwhip container is just the right shape for what we need. And it's not bad dispensing the whipped topping either!

    bangerjim

Posting Permissions

  • You may not post new threads
  • You may not post replies
  • You may not post attachments
  • You may not edit your posts
  •  
Abbreviations used in Reloading

BP Bronze Point IMR Improved Military Rifle PTD Pointed
BR Bench Rest M Magnum RN Round Nose
BT Boat Tail PL Power-Lokt SP Soft Point
C Compressed Charge PR Primer SPCL Soft Point "Core-Lokt"
HP Hollow Point PSPCL Pointed Soft Point "Core Lokt" C.O.L. Cartridge Overall Length
PSP Pointed Soft Point Spz Spitzer Point SBT Spitzer Boat Tail
LRN Lead Round Nose LWC Lead Wad Cutter LSWC Lead Semi Wad Cutter
GC Gas Check