PBcastcoLoad DataInline FabricationLee Precision
Reloading EverythingMidSouth Shooters SupplyRepackboxWideners
RotoMetals2 Titan Reloading
Page 5 of 5 FirstFirst 12345
Results 81 to 90 of 90

Thread: GunStock Re-Finishing, The Roger Method explained with Pics

  1. #81
    Moderator
    Texas by God's Avatar
    Join Date
    Mar 2016
    Location
    Texas
    Posts
    14,316
    I'm trying my best to remove the remainders of the impressed checkering on the pistol grip of my 1965 Rem 700 ADL. Every time I think I've got it- I wet the stock with water and Arghh. I shortened and reshaped the for end so it's good. I could go nuts wth a rasp but I don't want to change the shape of the pistol grip. Anybody been there? I DID a 70's 22-250 decades ago and I gave up and lived with it. I don't really care for checkering or stopping so That's out.
    I know-shut up and sand, right?
    Best, Thomas.

    Sent from my SAMSUNG-SM-G930A using Tapatalk

  2. #82
    Banned
    Join Date
    Aug 2017
    Location
    Loveland Colorado
    Posts
    51
    SO I never went to woodshop what's the difference between wet sanding and dry sanding? Do I wet the paper or the wood?? how much water ?? soaking wet?

  3. #83
    Banned
    Join Date
    Aug 2017
    Location
    Loveland Colorado
    Posts
    51
    Really no kidding do I wet the paper or the wood???????????

  4. #84
    Boolit Master
    Join Date
    Apr 2013
    Posts
    1,423
    The paper and rewet paper as it dries to clean paper and sand on!

  5. #85
    Banned
    Join Date
    Aug 2017
    Location
    Loveland Colorado
    Posts
    51
    Quote Originally Posted by Edward View Post
    The paper and rewet paper as it dries to clean paper and sand on!
    Thanks Edward I think I got it where I need it now but I cant get it to stain I went to 400 grit maybe too smooth? I am also gonna try leather dye someone else mentioned it

  6. #86
    Boolit Grand Master pietro's Avatar
    Join Date
    Mar 2008
    Location
    New England
    Posts
    5,249
    Quote Originally Posted by Texas by God View Post

    I'm trying my best to remove the remainders of the impressed checkering on the pistol grip of my 1965 Rem 700 ADL.

    Every time I think I've got it- I wet the stock with water and Arghh.


    You can sand until you end up with a toothpick, and still not remove the lignin ( the substance that bonds the wood fibers together ) that was melted when the factory checkering was applied.

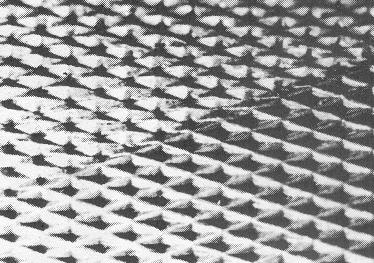
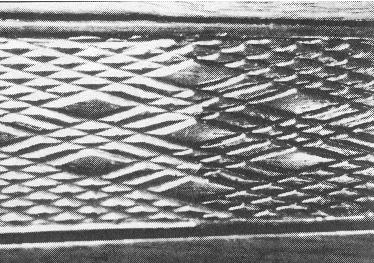
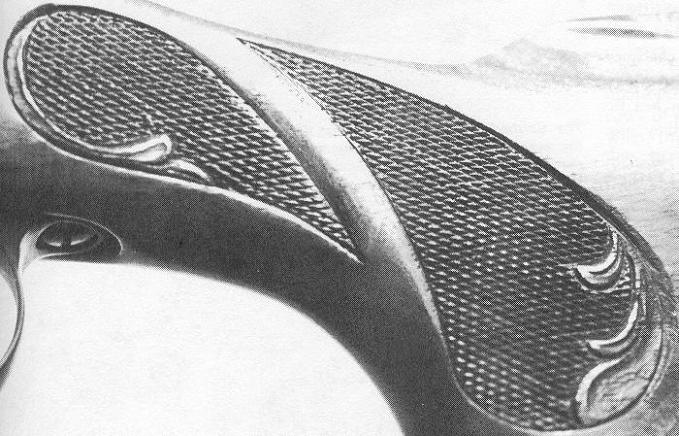
    I was successful, however, in converting the factory negative/impressed checkering to positive checkering diamond via running a single row checkering tool (head) up/down/across the rows with the tool cutting out the ridges between the depressions, leaving the high spots ( at each X ) as the tips of the checkering diamonds.

    If you attempt it, though, cut the partitions between the depressions with a razor knife before running the checkering down the rows.


    The photo below shows Negative Impressed checkering with the upper left portion converted to Cut checkering


    The photo below shows Positive Impressed checkering with the right portion converted to Cut checkering


    The photo below is of Negative Impressed checkering converted to Cut checkering


    .
    Now I lay me down to sleep
    A gun beside me is what I keep
    If I awake, and you're inside
    The coroner's van is your next ride

  7. #87
    Boolit Master
    Chad5005's Avatar
    Join Date
    May 2018
    Location
    Buena Vista GA
    Posts
    715
    i would like to thank Alaskanguy and everyone else that posted helpful hints on this post,i have finished redoing my first stock with the rogers method and im very happy with it,its for my stevens 14 1/2,i went the tru oil route Click image for larger version. 

Name:	FullSizeR[4140].jpg 
Views:	60 
Size:	43.5 KB 
ID:	231484

  8. #88
    Boolit Master Shawlerbrook's Avatar
    Join Date
    Nov 2015
    Location
    Central NY
    Posts
    2,904
    Tru oil is a very user friendly product that look nice.

  9. #89
    Boolit Master
    Chad5005's Avatar
    Join Date
    May 2018
    Location
    Buena Vista GA
    Posts
    715
    thank you sir

  10. #90
    Boolit Grand Master


    M-Tecs's Avatar
    Join Date
    Apr 2008
    Location
    Minnesota
    Posts
    9,441
    Quote Originally Posted by pietro View Post
    You can sand until you end up with a toothpick, and still not remove the lignin ( the substance that bonds the wood fibers together ) that was melted when the factory checkering was applied.

    I was successful, however, in converting the factory negative/impressed checkering to positive checkering diamond via running a single row checkering tool (head) up/down/across the rows with the tool cutting out the ridges between the depressions, leaving the high spots ( at each X ) as the tips of the checkering diamonds.

    If you attempt it, though, cut the partitions between the depressions with a razor knife before running the checkering down the rows.


    The photo below shows Negative Impressed checkering with the upper left portion converted to Cut checkering


    The photo below shows Positive Impressed checkering with the right portion converted to Cut checkering


    The photo below is of Negative Impressed checkering converted to Cut checkering


    .
    Thank for the info on this.

Page 5 of 5 FirstFirst 12345

Posting Permissions

  • You may not post new threads
  • You may not post replies
  • You may not post attachments
  • You may not edit your posts
  •  
Abbreviations used in Reloading

BP Bronze Point IMR Improved Military Rifle PTD Pointed
BR Bench Rest M Magnum RN Round Nose
BT Boat Tail PL Power-Lokt SP Soft Point
C Compressed Charge PR Primer SPCL Soft Point "Core-Lokt"
HP Hollow Point PSPCL Pointed Soft Point "Core Lokt" C.O.L. Cartridge Overall Length
PSP Pointed Soft Point Spz Spitzer Point SBT Spitzer Boat Tail
LRN Lead Round Nose LWC Lead Wad Cutter LSWC Lead Semi Wad Cutter
GC Gas Check