RepackboxRotoMetals2MidSouth Shooters SupplyLoad Data
Lee PrecisionInline FabricationReloading EverythingWideners
Titan Reloading Snyders Jerky
Page 3 of 11 FirstFirst 1234567891011 LastLast
Results 41 to 60 of 209

Thread: Making 30 Cal Dies

  1. #41
    Boolit Master
    Join Date
    Mar 2013
    Location
    seated with Him in the heavenly places in Christ Jesus (Eph 2:6)
    Posts
    1,192
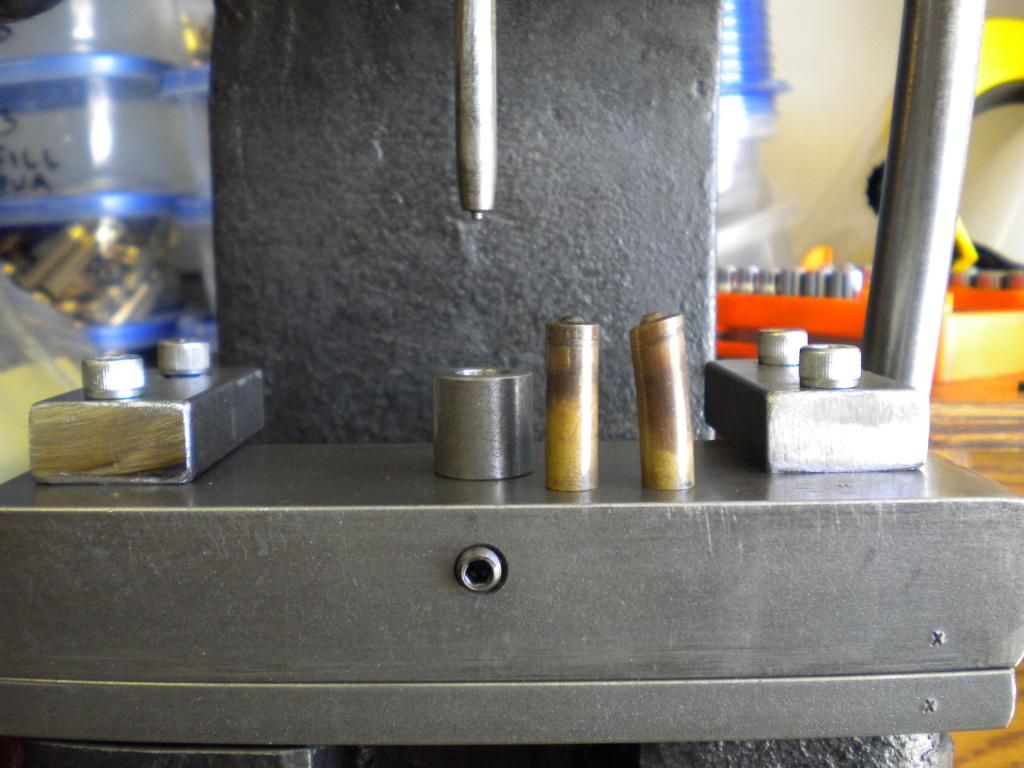
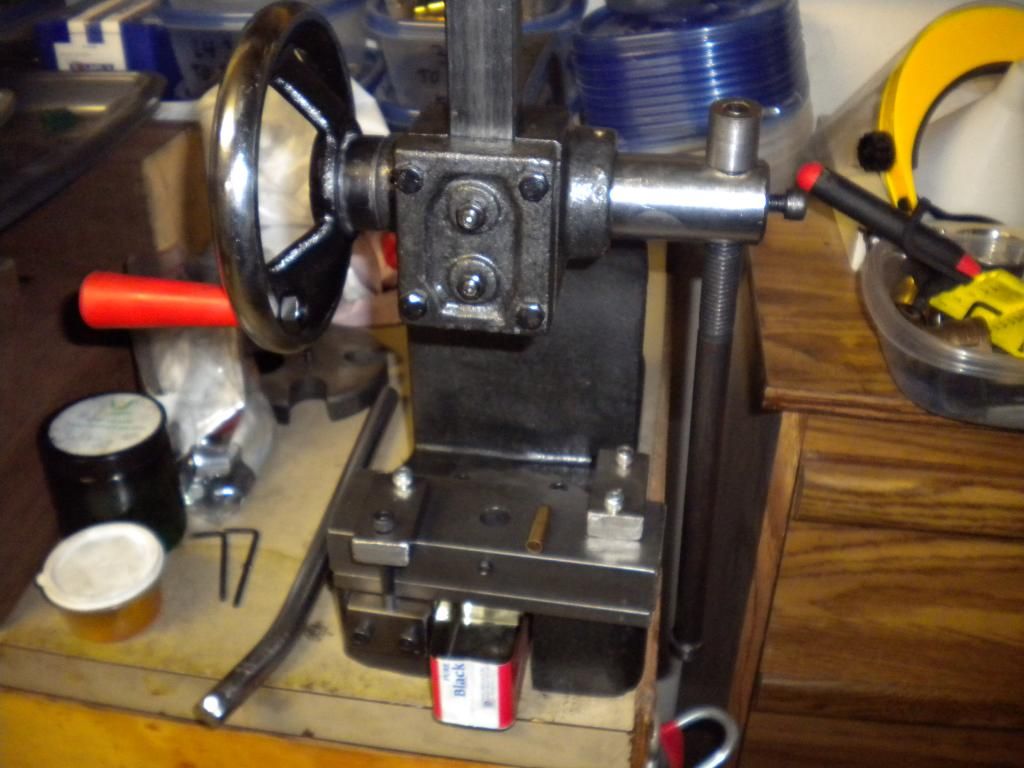
    still working on prototypes, but things are looking up, will post photos this weekend if i get the dies finished...

    Howard, i finally pulled the trigger on the 115 piece Cobalt drill bit set from HF... $129 regular price, on sale for $99, got a 25% off coupon and got it for $74!!!! felt like i just robbed them, 115 cobalt drill bits for $74: 1/16 thru 1/2 by 1/64, letter sizes A thru Z, and wire sizes to #1 thru #60

    Last edited by Cane_man; 09-06-2013 at 10:01 PM.

  2. #42
    Boolit Buddy Prospector Howard's Avatar
    Join Date
    May 2013
    Location
    AZ
    Posts
    418
    Glad to see you pulled the trigger. Best deal going I could find on drill bits that actually work good.
    Never in history has there been a situation so bad that the government couldn't make it worse.
    A foolish faith in authority is the enemy of the truth.

  3. #43
    Boolit Man
    Join Date
    Aug 2013
    Location
    Gilbert, AZ
    Posts
    85
    Looks like you are progressing nicely. Any chance of doing a tutorial on making the dies themselves?
    "I will ask permission of no man, for that which has been granted to me by God and the Constitution."

  4. #44
    Boolit Master
    Join Date
    Mar 2013
    Location
    seated with Him in the heavenly places in Christ Jesus (Eph 2:6)
    Posts
    1,192
    i am going to claim victory on the drawing part of this project 
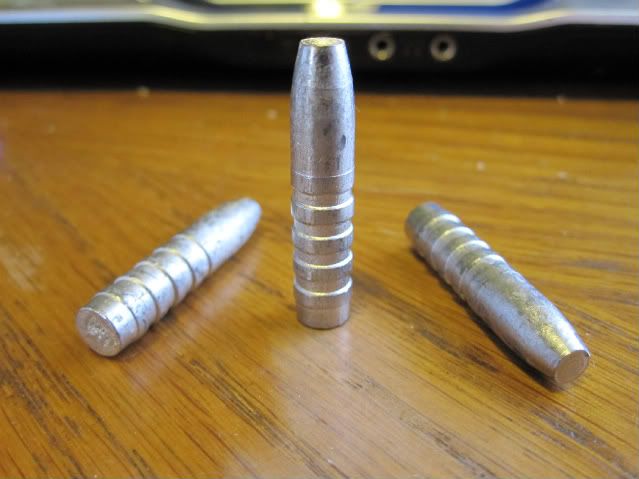
with a little help from my friends... here is a before and after: on the left is the drawn case with all the new improvements, and the right was my original draw:


    i took all the suggestions you guys gave me and here is what made the difference:

    1) turned a small tit on the nose of the punch so it would center on the flash hole, also i just used this one punch for all 4 draws using a 1/4" grade 8 bolt

    2) made a 'bushing' that sits on top of the die and helps keep the case on center as it enters the draw die

    3) made a centering bushing to make sure the die block was centered with the ram, and then added some hold down clamps to secure the die block in place, you can see that here:


    did 4 draws total, annealed on the last draw so there are a total of 2 anneals... not too bad

    now that i know what needs to be done with the draw dies i am going to redo these dies and bushings as there are a few minor mods i would make and i went ahead on got a couple of taper pin reamers... i plan to let this project sit for a while now and get back on it in November, ill report back then, and hopefully i can get this project done by the end of the year

    i am wondering if it would be better to remove the primer before drawing?

    also, is there a way to make some type of simple 'annealing machine', like a wheel you turn that puts the case in the flame, then dumps it in water??? idk
    Last edited by Cane_man; 09-08-2013 at 05:01 PM.

  5. #45
    Boolit Master
    Join Date
    Mar 2013
    Location
    seated with Him in the heavenly places in Christ Jesus (Eph 2:6)
    Posts
    1,192
    Quote Originally Posted by junkman1967 View Post
    Looks like you are progressing nicely. Any chance of doing a tutorial on making the dies themselves?
    i can do that, they are really straight forward to make... do you have a lathe? they are just pass thru dies just like Lee sizing dies, i make them from 9/16" O1 tool steel which is easy to find and not terribly expensive (3' stick for about $10)... basically drill a hole in them to whatever size you are after (using a step drilling method) and then use a file to taper the mouth, then heat treat and polish... i can show step by step pics but it is going to be a few months...

    i am using 4 draw dies for this project with these inside diameters: 0.360, 0.344, 0.323, 0.305

  6. #46
    Boolit Buddy Twmaster's Avatar
    Join Date
    Jul 2011
    Location
    Dallas, TX
    Posts
    375
    For simple annealing it's been suggested to use a 20# lead pot that's never had molten metal in it. Crank it up, let sit for a few minutes and dump the brass out.

    There's also a sticky on annealing at the top of this forum (I think it's this forum! )
    Mike

    Politicians should be limited to two terms.

    1 in office. 1 in prison.

  7. #47
    Boolit Master
    Join Date
    Mar 2013
    Location
    seated with Him in the heavenly places in Christ Jesus (Eph 2:6)
    Posts
    1,192
    ^^^ i did that for the first 3 draws, i had some leftover 9mm brass that i had annealed in my Lee 4-20... it works really well, i wrap the cases in foil, then put some ceramic insulation on top, then set the PID to 825F for 1 hour... but for the last draw i didn't want to wait around so i torched them red and dropped them in water, 30s vs 1 hour
    Last edited by Cane_man; 09-08-2013 at 08:17 PM.

  8. #48
    Boolit Man
    Join Date
    Aug 2013
    Location
    Gilbert, AZ
    Posts
    85
    Cane Man,
    I do have a lathe and a mill. I will attempt making one, based on your description. Thanks for the info.

    The hard one for me to wrap my head around is the die that forms the shape of the projectile. I was thinking of making a reamer in the profile of the bullet to ream the die. IS that the way it is done?
    "I will ask permission of no man, for that which has been granted to me by God and the Constitution."

  9. #49
    Boolit Master
    Join Date
    Mar 2013
    Location
    seated with Him in the heavenly places in Christ Jesus (Eph 2:6)
    Posts
    1,192
    go for it Junkman... key is to make the most gradual taper you can going into the die... i also like to 'relieve' the last 3/8" or so of the die by drilling it out larger so the case won't hang up on its way out (i dont know if this is possible, but i still like to add this to the exit part of the die, makes my OCD calm down )...

    not sure if you are going to use my setup i have here with the die block and the arbor press, or do you have another idea in mind? i didn't want to do this on my reloading press as i didn't want to break it

    also key is the 'bushing' that sits on top of the die to make sure the case enters the die on center and square... i am sure there are other ways to do this than the way i did it...

    if you are not using hardened steel, like annealed O1, you will want to heat treat it as this reduces the friction in the die and makes it more wear resistant, here is a description of how i heat treat O1:

    http://castboolits.gunloads.com/show...=1#post2308039

  10. #50
    Boolit Buddy
    Join Date
    Nov 2010
    Location
    Nevada
    Posts
    208
    I would like to say one thing on the anneling process, when you do put it in the oven after 1 hr, just turn oven off don't open let it cool slowly you will have a better grain structure.
    Sprink

  11. #51
    Boolit Mold
    Join Date
    Jun 2011
    Location
    Southern California
    Posts
    17
    I don't really mean to rain on the parade here... but starting with 9mm is a long way to go to get it down anywhere near .30". I can barely believe you pulled it off with that little arbor press. It looks like you have a good variable draw (the shape of the punch) to get it to a point where it should close.

  12. #52
    Boolit Master
    Join Date
    Mar 2013
    Location
    seated with Him in the heavenly places in Christ Jesus (Eph 2:6)
    Posts
    1,192
    i have read where some guys are taking the 9mm draw all the way to 0.277 and 0.257!

    the arbor press is easy to use especially when you add a 30" section of water pipe to the handle

  13. #53
    Boolit Master Forrest r's Avatar
    Join Date
    Nov 2011
    Location
    NE Ohio
    Posts
    2,084
    I do the same thing as cm, a 30" pipe & treat the draw dies with the moly bore paste.

    I'll be doing another batch of 500 this winter ( might go 1000 this time). It seems like a lot of work with all the drawing, annealing & cleaning/lubing but it really isn't. I have a 10m airgun range in the basement that I use in the winter months (ne ohio) & it's nothing to work on the 30 bullets between sets with the rifles & pistol.

    CM, a little fine tuning goes a long way with the 30 cal jackets. Give it some thought & by november I'm sure you'll of really got a handle on this. I'm sure I'm missing something & just haven't found it yet. You have a real knack for sniffing out the best way of doing things like this.

    forrest r

  14. #54
    Boolit Master
    Join Date
    Mar 2013
    Location
    seated with Him in the heavenly places in Christ Jesus (Eph 2:6)
    Posts
    1,192
    i'm with you forrest, i don't care about how long it takes to swage the bullets, this is not a business for me... i enjoy the entire process from making the dies to tumble polishing the final bullets...

  15. #55
    Boolit Master
    Join Date
    Mar 2013
    Location
    seated with Him in the heavenly places in Christ Jesus (Eph 2:6)
    Posts
    1,192
    good day today, picked up a Lee 6.5 Swede 170gr 'cruise missile' mold to make my 30 cal cores from at a decent price right here on swappin n selling... this mold will cast at 0.268 and should size easily down to 0.262 or so and drop right into the swaged 9mm cases, and trimmed to length using my lead trimmer to 90 grains...

    the 7mm mold i was using didn't like being sized down less than 0.270 without a big fuss so i am going a different route here...

    trim the cast bullet down so it weights 90gr, then size it to 0.262 by making a pass thru sizer and i will be good to go:

    Last edited by Cane_man; 10-18-2013 at 03:06 PM.

  16. #56
    Boolit Master
    Join Date
    Mar 2013
    Location
    seated with Him in the heavenly places in Christ Jesus (Eph 2:6)
    Posts
    1,192
    i didn't expect a buck on opening day, but it happened so now i am ready to pick up this project again...

    here is a California Muley forked horn (ours our smaller than your rocky mnt mulies, he turned his butt to me so i shot him through the corner of both eyes (was aiming for the neck but i'll take it, this is my first buck and my 3rd season), had to pack out about 40 lbs of meat 3/4 of a mile with a 1000 foot elevation gain and it kicked my butt:


    Last edited by Cane_man; 09-29-2013 at 06:09 PM.

  17. #57
    Boolit Buddy

    Join Date
    Jun 2011
    Location
    Lebanon. Pennsylvania
    Posts
    462
    Congratulations Caneman on your success, I am gearing up for our season here in PA. Got to love the mushrooms and venison you have in there, pour a little beer in the mix and you might be suprised.

  18. #58
    Boolit Master
    Join Date
    Mar 2013
    Location
    seated with Him in the heavenly places in Christ Jesus (Eph 2:6)
    Posts
    1,192
    thanks New!

    you are so right about the beer, and if you really want to do it right then get a bottle of Guiness and cook with that (crock pot, or saute)... i am going to do this with one of the rump roast for the crock pot

  19. #59
    Boolit Master
    Join Date
    Mar 2013
    Location
    seated with Him in the heavenly places in Christ Jesus (Eph 2:6)
    Posts
    1,192
    i decided to expand this project to include 7mm so i can feed my 7mm-08 Tikka deer rifle... two more draws is all it takes to get to 0.280 to make 7mm projectiles, specifically this will be 140gr FBHP 6s tangent ogive 7mm-08 bullets... .243 cast bullets will be used as cores...

    i have made the proof of concept draw dies, six total, and i am going to redo them now with design improvements, so here is the draw die system:

    anneal 9mm range brass
    1 - .390 drawn to .352, from here 9mm or .357mag bullets can be made
    2 - 0.352 drawn to 0.236
    3 - 0.236 drawn to 0.320

    anneal, this anneal will also be for 30 cal core seating and point forming
    4 - 0.320 drawn to 0.304, 30 cal can be made here
    5 - 0.304 drawn to 0.292, as the jacket gets thinner with each draw it gets more difficult to do the next draw

    anneal, this final anneal will be for 7mm core seating and point forming
    6 - 0.292 drawn to 0.280, 7mm can be made here (there is a pic of the first 7mm case below sitting on the arbor press!)

    3 anneals, seems like a lot, but this is for bolt rifle applications, and a batch of 50 to 100 bullets would be a normal size lot to make, and it is really easy to anneal in my Lee 4-20 PID controlled lead pot... takes a little time, but this is not a business for me it is a relaxing and enjoyable hobby and taking time is part of it!

    i had to make a few more mods to my arbor press to make the draws work:

    1) i bent the handle! probably made of inexpensive weak chicom steel so i replaced it with a 12" Grade 8 bolt, you can see the bent rod handle on the left!

    2) i had to trim off 1" from the bottom of the ram to increase the travel length, i had to do this because i was not able to push the cases thru the draw dies all the way


    one thing i need to make is a fitting that will push/scrape off the drawn case from the punch, thinking of getting some flat bar and drilling a hole right near the end that fits around the punch, then cut an opening in the hole so it can be pushed against the punch... that sounded confusing, so i'll try to get a pic up when i get it done
    Last edited by Cane_man; 10-13-2013 at 10:49 AM.

  20. #60
    Boolit Master
    Join Date
    Mar 2013
    Location
    seated with Him in the heavenly places in Christ Jesus (Eph 2:6)
    Posts
    1,192
    this project is really two in one, it is a 9mm draw system, and then a 30 cal and 7mm swaging system(s)... here is the design for the draw dies, i will probably be done in another week or so with the 9mm Draw system and will post more pics then:


    note: drawing is just a concept drawing and not to scale!


    die body - used 9/16" O1 tool steel, but you can use whatever you want... i step drilled the die body to the swage diameter I am looking for as the first step of making the draw die

    top of the die - i drill about 1/4" on the top of the die to same to the OD of the brass case before it is drawn, then bevel the mouth of the die with a chamfering bit

    end of die - i drill out a short section of relief maybe 1/8" long

    taper - at this point there will be two transition lines inside the die, one from the top of the die, and one from the end of the die, and a #6 taper pin reamer is used to blend these together with a smooth taper

    once the die has been tapered you rough lap it and get all the scoring lines out of it, heat treat with a flame to orange, quench in oil, then 60' in the oven at 350F to temper, let it cool then final polish the die and it is ready to go

    bushing - this sits on top of the die, and the bottom part of drilled out to the OD of the die (9/16" in this case) and then squared up with an end mill... the bushing is drilled out to an ID that matches the OD of the case before it is drawn, then the mouth is beveled... i like to use 12L14 because it is easy to machine and it has some lubricating properties in it... the die ID should be just a little larger than the case... this bushing helps keep the case centered as it is enters the draw die... this part does not need to be heat treated, and i am using a 3/4" rod 12L14


    there are a few more details here i am leaving out, ask if you have questions... it seems like it's always that last 10% that takes the most time but makes all the difference...
    Last edited by Cane_man; 10-19-2013 at 03:53 PM.

Page 3 of 11 FirstFirst 1234567891011 LastLast

Posting Permissions

  • You may not post new threads
  • You may not post replies
  • You may not post attachments
  • You may not edit your posts
  •  
Abbreviations used in Reloading

BP Bronze Point IMR Improved Military Rifle PTD Pointed
BR Bench Rest M Magnum RN Round Nose
BT Boat Tail PL Power-Lokt SP Soft Point
C Compressed Charge PR Primer SPCL Soft Point "Core-Lokt"
HP Hollow Point PSPCL Pointed Soft Point "Core Lokt" C.O.L. Cartridge Overall Length
PSP Pointed Soft Point Spz Spitzer Point SBT Spitzer Boat Tail
LRN Lead Round Nose LWC Lead Wad Cutter LSWC Lead Semi Wad Cutter
GC Gas Check