will pray for your healing cc... often times the only help is from above as He is good

|
   
   
|


|


will pray for your healing cc... often times the only help is from above as He is good
Amen, hoping to make it to Church in the AM. 7 days without Church makes one weak, if I don't make it tomorrow that will be the 3rd Sunday I'll miss.Originally Posted by Cane_man

Thanks for the prayers,
CC
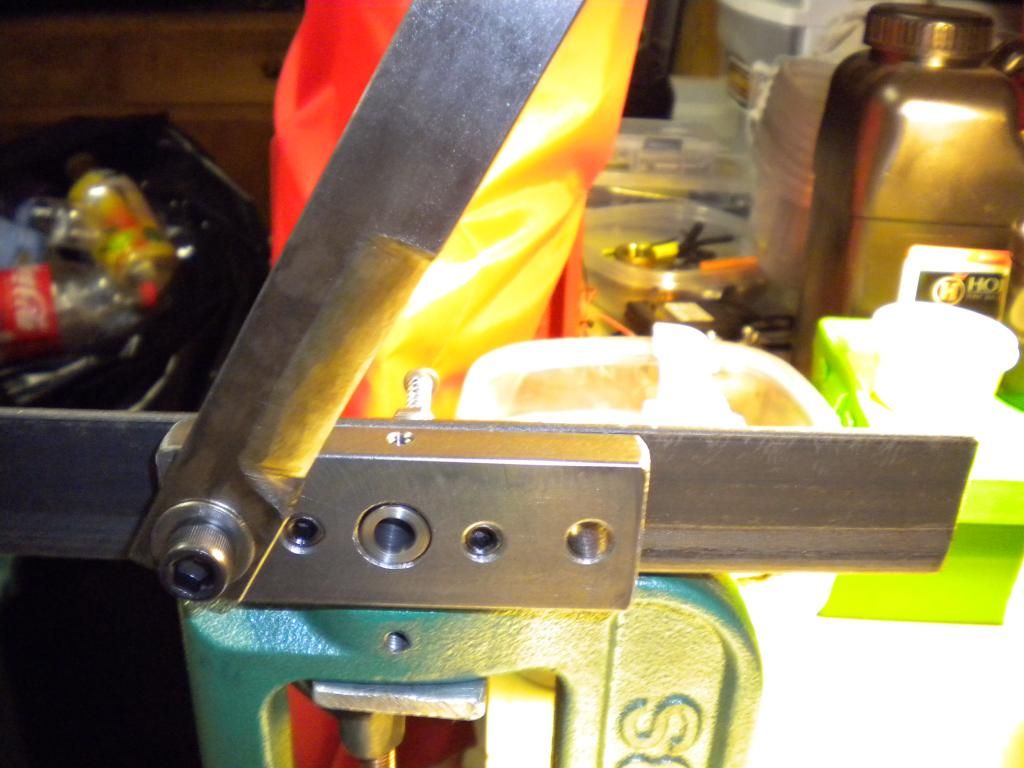
wanted to make sure in added this to this thread... above i was cutting the cast boolits with tin snips, this gave a 5 grain or so variation in the cores... so i decided to make a type of core cutter to get a little more consistent... not really a core cutter as most of you guys are using lead wire or something similar, where all i need to do is trim off the ogive of a cast boolit to get the desired core weight i need... here is the business side where you can see the insert where the boolit would be inserted with the ogive sticking out ready to trim to length:
i set it up so i can use different inserts for different size of boolits, and adjust how much of the ogive will stick out with an adjustment screw... you can almost see the backside where i just clamped it to the top of my press, there is the insert with a tiny ejection punch... trimming this way initially had my boolits within 0.5 grains of each other, before i was using tin snips and getting 5+ grain variations so i am very pleased with this setup…
here is the backside with the ejection punch (just push it to get the boolit out), trimmer clamped to the press, and a small plastic bin underneath to catch the lead ogive trimmings:
Last edited by Cane_man; 06-15-2013 at 10:24 PM.
I know we are trying to keep it cheap and simple as possible. But does Lee sell straight out blank molds. Could possible cut a core mold from a blank

^^^ yes Lee sells blank molds...
i am moving on now to 22LR to .224 swaging and i just bought a used Lyman 2 cav round ball mold off of evilbay for a decent price and i plan to flip it over and drill it out for my 0.1875 cores... but i am sure you could do the same thing for the 40sw/10mm cores...
edit: khmer6, cc is making his own core mold right now as you suggest, you might check out his thread:
http://castboolits.gunloads.com/show...=1#post2263296
Last edited by Cane_man; 06-16-2013 at 10:13 AM.
i have just finished my first working version of my 22LR to .224 dies and had some time to come back to this set and redo a sizing die with heat treating and tempering... since i last worked on this 9mm to .40sw/10mm i am satisfied with a heat treating regimen that i can recommend...
i redid a 0.4000 final sizing die using O-1 tool steel, heat treated, and tempered... i no longer use the 12L14 steel for dies as this material can't be heat treated and the case hardening results are not consistent... it is far easier to heat treat the O-1 so that is all i am suing now for die materials...
you buy the O-1 in the annealed state and it can be machined without too much trouble on my small 7x12 hobby lathe, and after tempering it is around 50 RC hardness and is much more durable that the 12L14, and it has much less friction as well when swaging the cases...
here are some steps to heat treat O-1 if you are making inserts like it did for this project:
1) turn your insert to within approximately 0.002 of final dimensions, so for this final sizing insert i drilled than lapped to 0.398 and it was ready for heat treating... leaving the die undersize like this will help to eliminate any warpage or out of roundness encountered when heating the die
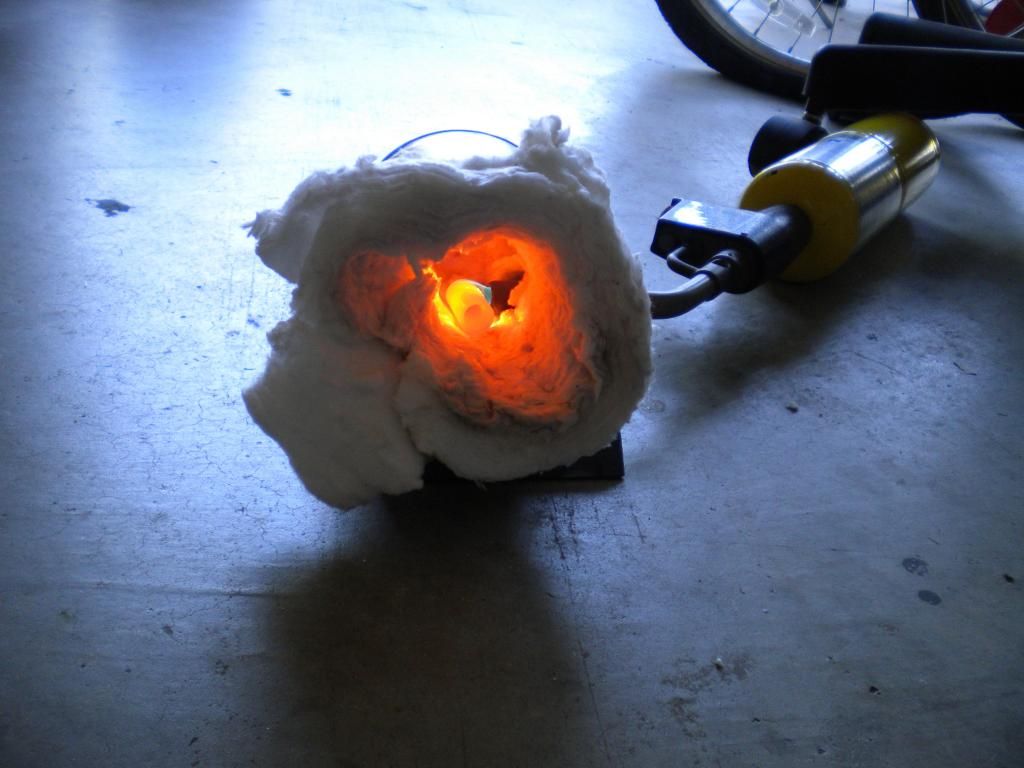
2) to heat treat i recommend you make a small "coffee can" heat treating oven like the one show by Forest earlier in this thread, you need to get some 1" ceramic insulation like the type used for wood stoves... i got some on evilbay for ~ $20 for one foot square, looks something like this:
3) preheat the die insert, just turn your flame on the torch to the lowest setting and slowly heat the die up... do this over about 5' or so, you will see it turn blue than back to a pewter color and then it is ready to put in the oven for heat treating
4) place in the oven and heat to orange for heat treating, just like you see in the picture above, as the die is heating up slowly turn it about 1/4 turn over 15 seconds or so, i use some small tongs for this with welding gloves... be careful that oven gets hot! i am using map gas here and i like it better than the blue propane canisters but i hear those work well too
5) once the die turns a uniform orange do not let it sit there, take it out to quench it in a small can of motor oil... use pure oil not synthetic, use the tongs to grip the top of the die and thrust it in vertically moving it up and down quickly... careful: the surface of the oil will burst into flames, but it gives me a cheap thrill so no worries as you can just blow the flames out like it was candles on a birthday cake...
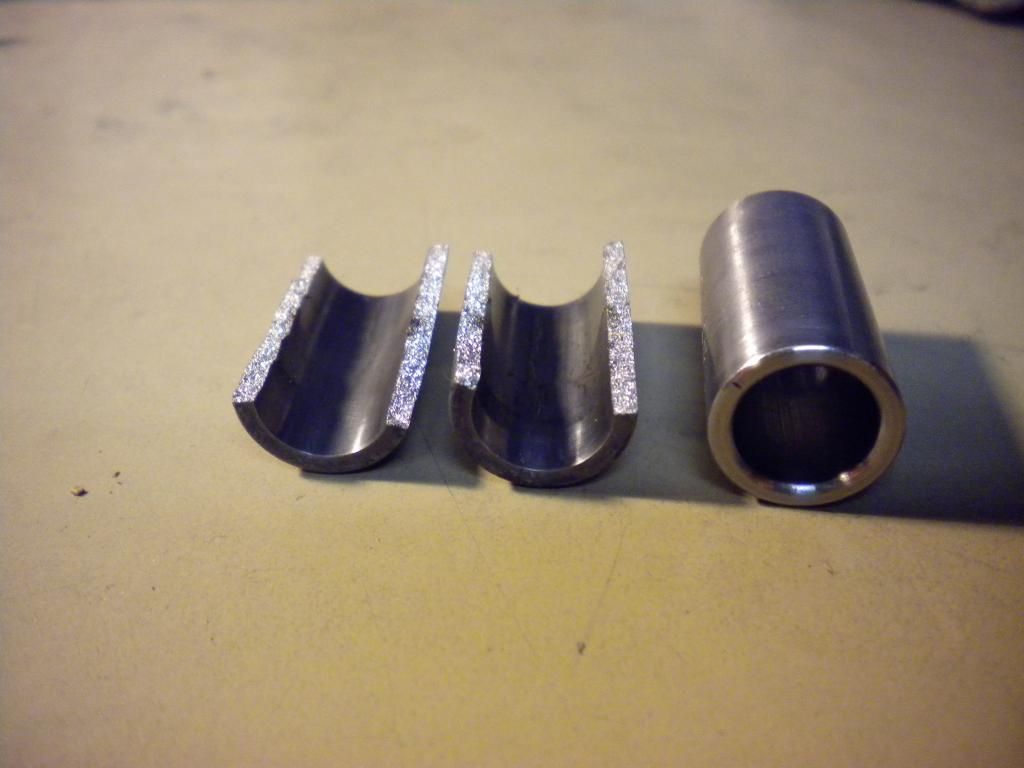
6) before you heat up the die in (3) above you want to preheat your kitchen oven to 350F... don't let the part sit in the quenching oil a long time, you want to pull the part out while it is still fairly warm and too hot to touch, pull it out of the oil after about 30 seconds or so and have a shop rag ready to put the die on... now get a small pan or something similar and put the part in the oven to temper for 1 hour at 350F... if you don't temper properly the die will be too brittle and fracture like this one die on the left, split right in half:
7) now that the die is tempered it is ready to be lapped to final sizing... the finished die is above on the right, it is around 50 RC and has good strength now that it is tempered and should last over 10s of thousands of bullets...
i am putting this swaging die set away for a while as i made about 400 200 gr 10mm rounds and that will last me until the winter when deer season is over, but i have a few more mods and upgrades to make on this set like a point forming die with an elliptical ogive (this die was a mystery but now i know how to make them), and i will post them here as i do...
remember, you can do this at home too, fire away with any questions as i am more than happy to help anyone get going on this project... no need to wait 2 years to get your swaging dies you can make them yourself just the way you want them and have the satisfaction that you made the dies and the bullets...
Last edited by Cane_man; 07-17-2013 at 05:14 PM.
I have not forgot about my 10mm/40sw dies... i fully intend to make a point forming die for a 200gr HP but other projects are in the way right now, like the 7mm 140gr dies i am into right now... i have ideas for some further improvement as well.. as always pm or post if you need more infooh, if you have a lathe you want to get rid of pm me
You have mail!


Somehow I missed this thread and it's an interesting read! I started learning to make reamers a couple of years ago. I have not yet made a furnace and just use a torch to heat the part, but a furnace is in my future.
I wanted to share my thoughts and experiences with heat treating O1. Initially (for about a year and change, truth be told), my efforts to harden tool steel yielded one of two results: a)the heat treated piece was left basically annealed and was destroyed upon initial use, or b) the heat treated piece was made too hard and was brittle as glass. Most of the reamers I made would enter the drilled hole, cut a few chips, and then SNAP! It was a bit more than frustrating.
Originally, I was using automotive oils to quench. I even got used to the flames and the parts coming out of the oil black with soot. I came across a couple of old machining reference books that had excellent write ups on heat treating and tempering and they spoke of using natural vegetable and nut oils, with the benefit being the high flash point, allowing quenching a part without having an insulating layer of bubbles surrounding the rapidly cooling steel, which would lead to uneven cooling. I tried it, and I like it! Just regular vegetable oil used for cooking -- no flame, no smoke, and the part comes out nice and clean with no carbon to remove.
Also, there was a description of torch heating and tempering that works quite well. Bring the part to a bright cherry red and hold it there for a bit. When ready to quench, just give the first inch or so of the part a quick dip in the oil and remove it. Allow the residual heat from the rest of the part to heat soak into the quenched area for a couple of seconds or so, then fully submerge into the oil with a gentle stirring motion.
I am not a metallurgist, so don't ask me to properly explain the mechanics of what's happening, but what I think is happening is the initial partial and quick plunge into the oil is giving a rapid cooling with resulting hardness, then when it is removed and allowed to heat soak, the heat remaining in the shank will travel into the quenched area and effectively temper it. This may not work for everyone, but I have made several good reamers this way and they cut as well as anything from a tool supplier.
good idea on the vegetable oil, i tried it this afternoon on a pointing die i am wrestling with right now... it was cleaner for sure, but it did flash and there was some black soot on the die but nothing like with when using motor oil...may try again if it works out on this die
"Our Constitution was made only for a moral and religious people. It is wholly inadequate to the government of any other." -John Adams 2nd POTUS
I am on page 2 of this and really wanting to read this in great detail. I wanted to thank you in advance for providing this post for those who want to try swaging on the cheap. Unfortunately it's well past my bed time and I will finish this later.
Cane Man I hope you don't mind but I am borrowing your engineering, have started making my own set for swaging 9mm bullets from 3/8" brass tubing. Have several inserts finished, but no one in my area has the 5/8"-18 bolts. I'm either going to have to order them or cut some on my mini lathe, which may not happen since I have read that is pretty much beyond its capability. Biggest I have done so far has been 3/8-16.
NH by all means please take whatever might help and then improve on what i have done, but report back when you do! that was the entire purpose of the thread is to share ideas, and to get others to get off the computer and in the shop to start making their own dies...
"Our Constitution was made only for a moral and religious people. It is wholly inadequate to the government of any other." -John Adams 2nd POTUS
Not too much to look at right now, but I will post pics, what I did, how I did it and what worked and didn't. Good info in this thread!
Been working on these as time permits (dam job!) and I think I am coming along nicely. I have a method to cut the tubing and trim it to length, have made the rounding die (starts to close the base of the jacket), the rounding punch, and the push thru sizer die to draw the jackets to .350". Lots of work left to do and I will need to fine tune what I have made so far. I am starting with a jacket length of .800" to see if I need them shorter or longer. All machined parts are made from 01 tool steel, except for the threaded insert which holds the inserts into the die body. Those are made from 304 stainless, which are cutoffs from when I made parts for Sikorky and the DOD. Good news is, the little Chinese mini lathes which have been so maligned, are capable of cutting the 5/8-18 threads needed for this project, just requires several passes, a very sharp bit, and lots of cutting oil. It did stall once cutting the threads, but did fine otherwise.
Pics will be posted shortly.
Well, I'm dead in the water until lathe parts arrive. The B-C change gear shaft and collar seized while I was in the middle of a cut, stopping this project in its tracks. Luckily LMS has the parts in stock.
Anyhoo, here's progress so far. The round over die is complete and WORKS! I am thrilled about this, as it took quite a bit of fine tuning to get right.
Attachment 108549
From left to right, are the ejection rod which attaches to the auto eject system I got with BTSniper's .224 swage die set, the die body I bored out to fit the insert, the two piece base punch, a 3/8-16 bolt center drilled 1/4" to guide the ejection rod, the insert retainer, and the insert. Lots of polishing and lapping to get that die insert to form and release the jacket blanks. I made the base punch in two pieces so that if I wreck a punch, I can just make a new shaft and not have to make the whole thing.
Attachment 108550
And here are the results. On top is a jacket blank cut from 3/8" brass tubing, trimmed to .800" length and chamfered and deburred. Below are three jackets that have been rounded over, ready to be run through the draw die and then flattened in the core seat die. I have the sizing die and its corresponding punch made, and was making the retainer when catastrophic failure of my equipment occurred. Once parts are in hand, I will fix the problem and continue where I left off.
Until the next installment...
nh, pics are not showing and the link doesn't work... can you take the url of the pic and put it between [img] [/img] and it will show in your post?
"Our Constitution was made only for a moral and religious people. It is wholly inadequate to the government of any other." -John Adams 2nd POTUS
Not sure what happened. I've been able to post pics up to this point. I tried copy and paste, but that didn't work either. Maybe I need to upgrade my browser.
so "all" I need is $1000 worth of tooling, several thousand $ worth of training, and I can make bullets 10x more slowly than if I cast them? Don't think that jibes with my reality. If it was rifle bullets, maybe, at such high velocity that paper patching would not suffice, and if I could sell the hell out of them at a profit of $50 an hour for all the work. otherwise, don't think so.
 Posting Permissions


| BP | Bronze Point | IMR | Improved Military Rifle | PTD | Pointed |
| BR | Bench Rest | M | Magnum | RN | Round Nose |
| BT | Boat Tail | PL | Power-Lokt | SP | Soft Point |
| C | Compressed Charge | PR | Primer | SPCL | Soft Point "Core-Lokt" |
| HP | Hollow Point | PSPCL | Pointed Soft Point "Core Lokt" | C.O.L. | Cartridge Overall Length |
| PSP | Pointed Soft Point | Spz | Spitzer Point | SBT | Spitzer Boat Tail |
| LRN | Lead Round Nose | LWC | Lead Wad Cutter | LSWC | Lead Semi Wad Cutter |
| GC | Gas Check |

 Reply With Quote