MidSouth Shooters SupplyWidenersRepackboxLee Precision
Snyders JerkyLoad DataInline FabricationReloading Everything
Titan Reloading RotoMetals2
Page 3 of 7 FirstFirst 1234567 LastLast
Results 41 to 60 of 124

Thread: Swaging on the Cheap - 9mm Case to 40SW/10mm JWords

  1. #41
    Boolit Master
    Join Date
    Mar 2013
    Location
    seated with Him in the heavenly places in Christ Jesus (Eph 2:6)
    Posts
    1,192
    ^^^ sooooooo, where were you 2 weeks ago?

    i thought the threads might scratch the inserts since initially i wasn't going to case harden them, but now that i have added the case hardening this would probably work fine... but the punch looks so cool when it is polished!

    btw - your tip on annealing the brass in the Lee 4-20 is beast, big time saver

  2. #42
    Boolit Master
    alfloyd's Avatar
    Join Date
    Apr 2009
    Location
    Logan, Utah
    Posts
    625
    threads might scratch the inserts

    Not, just get a longer bolt, such as a 6 inch, and cut off the threads.
    This way you have a 4.5 inch punch with no threads.
    TaDa, no threads to scratch the inserts.

    Lafaun
    Just staying at home and playing with multi-color boolits.

  3. #43
    Boolit Master
    Join Date
    Mar 2013
    Location
    seated with Him in the heavenly places in Christ Jesus (Eph 2:6)
    Posts
    1,192
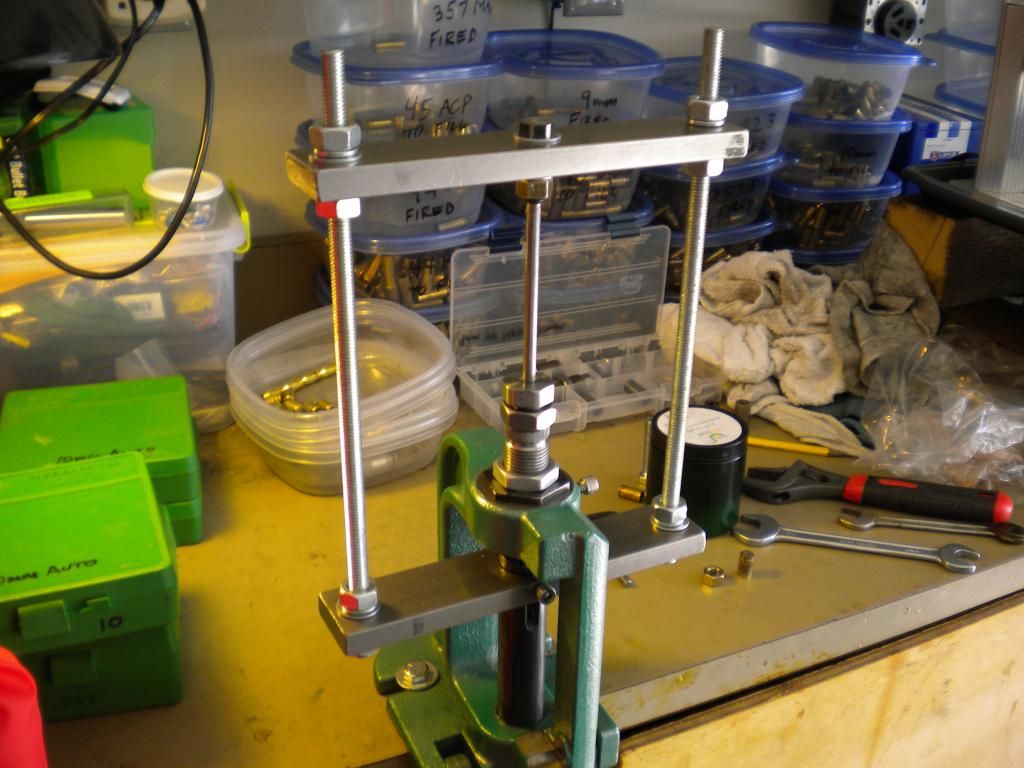
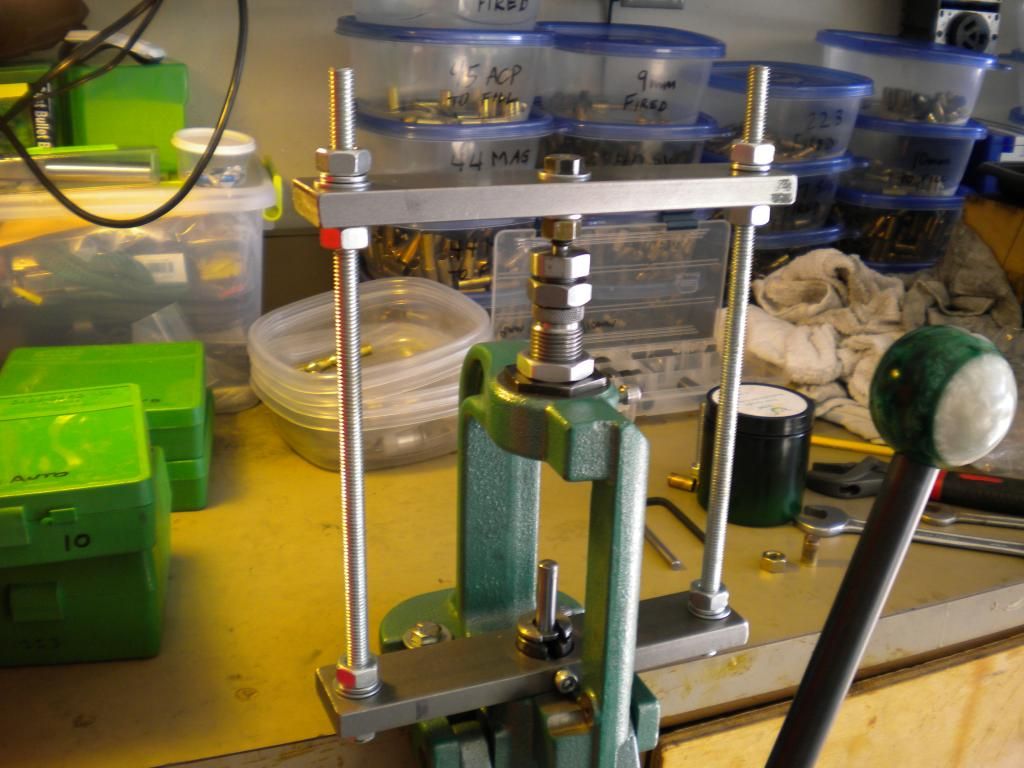
    success! here is the auto eject on the press downstroke when swaging a case:


    and then the case is ejected on the press upstroke, much easier than using a hammer on the top eject punch and takes far less effort:


    is it pretty? No, but it would look fine on a walmart shelf, and it is functional!

    what i ended up doing was turning down a 5" long 3/8" grade 8 bolt, leaving about 3/4" of the threads near the head, then securing it with nut/washer/lockwasher... it turned out to be much less drama than i thought to get this part completed...

    if you add this to the project you are out another $25 or so for the flat bar, all thread, nuts/bolts/washer, and bi-metal hole saw... not bad considering it will cost your upwards of $150 if someone else makes it for you, but $25 well spent for this project...

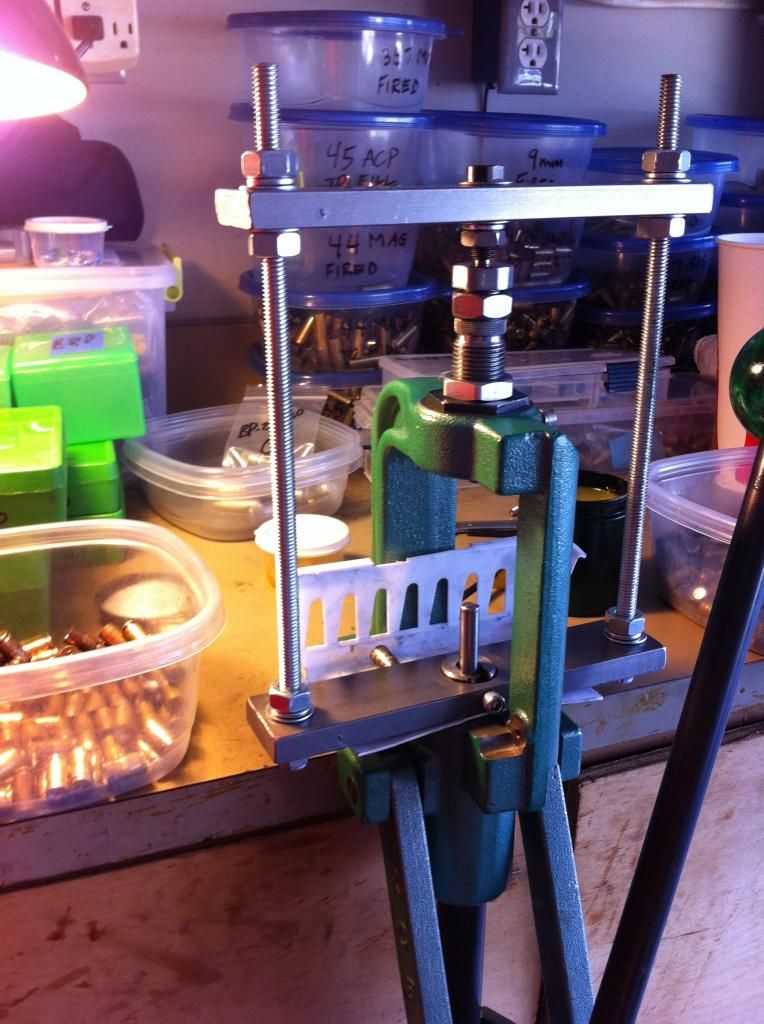
    but now i have a new problem: the shells shoot out like a bat out of Hades when ejected, i need some type of catch basin, any suggestions? the space to catch the shells is limited, irregular, and must stay on the bottom of the press and fit around the ram and bottom flat... ???
    Last edited by Cane_man; 05-31-2013 at 01:03 PM.

  4. #44
    Boolit Master
    Join Date
    Mar 2013
    Location
    seated with Him in the heavenly places in Christ Jesus (Eph 2:6)
    Posts
    1,192
    Heat Treating Update

    looks like the method i am using for case hardening is working, but it is warping the cores and the bullets swage/size out of round!

    so i plan to scrap these inserts that were case hardened and make new ones... live and learn (that's part of what makes this project more fun, btw)... so if the cores wear some over thousands of bullets it just isn't a big deal to turn a new insert... so that is what i need to do this weekend, remake the 3 inserts then i am going to swage a batch of 250 with the auto eject and it should go much easier and faster...

  5. #45
    Boolit Master Forrest r's Avatar
    Join Date
    Nov 2011
    Location
    NE Ohio
    Posts
    2,084
    Wow!!!

    Did you quench your parts in brine or oil or just water?

  6. #46
    Boolit Buddy
    Join Date
    Apr 2013
    Location
    West Central Fl
    Posts
    451
    Looking good. Can you run them back through a final sizer die from Lee??? Maybe you could contact a commercial heat treater to see if they can heat treat and eliminate any warpage?

    CC

  7. #47
    Boolit Master
    Join Date
    Mar 2013
    Location
    seated with Him in the heavenly places in Christ Jesus (Eph 2:6)
    Posts
    1,192
    i followed the directions on Cherry Red and quenched in water... i never follow directions so maybe i should have quenched in oil instead... this 12L14 won't heat treat so case hardening is my only option...

    i ran the bullet through my final sizer insert and it would get close to eliminating the egg but not good enough, and i didn't really want to run them through the sizer 3 or 4 times anyway... i think i would have the same problem with a Lee sizer

    i had another thought that i could size the insert a few thou or three under, case harden, the use a drill bit or reamer to get close then lap to final ID... this suff gets pretty hard! not sure how well a drill bit would do on it, but what the heck i can turn an insert in 10' i might just give it a try because the cases eject much easier in a case hardened insert...

  8. #48
    Boolit Master Forrest r's Avatar
    Join Date
    Nov 2011
    Location
    NE Ohio
    Posts
    2,084
    I don't know if it helps with distortion any on soft steel but I use a soupcan furnace to get an even heat on the entire piece being hardened & quench everything in oil. Water will boil creating air pockets (steam) around the metal being cooled causing the part to cool unevenly creating warpage.

    Some metals/case hardeners call for water quenching. It's better to use a brine than strait water, a typical brine is 3/4# of salt to 1 gallon of water. The brine will cut down on the amount of air/steam that is around the part being cooled.

    Personally I like to use oil (old harley oil), it's full of carbon. It works to heat treat different grades of harder steel & can be used to simple quench hot steel.

    You might consider taking one of your out of round dies & drilling it out to a larger dia & checking it for roundness. Then re-heat treating it but use oil instead & see what helps. The other thing that most people overlook with heat treating steel is the more even the heat the better, the more even the cooling the better. Someone that is heat treating a shaft for a pulley or a pin to hold a mower deck on isn't really concerned about 2 or 3/1000th's of warpage.

    Something else to consider:
    You are heating what is nothing more than a tube and a tube is harder to heat evenly than a solid shaft. A solid shaft(bolt, rod, pin, etc.) takes longer to heat but the heat will spread evenly throughout the metal. A tube on the other had will draw air thru it cooling part of the tube & making it harder to transfer heat evenly. I don't know what your setting/resting/holding the parts your heat treating with but that will definitely affect how even your parts are heated.

    In heating, 1700* here & 1575* on the other side ='s warpage
    In cooling, 100* water here & 500* steam there ='s warpage

    I'm sure you will figure it out, everything else you've done has been well thought out.

    When I started using the soupcan furnaces the quality of what I was heat treating went to the next level (even heat). A pic of the 2 furnaces I use, nothing high-tech just a soupcan & a coffee can lined with ceramic insulation. But when you heat something in either of these you don't get any hot or cold spots in the part being heated.

    Attachment 72290Attachment 72291

  9. #49
    Boolit Master
    Join Date
    Mar 2013
    Location
    seated with Him in the heavenly places in Christ Jesus (Eph 2:6)
    Posts
    1,192
    got tired of the swaged cases shooting all over the floor and counter top when ejected... went to walmart, kitchen section, plastic kitchen thingy $0.74, took some shop scissors to it & drilled a hole and here is what i came up with:


    the little plastic catcher on the back really works... most of the time the bullets bounce to the catcher or sit on top of the flat bar, about a third will bounce out the front and they are easy to snag with an open hand (if you can aim a gun and hit a target you will have the manual dexterity to catch it), every once in a while they will hit the ground or squirt off to the side but that is like one in 50... this is much better than without the catcher and something you will want to add... i know you can come up with something better so post a pic if you do

    i was swaging about 400 cases today, it is amazing how much heat is generated by this process... the die warms up, the case comes out warmer, etc.


    Lube Update - i had been using straight lanolin because i was too lazy to mix it up with some castor oil... a cb member swears by using 1/2 Millitec Oil and 1/2 Lanolin, i mixed some up and thought the straight lanolin was better... i have yet to try the 50/50 mix with castor oil... not sure if i will do this as the Lanolin works really well, and the wifey says it gives me soft skin , hey whatever it takes to keep the old lady happy... the Lanolin could be working well because the hot weather has set in here and it is very thin, and i can see that in the winter the Lanolin will be much more viscous and perhaps that is where cutting it with oil will be a benefit...
    Last edited by Cane_man; 06-02-2013 at 06:11 PM.

  10. #50
    Boolit Master
    Join Date
    Mar 2013
    Location
    seated with Him in the heavenly places in Christ Jesus (Eph 2:6)
    Posts
    1,192
    Quote Originally Posted by Forrest r View Post
    I don't know if it helps with distortion any on soft steel but I use a soupcan furnace to get an even heat on the entire piece being hardened & quench everything in oil. Water will boil creating air pockets (steam) around the metal being cooled causing the part to cool unevenly creating warpage.

    Some metals/case hardeners call for water quenching. It's better to use a brine than strait water, a typical brine is 3/4# of salt to 1 gallon of water. The brine will cut down on the amount of air/steam that is around the part being cooled.

    Personally I like to use oil (old harley oil), it's full of carbon. It works to heat treat different grades of harder steel & can be used to simple quench hot steel.

    You might consider taking one of your out of round dies & drilling it out to a larger dia & checking it for roundness. Then re-heat treating it but use oil instead & see what helps. The other thing that most people overlook with heat treating steel is the more even the heat the better, the more even the cooling the better. Someone that is heat treating a shaft for a pulley or a pin to hold a mower deck on isn't really concerned about 2 or 3/1000th's of warpage.

    Something else to consider:
    You are heating what is nothing more than a tube and a tube is harder to heat evenly than a solid shaft. A solid shaft(bolt, rod, pin, etc.) takes longer to heat but the heat will spread evenly throughout the metal. A tube on the other had will draw air thru it cooling part of the tube & making it harder to transfer heat evenly. I don't know what your setting/resting/holding the parts your heat treating with but that will definitely affect how even your parts are heated.

    In heating, 1700* here & 1575* on the other side ='s warpage
    In cooling, 100* water here & 500* steam there ='s warpage

    I'm sure you will figure it out, everything else you've done has been well thought out.

    When I started using the soupcan furnaces the quality of what I was heat treating went to the next level (even heat). A pic of the 2 furnaces I use, nothing high-tech just a soupcan & a coffee can lined with ceramic insulation. But when you heat something in either of these you don't get any hot or cold spots in the part being heated.

    Attachment 72290Attachment 72291
    Forest that is pretty clever... what is your heat source when you do your heat treating? where do you get the ceramic insulation? are you using a thermocouple to measure the temp? ...it would be pretty easy to add a high temp TC to my PID to see what temp i was getting on the inside...

    your explanation on why i was getting warpage makes perfect sense, and even though i had a torch on each end of the insert it wasn't a uniform orange/red all across the insert... and when i quenched in the water there was some steam and an instant of boiling water around the part... i have heard of the brine water quenching medium but never used it...

    i want to get the case hardening done because the reduced friction when swaging is a whole order of magnitude less, imo... so i will keep after this and see what i can come up with

  11. #51
    Boolit Master Forrest r's Avatar
    Join Date
    Nov 2011
    Location
    NE Ohio
    Posts
    2,084
    It's low tech but it works. Use nothing more than a plain old benz-o-matic torch, you can see the hole in the side of the small soup can where I stick the torch in. You can use map gas (yellow bottle) but it's really a waste of money compared to propane (blue bottle). The map gas will get a little over 2000* in one of these furnaces & the propane will get around 1900*.

    You can get the ceramic insulation where they sell wood burning fireplaces or kilns for pottery, etc. It normally sells for $20 for a 12" x12"x 1" thick piece.

    When I heat something in 1 of these small ovens I still rotate the part 90* after it becomes bright cherry red to make sure it has been heated evenly. I've worked in a couple machine shops & for machinists over the decades & have done my fare share of heat treating. I'm not saying I have a trained eye for the correct color of red/orange. But I can say I use nothing more than a magnet to test the heated parts when I think the temperature is correct. After prying red hot parts off of a magnet for awhile I got a pretty good eye for it. A magnet is your friend, when you think it's hot enough, give it a little longer then test.

    This might sound stupid, buttttttt. Why not just buy annealed steel or a better grade of hardened steel or grade 5/8 bolts & anneal them to be able to easily machine them them simply re-heat treat them? Heat treating is a lot easier than case hardening & annealing is easier than either of the hardening processes. Buy a machinery's handbook, some ceramic insulation & some better grades of steel. The machinery's handbook will have tables in it that will tell you the temps & what medium to use to heat treat, quench & anneal the different grades/types of steel.

    Attachment 72395

  12. #52
    Boolit Master
    Join Date
    Mar 2013
    Location
    seated with Him in the heavenly places in Christ Jesus (Eph 2:6)
    Posts
    1,192
    done! got me a foot of the 1" thick on evilbay for $22...

    are you leaving the can open on one end when heating, or are you covering it?

    are you saying that if you are at the correct temp it is no longer magnetic... just touch a small magnet to it to test?

    this case hardening is pretty easy to do with these small parts... if i can get it heated evenly i think it wont warp anymore + quenching in oil or brine water, and i hope this little soup can oven will be the trick...

  13. #53
    Boolit Buddy
    Join Date
    Jun 2011
    Location
    San Diego, CA
    Posts
    361
    "But I can say I use nothing more than a magnet to test the heated parts when I think the temperature is correct. After prying red hot parts off of a magnet for awhile I got a pretty good eye for it. A magnet is your friend, when you think it's hot enough, give it a little longer then test."

    A piece of iron will ordinarily be attracted to a magnet, but when you heat the iron to a high enough temperature (called the Curie point), it loses its ability to be magnetized. Heat energy scrambles the iron atoms so that they can't line up and create a magnetic field. Here is a simple demonstration of this effect.
    http://www.exploratorium.edu/snacks/curie_point/

    Got my learnin' done for the day. Thanks Forrest r.
    Supe

  14. #54
    Boolit Master
    Join Date
    Mar 2013
    Location
    seated with Him in the heavenly places in Christ Jesus (Eph 2:6)
    Posts
    1,192
    "Another way to tell that it's too cold is by its Curie point. The Curie point is the temperature where a magnetic alloy becomes non-magnetic or visa-versa. For low-alloy steel, the curie point is 1414º F. A quick touch with a magnet will tell you if you are over the curie point. Typically, you should stay over 1500º F. Of course, there is the color vs temperature method to determine its temperature. Once the part is the shape you want, you can let it cool on its own to form a normalized structure or you can quench it to harden it by forming martensite. Don't forget to temper it."

    "When you are done, you will have a decarburized layer. The best method for removing this layer is with a file. You will know when you have removed it when the file doesn't remove as much as easily. The decarburized layer is all ferrite. Ferrite is much softer than tempered martensite. I have done this at home with small parts using a torch. If the grade of steel is not very harden able, you will need to quench it in brine (10 percent salt water). If its very hardenable, brine will crack it. Use an oil for these steels. As with any quenching operation, agitation accelerates the quenching operation. I have never done large parts at home. You would need a large hot fire. I would suggest reading a blacksmithing FAQ. However all of the metallurgy remains the same."

    interesting, wish i had looked at this earlier...

    http://www.rocketmaterials.org/research/metallurgy/

  15. #55
    Boolit Master
    Join Date
    Jan 2013
    Posts
    895
    This thread just keeps getting better. From milling to heat treating :thumbup:

  16. #56
    Boolit Master Forrest r's Avatar
    Join Date
    Nov 2011
    Location
    NE Ohio
    Posts
    2,084
    I leave the end open to be able to see, move, rotate the parts I'm heat treating ot annealing. You'll be amazed at how quickly the parts will heat up in 1 of these little ovens. Just make sure you rotate the part 90* when you think it's ready & heat it a little more before you test it with a magnet.

    good luck

  17. #57
    Boolit Mold
    Join Date
    Aug 2012
    Location
    evanston wy
    Posts
    10
    thanks Cane man for your info love this thread!
    I like how you put this together.

  18. #58
    Boolit Master
    Join Date
    Mar 2013
    Location
    seated with Him in the heavenly places in Christ Jesus (Eph 2:6)
    Posts
    1,192
    thanks mrjohn, it has been a lot of fun... swaging and making swaging stuff is about as much fun as you can have without a permit (credit NZ jeff!)...

    WY, my son is there right now for his freshman orientation as he will be in Laramie in school starting in the Fall... looks awesome wish i lived here

  19. #59
    Boolit Master
    Join Date
    Mar 2013
    Location
    seated with Him in the heavenly places in Christ Jesus (Eph 2:6)
    Posts
    1,192
    working on [1] a lead core trimmer similar to a core cutter for trimming my 357 bullets to use as cores, and [2] using O1 for the inserts and heat treating then tempering instead of using 12L14 and case hardening... Forest really got me to reassess this and in the long run the O1 may be the way to go for us rednecks doing this at home on the cheap and it may make it possible to eliminate 2 steps and swage in one step instead of two and eliminate the core sizing as well... give me another week, it is freaking 107F today and summer has arrived early in the CA central valley with the garage being just too hot to get anything done for more than an hour or so...

  20. #60
    Boolit Buddy
    Join Date
    Apr 2013
    Location
    West Central Fl
    Posts
    451
    Cane, good luck getting back in the garage. It's been summer time here for a couple of weeks now. I'm going to have to airconditon my garage. First thing though I've got to get over this sinus infection that has now turned into bronchitis. If I go out into the humidty for 10 minutes I spend the next couple of hours trying to cough up a lung. Been on antibiotics for 2 weeks, shots last Dr visit, and the worst part a steroid inhaler. I don't see how people "abuse" those things, makes me "jittery" as all get out. Can't even stand to be around myself, much less anyone else. I felt a little better for the first time yesterday so I went out in the garage and played around with the derimming die. I'm paying the price today though.

    CC

Page 3 of 7 FirstFirst 1234567 LastLast

Posting Permissions

  • You may not post new threads
  • You may not post replies
  • You may not post attachments
  • You may not edit your posts
  •  
Abbreviations used in Reloading

BP Bronze Point IMR Improved Military Rifle PTD Pointed
BR Bench Rest M Magnum RN Round Nose
BT Boat Tail PL Power-Lokt SP Soft Point
C Compressed Charge PR Primer SPCL Soft Point "Core-Lokt"
HP Hollow Point PSPCL Pointed Soft Point "Core Lokt" C.O.L. Cartridge Overall Length
PSP Pointed Soft Point Spz Spitzer Point SBT Spitzer Boat Tail
LRN Lead Round Nose LWC Lead Wad Cutter LSWC Lead Semi Wad Cutter
GC Gas Check