WidenersRotoMetals2Snyders JerkyInline Fabrication
Load DataLee PrecisionReloading EverythingRepackbox
MidSouth Shooters Supply Titan Reloading
Page 2 of 7 FirstFirst 1234567 LastLast
Results 21 to 40 of 124

Thread: Swaging on the Cheap - 9mm Case to 40SW/10mm JWords

  1. #21
    Boolit Master
    Join Date
    Mar 2013
    Location
    seated with Him in the heavenly places in Christ Jesus (Eph 2:6)
    Posts
    1,192
    Quote Originally Posted by newcastter View Post
    Even if I do score a good deal on a lathe my only other rebuttal is that I would still have to learn the tooling with no previous experience.
    easy to learn, lots of youtube tutorials on how to do these basic lathe operations... i am a self taught home machinist and it probably took me a few weekends to learn the basics and that is all that is required for this project... and using a lathe for diddling around at home for various projects is just plain fun!

    i will add this, when you do get your lathe you will probably have to spend another $50-$100 for the tooling like a drill chuck for the tail stock, a live center, some drill bits, a few files, and some cutting tools...

  2. #22
    Boolit Master
    Join Date
    Mar 2013
    Location
    seated with Him in the heavenly places in Christ Jesus (Eph 2:6)
    Posts
    1,192
    Quote Originally Posted by khmer6 View Post
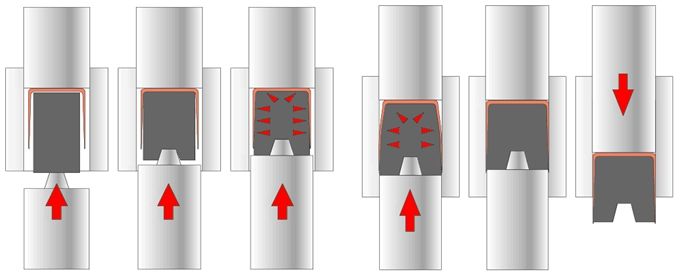
    Can't wait to see the point forming step. Just to be clear, does the top stop punch presses against the lead core and expands the brass casing?
    actually what is happening is that the bottom punch is pushing up on the lead inside the case, causing the lead the flow in all directions and expand/swage the 9mm case from 0.390 to 0.399... the case is pressed between the top stop punch and the bottom punch, like this:


    you are going to be disappointed with point forming, it is anticlimactic it is so simple! i am going out to shoot my 10 this morning then later i will post on point forming and bullet sizing and wrap this thread up for now...


    .

  3. #23
    Boolit Master
    Join Date
    Jan 2013
    Posts
    895
    Ahhhhh so true. I didn't see the pic of the case being upside down. Can't wait to see what trickery you have for point forming. My 10s are begging for jackets, we'll not really. I just like to push them hard

  4. #24
    Boolit Master
    Join Date
    Jan 2013
    Posts
    895
    I got to thinking. Some seating stems are shaped to certain boolit profile type. What if one were to use a seating die or maybe rig up a die with a seating stem to point form?

  5. #25
    Boolit Master
    Join Date
    Mar 2013
    Location
    seated with Him in the heavenly places in Christ Jesus (Eph 2:6)
    Posts
    1,192
    ^^^ you are on the right track, actually what i will use a 220 Swift sizing die for point forming... if you glance through the thread that i linked in the OP CB member Danr lists the dies you can use for just about all the popular pistol calibers, he is the one that nutted this all out...

  6. #26
    Boolit Master
    Join Date
    Mar 2013
    Location
    seated with Him in the heavenly places in Christ Jesus (Eph 2:6)
    Posts
    1,192
    [7] Point Forming

    Getting close to finishing now, all that is left if point forming and sizing… here are the parts you need to make or acquire:


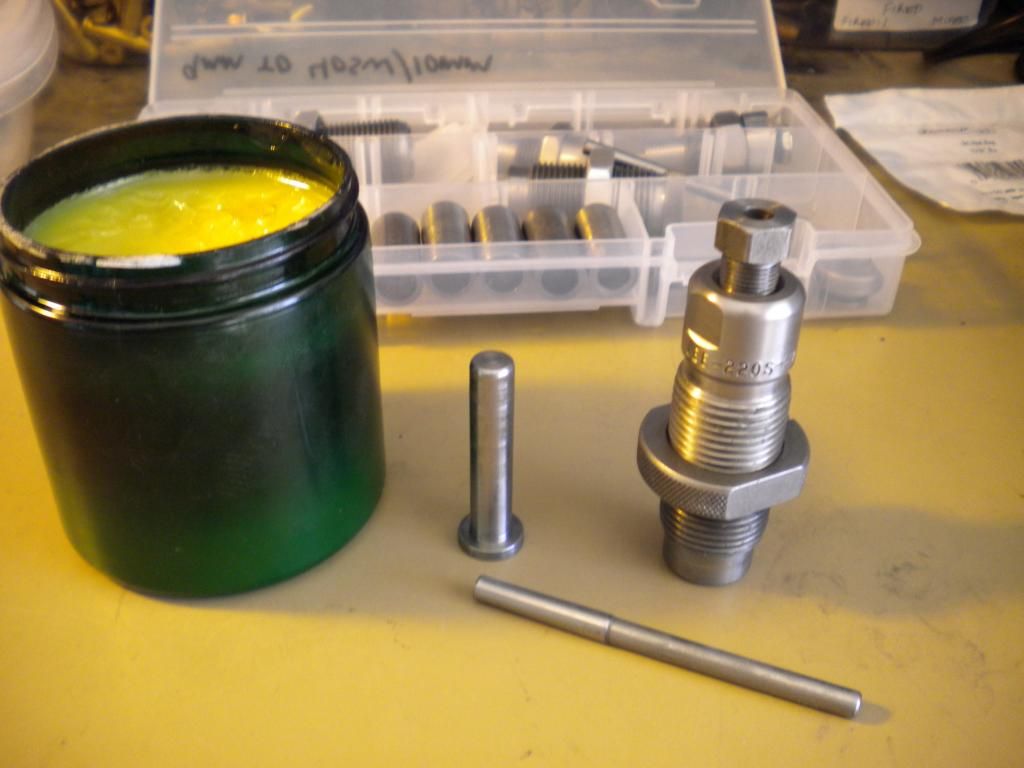
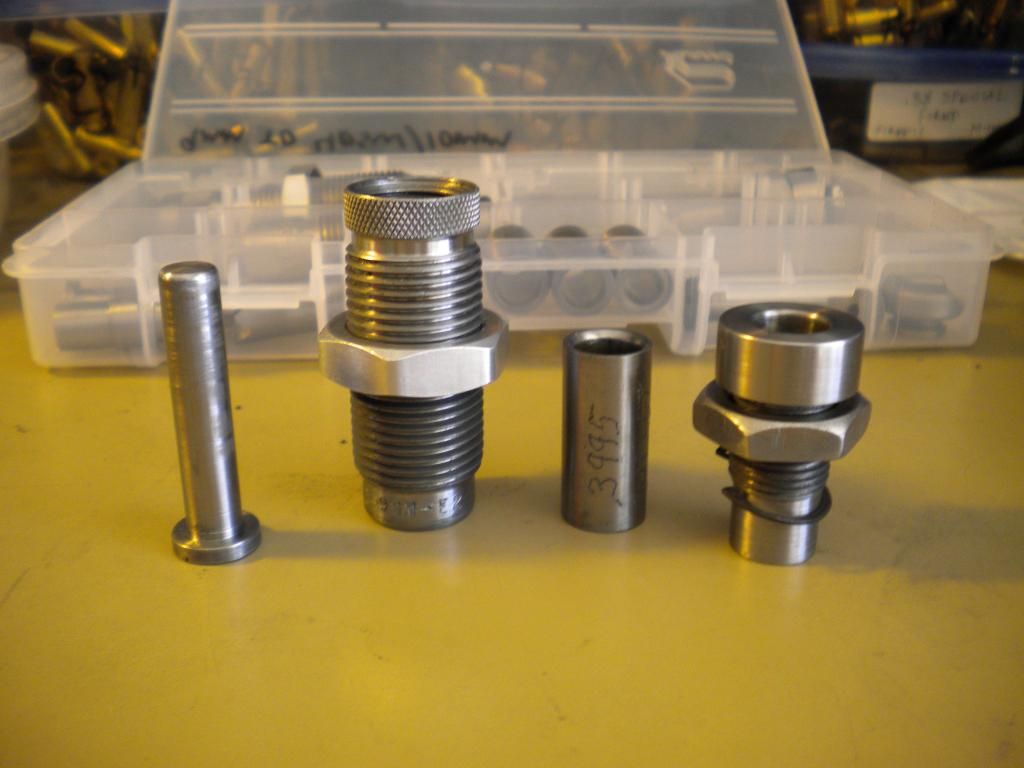
    from left to right is the longer bottom punch (you already made this), a Lee 220 Swift sizing die with modified decapping pin (you need to get this), and this is what is needed next:

    Lee 220 Swift Sizing Die
    – you are going to use this die to form the point… the shoulder forming part of the die makes a really nice truncated cone type of ogive for the bullet… that is the genius of this system (thanks to others figuring this out) is that you don’t have to make a point forming die because Lee has already done this for you… only thing you will have to do is remove the small “pin” part of the decapping pin and the rest fits nicely in the die as is… Lee won’t let you just buy the die itself, so you have to buy all the parts for it, which include the sizer die body, the decapper clamp, and the decapper pin, and while you are at it get the die lock ring as well:

    http://leeprecision.com/size-die-body-220s.html


    http://leeprecision.com/decapper-clamp.html


    http://leeprecision.com/223-ez-x-exp-decapper.html


    all total this will set you back another $18.50... only mod you need to do is file off the decapper pin point section, then flip it around and it makes a great ejection punch… if you look in the pic below you can see how I have oriented it…

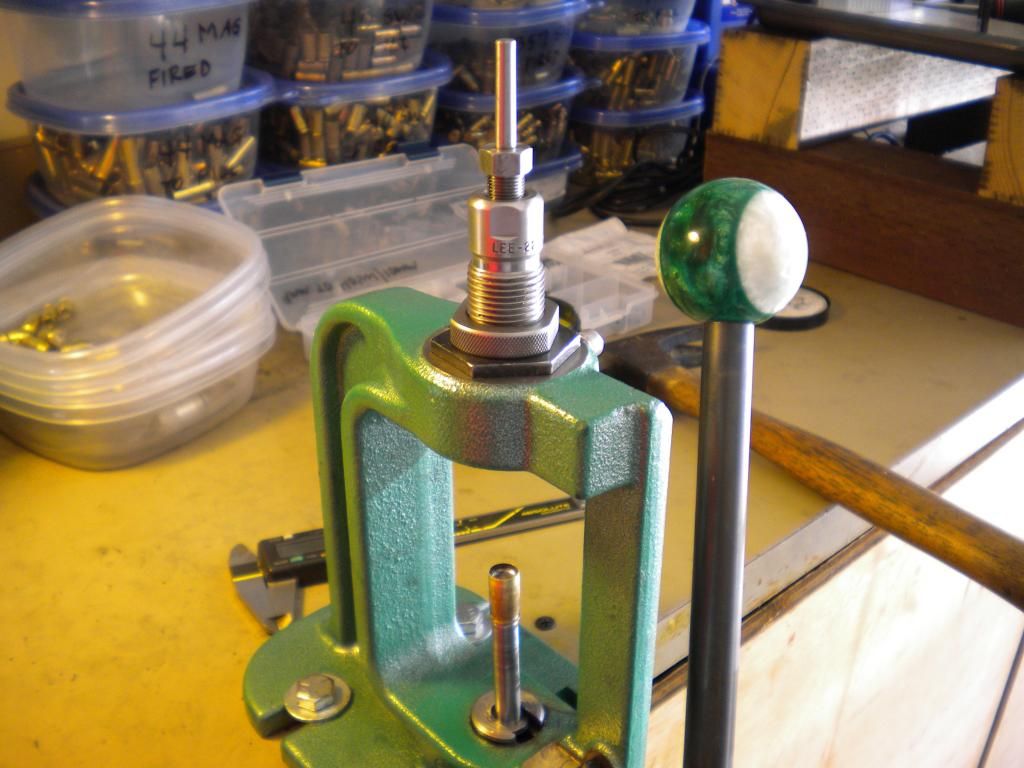
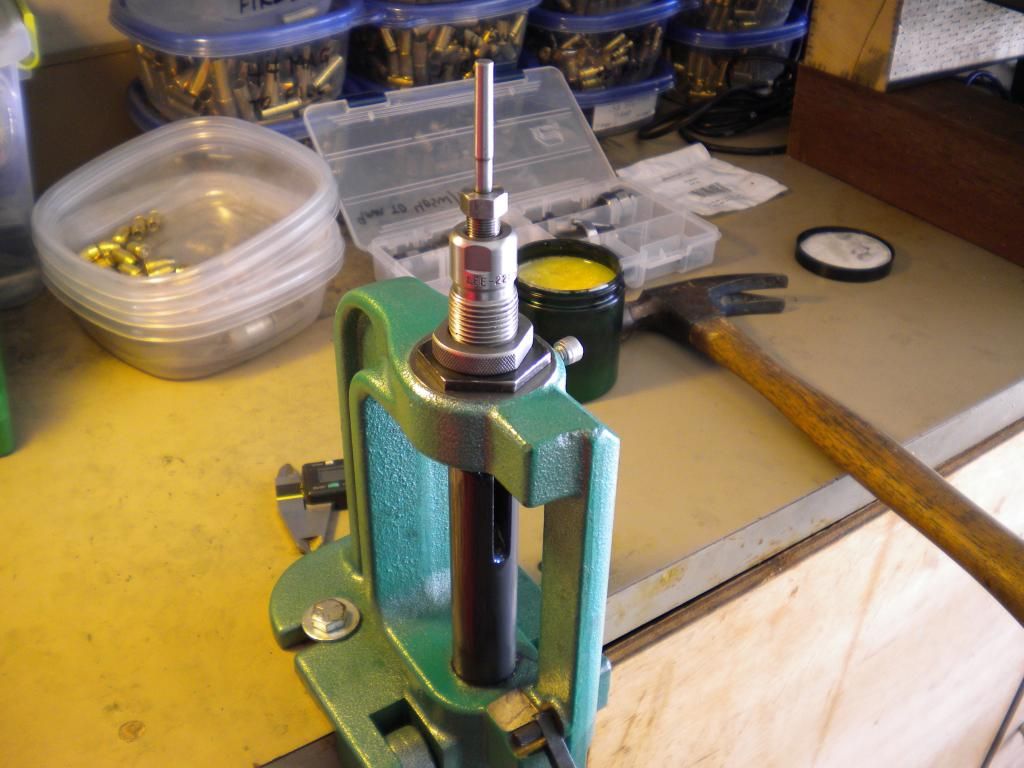
    to point form the swaged core all you need to do is lube the top third of the case, put the case on the bottom punch case mouth pointing up, and then push it up in the die… you need to go easy here and adjust the depth of the die little by little until you get the ogive you are looking for… you should be able to cam over the ram at the top of the stroke, but if you push too much of the case in the die then then case mouth will start to bell out and lead will overflow the edge… play with it and you will see what I mean… one small item that is harmless is that this die has a bleeder hole on it right on the shoulder, and when you point form it will put a small dimple on the ogive which affects absolutely nothing in the performance of the bullet… if you are anal retentive this will bother you, but just relax because it is no biggie considering how cost effective that bullet was to make!


    here you can see the ejection pin rise up at the top of the stroke, also notice that the thicker part of the decapping pin is on top of the die… now just lower the ram and put a little tap on the ejection pin and the bullet comes out easily in your cupped hand


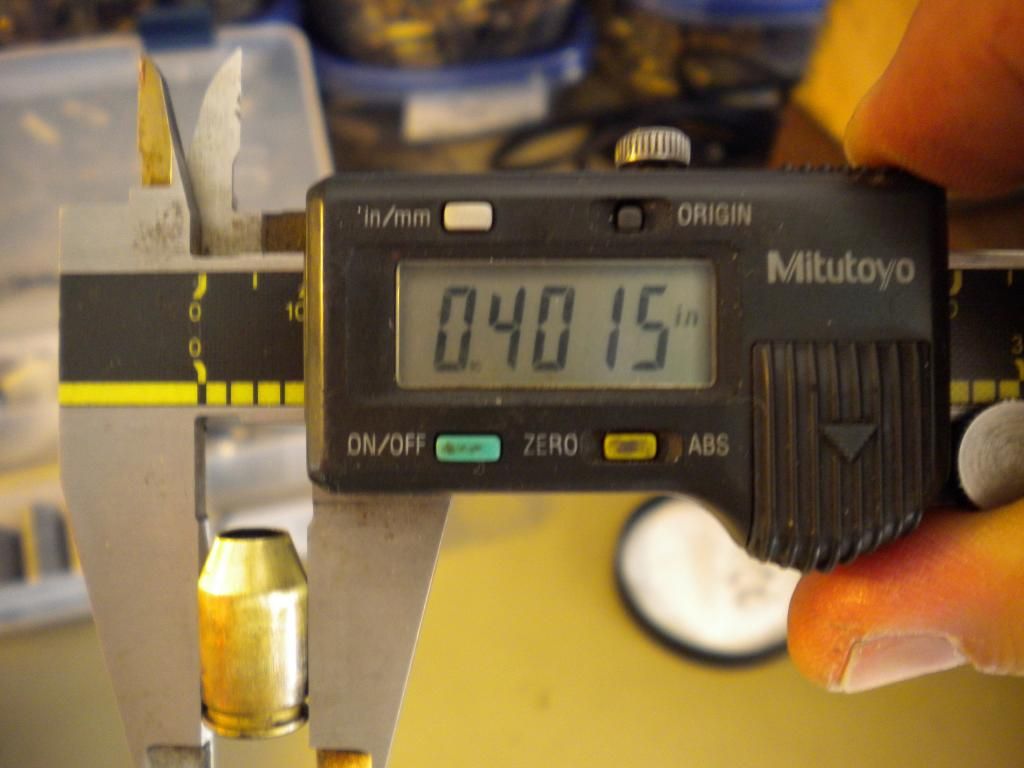
    alright, you have just put a nice truncated cone type ogive on your bullet, but in the process the bullet OD went from 0.399 to 0.4015, which is too big of course and now you have to size it down to 0.4000 or so and you will do that next during sizing:


    that's all there is to point forming, it goes very fast and once you have the die adjusted properly you can knock them out quickly... if you go to the url for the thread i posted in the OP there are rifle sizing dies listed there that will work very well for point forming other calibers like 45acp, 44mag, 9mm, etc... here is a quick summary:

    45 ACP (.451) - 243 winchester (.454)
    44 mag (.430) - 244 remington (.429)
    38 Spl & 357 - 222 remington (.357)
    9mm (.355) lee (.356) - 17 remington (.356)

    at this point you are in for another $18.50, adding this to the previous costs gives a total project cost of $95.75, and you are ready to finish sizing your bullets…
    Last edited by Cane_man; 05-27-2013 at 02:16 PM.

  7. #27
    Boolit Master
    Join Date
    Mar 2013
    Location
    seated with Him in the heavenly places in Christ Jesus (Eph 2:6)
    Posts
    1,192
    [8] Final J-Word Sizing

    You are at the end now and ready to finish size the bullets, here are the parts you will use:


    from left to right you have the longer bottom punch (you already made this), the Lee die body, a 0.3995 ID die insert, and the top “pass thru” punch (you already made this)… here are the parts you need to make:

    die insert – you need to turn a new die insert with an ID of 0.3995 to 0.4000… make this just like you did the others, you can final drill it out with an X size drill bit which you already have… take your time lapping to the final OD, place it in the die and pass thru some lead cores to check the ID several times during the lapping process… this step took me the longest, and I want to say it took a few hours to lap it carefully to the final diameter…

    improvement alert: if you look at the pic above for the top pass thru punch you will see what looks like a thin washer on the bottom part of the threaded section… what I found is that the lock nut didn’t tighten down on the die body very well and would work loose… I needed a very thin type of lock washer I could use with it… I was poking around the hardware store and found some 11/16” diameter “Internal Housing Rings” that work awesome as very thin lock washers… I picked up a couple of them and now have incorporated them with the top punches…

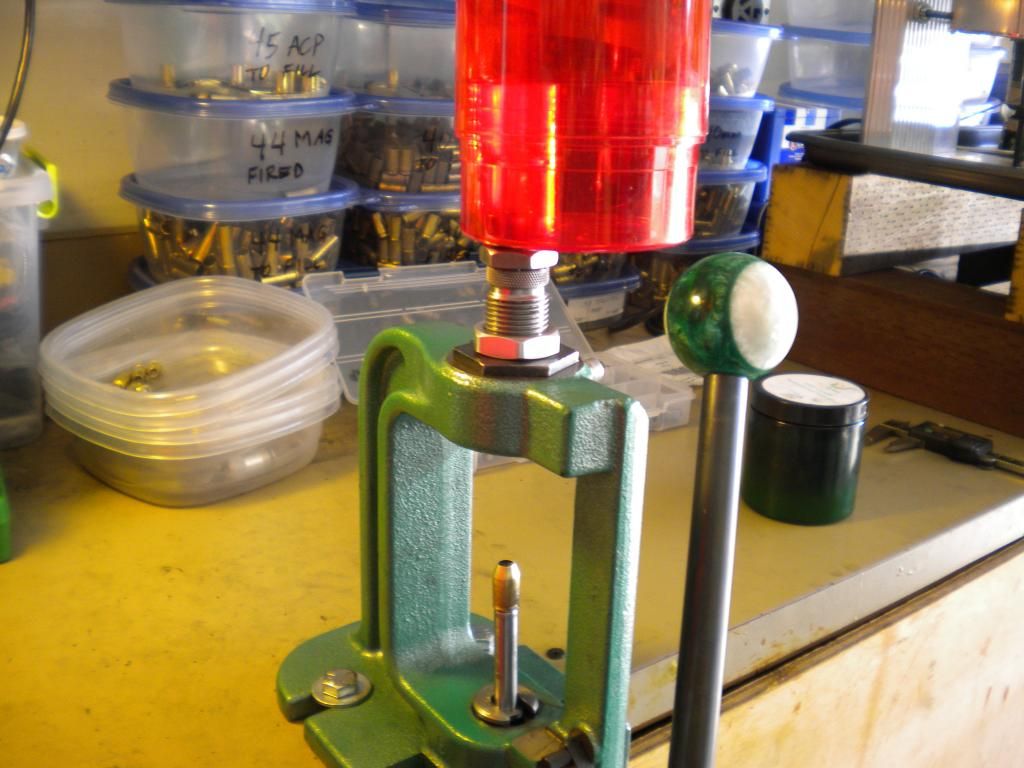
    now you are ready to drop in the core and tighten it down for final sizing… I found that the red Lee plastic catch bins that come with sizing dies fit perfectly on top of the top pass thru punch and it seems to have the same ID as a soda bottle… you just lube up the bullet and push it thru just like you did with core sizing… you may have to adjust the die depth to make sure the bullet is pushed all the way through at the top of the stroke, you will feel it go all the way to the top:


    the bullets will collect at the top and you can size several hundred at a time and have them collect at the top of the die...

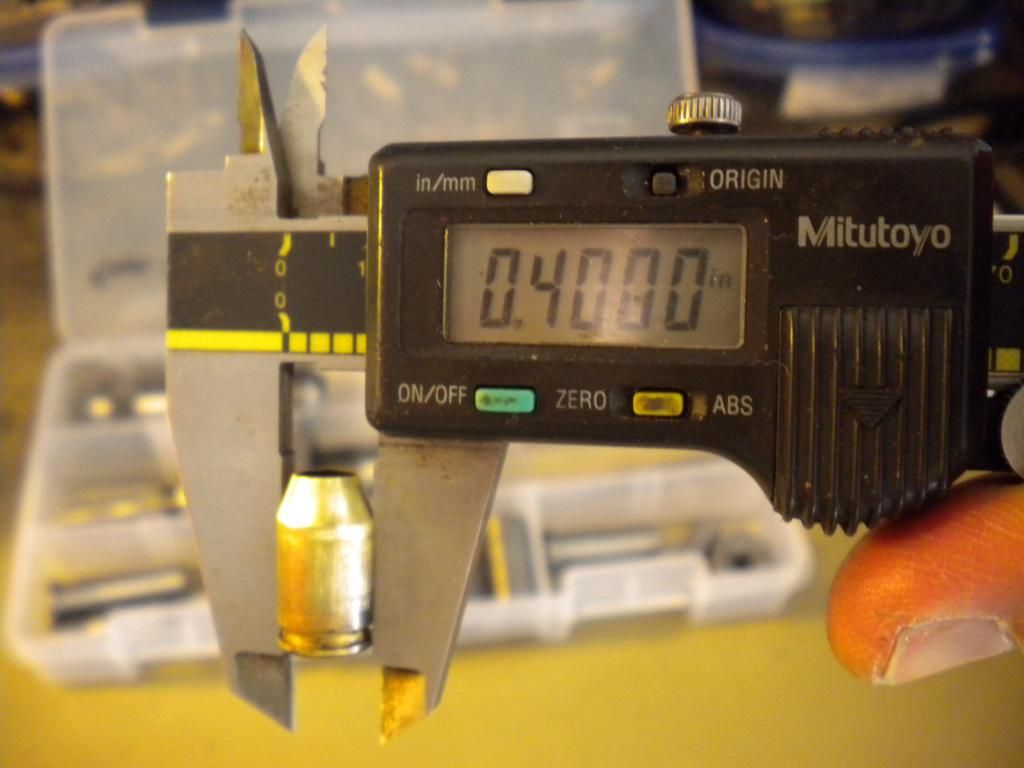
    here is the finished product… notice that the die is sized for 0.3995 but the bullet has some “spring back” and final sized at 0.4000, which is right on spec:


    last thing to consider which is optional is to remove the lanolin from the bullets... I chose to do this in walnut media with the vibratory tumbler, I added a couple of cap fulls of mineral spirits and let them clean for an hour and they were bright and shiny with no more lube on them…

    there it is, I hope this helps someone get going on swaging their own bullets… and the final project cost? $95.75, can you say cheap!

  8. #28
    Boolit Master
    Join Date
    Mar 2013
    Location
    seated with Him in the heavenly places in Christ Jesus (Eph 2:6)
    Posts
    1,192
    One item on the improvement list is heat treating... not sure if it is absolutely necessary, but why not check it out?

    I don't have a heat treating oven, but 12L14 won't heat treat anyway so that is not a loss, but it will case harden... I learned of this case hardening compound called Cherry Red and decided to pick up a 1# jar from an online horseshoeing place, the cherry red looks like this:


    all you do is heat the object up to "cherry red", immerse it in the compound, heat it back up to cherry red, then quench in water and clean up the part, they have a nice youtube vid to show how it is done:


    so i decided to give it a try... what it does is case harden the first 0.005 or surface thickness of the material and increase the hardness...

    i performed the necessary steps (used mapp gas and it worked pretty good in my canister style torch), then cleaned up the part... i decided to use the core sizer insert because that is an easy part to make and if i screwed it up it would be no big loss... after i cleaned it up i ran some cores through it and two things happened:

    1) the cores were sized smaller - so this case hardening process added some material, or something increased the ID

    2) it was easier to push thru the cores - maybe with a harder surface there is less friction?

    Not sure of the outcome just yet, i need to clean up this part tomorrrow and resize from 0.353 back to 0.355 and go from there... anyway, it was easy to do but not sure if i will harden the other cores like this yet...

    edit: well i know that this process works, i cleaned up the core sizing die and then tried to scribe the sizing on it and my little electric scribe could barely etch the surface... the cores just fly through like hot butter, not nearly the resistance as before...

    not sure how much harder as i dont have a hardeness tester... anyone who has a BH tester like to receive a sample and test it for me? i would send it to you, you test it, then throw the sample away when done... let me know- thanks.
    Last edited by Cane_man; 05-28-2013 at 10:26 AM.

  9. #29
    Boolit Master
    Join Date
    Jan 2013
    Posts
    895
    Really strange how Lee does sell the entire die by itself. They sell lots of other sizing or expanding dies by themselves. Also the deluxe 3 die set for 220 swift can be had for about 28$ sell the other 2 dies and possible make your money back. Can the bottom punch from the 356-401 sizing kit from Lee be used as well? For someone who has lots of Lee tools the only thing I see needed to make would be the swaging process. It might be possible to get a. 399 sizing die for this process, something to plug the top and eject the swaged case.
    Would cut down too long and expenses even more cuz I'm a cheap ****.
    1.) size cores
    2.) use universal expander to expand case mouth and seat cores
    3.) get a 399 sizing die and plug the top to swage.
    4.) point form in 220 swift sizing die.

  10. #30
    Boolit Master
    Join Date
    Mar 2013
    Location
    seated with Him in the heavenly places in Christ Jesus (Eph 2:6)
    Posts
    1,192
    Quote Originally Posted by khmer6 View Post
    Can the bottom punch from the 356-401 sizing kit from Lee be used as well?
    this is redneck swaging anything is possible, if it fits in the die and pushes the case up high enough then sure why not...

    dont forget final sizing at the end, this is important! you can't oversize jwords like you can boolits, be careful

  11. #31
    Boolit Buddy
    Join Date
    Apr 2013
    Location
    West Central Fl
    Posts
    451
    Cane: Thanks for finishing this process up so quickly. I need to reread the entire post again, and then break it down into smaller parts. As soon as I can find a source for 9mm., .40, and .45. I will be making more reamers and dies. It's getting late, and my headache is not conducive to following everything.

    CC

  12. #32
    Boolit Buddy
    Join Date
    Apr 2013
    Location
    West Central Fl
    Posts
    451
    Quote Originally Posted by newcastter View Post
    Even if I do score a good deal on a lathe my only other rebuttal is that I would still have to learn the tooling with no previous experience.
    Newcaster, look for a deal, at least look for a couple of months. By then you'll have some experience, to judge the value of what you are looking at. Also be aware that tooling can be worth as much or more than the machine. I'm talking about extra chucks, follow rest, steady rest, indicators, DRO's, carbide tooling, drill chuck for the tail stock, live centers, indexable tool holders for the tailstock, quick change tool posts. I know it's all greek right now, but do your homework, trust me it will be time well spent if you decide to go this route. Machinery can be dangerous, so make sure you know the safety rules also. If you can run a drill, circular saw, table saw, drill press, etc., you can learn to run a lathe or mill. If you reload and haven't blown your self up, then you can follow instructions. Don't think you can't do it just because you've never done it before. Also if you get a good deal and decide it's not for you, you can always sell it and get your money back out of it.

    just my .02,
    CC

  13. #33
    Boolit Buddy

    Join Date
    Jun 2011
    Location
    Lebanon. Pennsylvania
    Posts
    462
    Quote Originally Posted by customcutter View Post
    Newcaster, look for a deal, at least look for a couple of months. By then you'll have some experience, to judge the value of what you are looking at. Also be aware that tooling can be worth as much or more than the machine. I'm talking about extra chucks, follow rest, steady rest, indicators, DRO's, carbide tooling, drill chuck for the tail stock, live centers, indexable tool holders for the tailstock, quick change tool posts. I know it's all greek right now, but do your homework, trust me it will be time well spent if you decide to go this route. Machinery can be dangerous, so make sure you know the safety rules also. If you can run a drill, circular saw, table saw, drill press, etc., you can learn to run a lathe or mill. If you reload and haven't blown your self up, then you can follow instructions. Don't think you can't do it just because you've never done it before. Also if you get a good deal and decide it's not for you, you can always sell it and get your money back out of it.

    just my .02,
    CC
    Thanks for the advice, I have already spent some time researching you tube vids and pricing online so I feel I have a better understanding but a ton to learn, I am pretty mechanically inclined so I am confident I can learn just would be better if I had some hands on training I will keep on the look out for a good deal, again thanks for the advice.

  14. #34
    Boolit Master
    Join Date
    Mar 2013
    Location
    seated with Him in the heavenly places in Christ Jesus (Eph 2:6)
    Posts
    1,192
    improvement alert: i roughed out the auto eject today... the old lady went shopping so what was i supposed to do? anyway, i will have to redo my punch, but all i can say is that if you do this project YOU NEED AUTO EJECT! details later...


  15. #35
    Boolit Buddy
    Join Date
    Apr 2013
    Location
    West Central Fl
    Posts
    451
    Looks good. I guess you use an allen bolt on the back side to secure the eject pin?

    CC

  16. #36
    Boolit Master
    Join Date
    Mar 2013
    Location
    seated with Him in the heavenly places in Christ Jesus (Eph 2:6)
    Posts
    1,192
    i am just slamming it down right now for proof of concept, but i think i will probably turn a new punch and have the top part threaded so i can secure it to the top bar....

  17. #37
    Boolit Buddy
    Join Date
    Apr 2013
    Location
    West Central Fl
    Posts
    451
    Your idea may be better. I don't know how well the pin would line up with the die if it moves up with the ram each time, and then back down into the die? As long as the ejector pin has a rim or shoulder on it so that it can't fall through the die after ejecting the j-word, I wouldn't worry about it.

    CC

  18. #38
    Boolit Master
    Join Date
    Jan 2013
    Posts
    895
    Maybe a washer or something so it doesn't fall too deep into the die and slam it. Or thread the hole and pin sorta like the gauge/trimmer and thread it into the bar

  19. #39
    Boolit Master
    Join Date
    Mar 2013
    Location
    seated with Him in the heavenly places in Christ Jesus (Eph 2:6)
    Posts
    1,192
    the top bar height is adjustable so you can set it so that it doesn't touch the top of the die, i am just slamming it right now so i can play with my new toy...

    what i think i may do is mill/file a small "slot" on the top bar so the bolt/punch has some play and the position somewhat adjustable, so it can be aligned correctly each time at setup and locked down with a nut & lock washer...

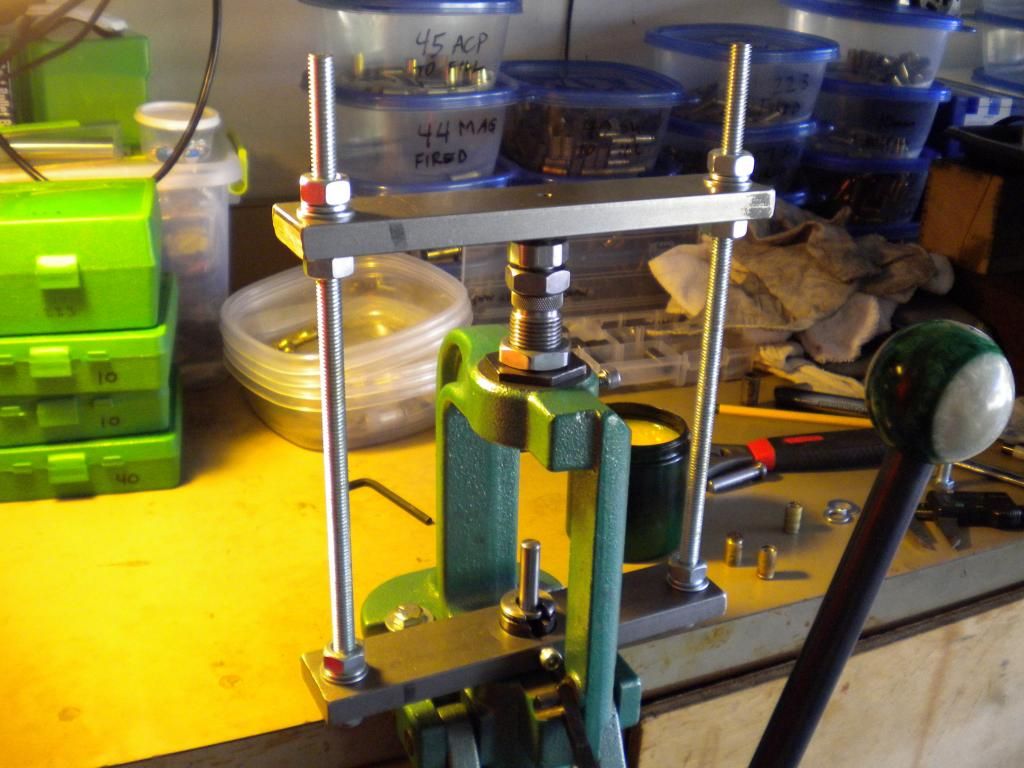
    i guessed on the dimensions for the bar i got lucky, i printed a pic from the archives and scaled it with a ruler knowing that the ram is 1" diameter:

    -flat bar is 1-1/2" wide by 1/2" thick, 8" long, used 1018 cuz i dont know any better

    -all thread is 3/8"-16

    the hole for the ram was a PITA! i have an el cheapo drill press and i used a 1" bi-metal hole saw from HD and it took me over an hour to drill it out with lots of starts-stops-oiling!


    drilled and tapped a 1/4"-20 threaded hole right at the ram, and a 1" cap screw secures it, fits real well as the RCBS RC ram is hollowed out some on the inside...
    Last edited by Cane_man; 05-29-2013 at 10:07 PM.

  20. #40
    Boolit Master
    alfloyd's Avatar
    Join Date
    Apr 2009
    Location
    Logan, Utah
    Posts
    625
    In post #9 you said:
    "top ejection punch – you are going to start with a 4” long 5/16” grade 8 bolt and turn it down to a diameter of 0.240 or so in order for it to fit easily and smoothly through the top stop punch… this can be a PITA turning down this diameter because the bolt will flex some while chucked in the lathe"

    Why not just use a 1/4 bolt and not turn it down.
    That is what I use for my top punches in my dies I make.

    Just my $0.02 worth.
    Lafaun
    Just staying at home and playing with multi-color boolits.

Page 2 of 7 FirstFirst 1234567 LastLast

Posting Permissions

  • You may not post new threads
  • You may not post replies
  • You may not post attachments
  • You may not edit your posts
  •  
Abbreviations used in Reloading

BP Bronze Point IMR Improved Military Rifle PTD Pointed
BR Bench Rest M Magnum RN Round Nose
BT Boat Tail PL Power-Lokt SP Soft Point
C Compressed Charge PR Primer SPCL Soft Point "Core-Lokt"
HP Hollow Point PSPCL Pointed Soft Point "Core Lokt" C.O.L. Cartridge Overall Length
PSP Pointed Soft Point Spz Spitzer Point SBT Spitzer Boat Tail
LRN Lead Round Nose LWC Lead Wad Cutter LSWC Lead Semi Wad Cutter
GC Gas Check