Actually was thinking a couple degrees was not worth fretting about but do plan on getting my thermometer closer than 50 degrees. Thank you and mega thank you's for all the good info you've posted.
Originally Posted by Frozone


|
   
   
|


|


Actually was thinking a couple degrees was not worth fretting about but do plan on getting my thermometer closer than 50 degrees. Thank you and mega thank you's for all the good info you've posted.
Mike
Benefactor Member NRA
Life Member Iowa Firearms Coalition
US Army Vet
There are two ways to conquer and enslave a nation.
One is by the sword. The other is by debt.�
John Adams 1826
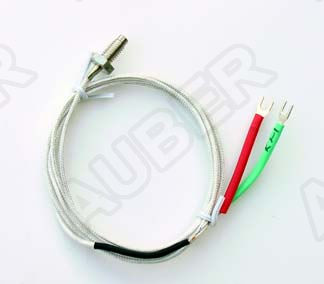
Figure I might as well rig my sizer/luber to operate off my PID controller. I put Auber's TCCON panel mount on my rig so I'm thinking their TCMALE plug for K type should fit right into my little outlet. Also a TC-K3 which I'm guessing is what is pictured in post #176
The plate on my heater unit only appears to be about 1/4" thick aluminum. Long as the unit bottoms out in the hole and maybe some of that special heat sink grease in it I'm assuming I'd be OK. Or would it need that whole 1/2" of the probe making contact????
Mike
Benefactor Member NRA
Life Member Iowa Firearms Coalition
US Army Vet
There are two ways to conquer and enslave a nation.
One is by the sword. The other is by debt.�
John Adams 1826


No, just that little 'bulb' on the end.
I don't even recommend drill/tap anymore. A dollop of epoxy on the surface and push the probe in is all it takes.
BTW, I have a 'glue on' probe with plug for $5 ($8.50 to your door) if you're interested.

Frozone: Are there plug/probes available that have a way to detach the probe from the wire as well as from the PID? Sometimes I might not want to use my heater/PID with my sizer and wouldn't want the wires in the way, even though the probe is epoxied to the base. (I mount my sizers with bolts and wingnuts as needed, then they get stored to conserve bench space)
Thanks
KE4GWE - - - - - - Colt 1860, it just feels right.
Aubers have an inline mini-connector TCCON2 that probably would do what you want.
Mike
Benefactor Member NRA
Life Member Iowa Firearms Coalition
US Army Vet
There are two ways to conquer and enslave a nation.
One is by the sword. The other is by debt.�
John Adams 1826
Yes, and I have them in stock. They are a female version of the plug on the end of the probe cable.
They don't have the exposed screws or the mounting flange of the panel plugs, It looks/work more like an extension cord then some hacked together arraignment.
Last edited by Frozone; 01-29-2014 at 05:57 PM.
Thanks for the replies! PM sent to Frozone.
KE4GWE - - - - - - Colt 1860, it just feels right.
PM replied.
The best way to do this is to just shorten the TCs you have now to a length you like.
And I'll send you an 'Extension Cord' that will go from the new end to the controller.
I do a similar set up on my LEE pots that have 'through the pot' TCs.
I put a panel mount in the back of the pot stand and than use a male-male cable to connect to the controller.

I just setup my controller on the cart that I cast on. It's working fine (Mypin PID TD4-SNR+SSR), it autotuned and worked fine. Now I woul
d like to add in a couple of alarms (low temp and high temp) but it looked like I could only find one alarm in the wiring schematic.
The 5/6 alarm is obvious, but I can't seem to see a second alarm.
Here's what it looks like on the cart with a toggle switch.
Probe in the pot.
If I am correct, I would need to put a 24v light in line on the SSR to indicate low temp/power on the element, then change Alarm 1 to the high alarm and then i could put a 110v light on that one. Could someone verify that before I spend more money on the build.
TD4-SNR S = SSR main output, N = NO Alarm2 output, R = Relay Alarm1 output.
You don't have a second alarm to use.
You needed a SRR type minimum to get 2 alarms.
You could put an LED in the SSR control line to indicate it is energized.
Just put it inline from the unit to the SSR. There is plenty of voltage to run it.
But You may want to add a 1K resistor in series with the LED to limit current.
Frozone,
Thank you very much. I've got about 65$ in the project less 30$ in amazon points, so I'm at about $35 out of pocket. Thank you for verifying my thoughts on the alarms. I'll probably just put a light on the LED to indicate the energizing. With where the PID is mounted it's easily seen while casting. It worked awesome as it is mounted now for casting a couple of hundred with great temperature stability.
You could use a neon lamp (Radio Shack, color choices) wired directly to the AC out to the pot to show the SSR is supplying power to the pot. It'd also show if the SSR was shorted by staying on when it shouldn't be.
It's possible to add a few missing parts to the pc board inside the SNR to make it a two-alarm SRR or SSR but it would require a bit of electronics construction skill.
"The urge to save humanity is almost always a false front for the urge to rule." --H. L. Menchen
It would be interesting to know how to patch in the second alarm since it's in the firmware, but it's not mandatory. It's functioning good as is, i just love tinkering with things. Right now, i'll put high alarm on the alarm 1 then put a 24v light on the way to the SSR and that should cover all that I could use. So any info about tweaking it, I'm open to it. Thanks everyone for their posts showing how to hook this up.
It definitely made a big difference in the the consistency of the boolits when I used it after installing this.
Um, what kind of light? You only have ~ 25mA available depending on the SSR's internal current limiter.
I bought a REX-C100fk02 for my project. Have it wired and about to power it up and I noticed the sticker on the side of the unit has AC in to post 1&2, and the manual I downloaded has the AC in to post 6&7. Before I take the thing apart I thought I would see if any one has used a REX to control their PID and which post they used for the AC in.
Has anyone used a REX-C100?

I think my PID is a REX model. Where'd you get it? My terminals were in a different order than I saw in most manuals online. I wired them up according to the sticker on the side, and it works fine.
I can't look at my PID setup to verify until later tonight when I'm off work.
ΜΟΛΩΝ ΛΑΒΕ
Thanks. That is how I wired mine also. Just happened to be looking at a English version of the manual and noticed the wiring difference. Bought it on ebay as a kit. Not out that much if I frill it.
well, all my parts are ordered. I plan on using an old power supply case. Once I have the holes cut out I'll powder coat the case.
I've been using Lee equipment for 44years and find it excellent. Cost is not a issue with me as far as equipment goes as this is what I prefer
to spent time and $$$ on. I've had custom molds made and the $25.00 Lee has out shot it on more than one occasion. The Lee Pots can be a temperamental beast but just watch what your doing and adjust accordingly.
Wow, I just found this thread about PID's, there are a lot of very well put together projects.... I wish I could build one but with FM, my hands are having problems with just holding on to the mold while casting, I would not be able to do what you guys did. I saw one for sale on eBay but I cant spend $200.00 for one. I will have to keep using the thermometer and dial method... LOL
Doc
 Posting Permissions


| BP | Bronze Point | IMR | Improved Military Rifle | PTD | Pointed |
| BR | Bench Rest | M | Magnum | RN | Round Nose |
| BT | Boat Tail | PL | Power-Lokt | SP | Soft Point |
| C | Compressed Charge | PR | Primer | SPCL | Soft Point "Core-Lokt" |
| HP | Hollow Point | PSPCL | Pointed Soft Point "Core Lokt" | C.O.L. | Cartridge Overall Length |
| PSP | Pointed Soft Point | Spz | Spitzer Point | SBT | Spitzer Boat Tail |
| LRN | Lead Round Nose | LWC | Lead Wad Cutter | LSWC | Lead Semi Wad Cutter |
| GC | Gas Check |

 Reply With Quote