


In another thread a conversation popped up about identification and use of Safety Wire Pliers, so to avoid hijacking the OP’s excellent thread I have opted to start a new topic. Many have seen different fasteners over the years that include thru holes in the wrench head or nuts and other fasteners that have holes drilled thru the wrenching flats and wondered what they were for. Safety wire is predominantly found in the aircraft world where fastener retention is a paramount concern and shows up in racing and some high vibration commercial applications. The conversation mentioned really revolves around the tool. Though I am not a leading expert in the technology and engineering behind when and where safety wire is needed, I have definite experience on ground vehicles while in the military I am sure some of the aircraft oriented members will chime in.
The description and use is well covered in Wikipedia and there are U-tube videos so I won’t spend time going over it here.
https://en.wikipedia.org/wiki/Safety_wire
In general to apply safety wire a set of specialty pliers are used. There are basically 2 different sizes available, a smaller 6in, and a more generic 9in length and can be found at the usual places to get tools to include northern and horrible freight. The size used depends on the selected wire size and application. Both operate same way, the pliers consist of the semi needle nose jaws to help push and pull the wire through the fastener, wire cutters and a knurled gripping section to grip the wire, the handle end which includes a locking latch to clamp down on the wire and the mechanism that spins the tool on a square helix shaft to impart the twisting action to the wire when the handle is pulled. Once the mechanics are understood it can be done manually using a pair of vice grips, but the results are generally an ugly mess demonstrating why there is a proper tool for the job.
Attachment 220117
The process is fairly simple to describe, loop the wire through the hole around the fastener, clamp into the pliers, apply the twist which will also draw the wire in to conform with the fastener, connect to the second fastener (or fixed point) in the direction of tightening, feed the receiving fastener in the direction of tightening and twist again, clip of the excess and curl or fold the end in to avoid having a “spike” that will snag you or your clothing (I have the scars from bad jobs).
Attachment 220118
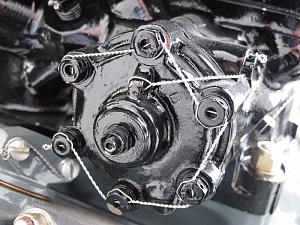
Sounds easy enough until you get into the actual application. It is definitely a thinking game and a definite lesson in patience. To train the young pups we had a metal block with fasteners all around in different orientations for them to practice on and some never really mastered the skill. The first major hurdle is connecting the fasteners in the tightening direction (normally clockwise), having the start and end of the twist at the fastener holes (second hurdle) and getting the backwards “S” look. This is easy enough when the fasteners have the holes aligned to a relative twelve to six orientation with each other. But being the real world most fasteners end up everywhere but perfectly aligned (worst case is with both fasteners at 9-3). Note the need to loop twisted portion around the fastener.
Attachment 220119
The second hurdle to overcome is the length of the twisted area, as the wire is twisted it actually shortens in length making the connection to the second point either too short (better because you can re-bite and twist to the desired length) or worst case too long eliminating the ability to get a nice tight wire lay between the two fasteners. If applied properly the wire can be plucked like a guitar string and remain looped around the fasteners.
The third hurdle is while attempting to get the wire to lay, wrap and twist correctly is not to break it. Overenthusiastic twisting will break the wire, generally at the root of the twist. If attempting to do a multiple fastener job sometimes the work can be salvaged by cutting back to the last pair of “good” wired fasteners.
Attachment 220121
Done well it can be a piece of art. Like anything it is a definite skill and takes practice. The last thing a Mech wanted to hear was the snip of wire cutters when his installation job is being inspected by QA.

|
   
   
|


|

 Reply With Quote


