Snyders JerkyMidSouth Shooters SupplyInline FabricationLoad Data
RotoMetals2Reloading EverythingRepackboxLee Precision
Titan Reloading Wideners

Thread: Making that Bullet Collator

  1. #2201
    Boolit Bub
    Join Date
    Jul 2020
    Posts
    72
    Quote Originally Posted by TylerR View Post
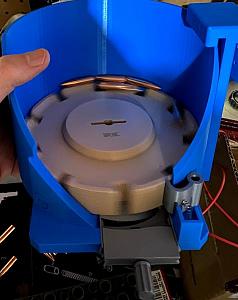
    Check this out. I think this is the ticket right here.

    Attachment 271175
    The biggest issue I had with the thingiverse one was since the bullets were so long they'd ride up on the ridge of the plate and just rotate in the back of the bowl. Your design seems to fix that issue. I'll be curious to see how well the bullet flipping part works since that was the other part that was giving me fits no matter what speed/angle I went at.
    Click image for larger version. 

Name:	3082.jpg 
Views:	31 
Size:	30.6 KB 
ID:	271177

  2. #2202
    Boolit Master GWS's Avatar
    Join Date
    May 2019
    Location
    New Mexico
    Posts
    1,355
    Had a thought.....yes it even happens to me.....

    On my shakers you have a slight funnel that runs the bullets towards the hole. Why not make a funnel around each hole....doesn't have to be deep, just wide. Since you have the verticals the funnel could be as big around as say 1" diameter centered on the holes but going around from plate edge to the upright.

  3. #2203
    Boolit Bub
    Join Date
    Jul 2020
    Posts
    72
    In other news, my print is on its way. Only 23.5 hours left!

    Click image for larger version. 

Name:	p1.jpg 
Views:	26 
Size:	56.9 KB 
ID:	271180

  4. #2204
    Boolit Master lablover's Avatar
    Join Date
    Aug 2015
    Location
    Macomb Michigan
    Posts
    749
    Quote Originally Posted by noacess View Post
    In other news, my print is on its way. Only 23.5 hours left!

    Click image for larger version. 

Name:	p1.jpg 
Views:	26 
Size:	56.9 KB 
ID:	271180

    Great, another prusa photo. I’ve had one in the cart for a week...just can’t “pull the trigger”

  5. #2205
    Boolit Man
    Join Date
    Nov 2018
    Posts
    84
    Quote Originally Posted by TylerR View Post
    Check this out. I think this is the ticket right here.

    Attachment 271175
    That does indeed look like the ticket! The original in gray fixed all the issues I had. You sir are definitely on a roll! What parameters did you use to get those bullet spike troughs?
    Whenever you update the generator or file I'll also print one to test and the deep ramp piece. I have spent more time on 247gr cast boolits with the other one (original in gray), probably more grumbling and fidgeting until I found that one. This will likely make me print another big base :O and maybe just use the original AM one for just sizing. Epic and coincidentally I just ordered more filament. It's a sign!

  6. #2206
    Boolit Master TylerR's Avatar
    Join Date
    Dec 2008
    Posts
    1,997
    Quote Originally Posted by djinnpb View Post
    That does indeed look like the ticket! The original in gray fixed all the issues I had. You sir are definitely on a roll! What parameters did you use to get those bullet spike troughs?
    Whenever you update the generator or file I'll also print one to test and the deep ramp piece. I have spent more time on 247gr cast boolits with the other one (original in gray), probably more grumbling and fidgeting until I found that one. This will likely make me print another big base :O and maybe just use the original AM one for just sizing. Epic and coincidentally I just ordered more filament. It's a sign!
    I just started printing mine. I will post it in just a little bit. These are the settings I used to produce this, using the new parameters. centerRidges = false and rotateSlides = true;

    description="Long Rifle Bullet (#4)"; //description
    caliber=7.82; //ENTER YOUR CALIBER HERE
    collator_plate_h=18; //plate height - pistol 13, rifle 18

    // RIFLE BRASS PLATE OPTIONS
    // Use caliber setting for hole length
    isRifleBrassPlate = false;
    rifleHoleWidth = 9;

    // PLATE OPTIONS
    addPivots = false; // Add pivots for base down brass feeding
    addSlides = true; // Add sliding slots for bullets
    addRidges = true; // Add top ridges for brass plates
    centerRidges = false; // if false ridges align with far side of hole
    rotateSlides = true; // Rotate slides 90 degrees in front of hole
    ridgeAlternate = false; // Skip every other hole
    ridgeHeight = 3.0; // Ridge height in mm
    ridgeLength = 15; // Ridge length in mm
    hole_multiplier=3.5; // Modify the number of holes

    addBevel = true; // Add top bevel to holes
    bevelSize = 1.5; // Change depth of bevel (1.3 - 1.6)

  7. #2207
    Boolit Master TylerR's Avatar
    Join Date
    Dec 2008
    Posts
    1,997
    v1.1.3 uploading now.

  8. #2208
    Boolit Bub
    Join Date
    Jul 2020
    Posts
    72
    Quote Originally Posted by TylerR View Post
    v1.1.3 uploading now.
    Awesome. Is the new collator generator the only change?

  9. #2209
    Boolit Master TylerR's Avatar
    Join Date
    Dec 2008
    Posts
    1,997
    Quote Originally Posted by noacess View Post
    Awesome. Is the new collator generator the only change?
    I also regenerated the rifle brass plates, and added the new "deep dish" rifle bullet slide.
    I am in a stage of tweaking things on a daily basis, so in general my suggestion is if you haven't printed a part and are thinking about it, always download the latest.

  10. #2210
    Boolit Master TylerR's Avatar
    Join Date
    Dec 2008
    Posts
    1,997
    So I'm not going to lie, this new design has me rethinking these collator plates in general. At a minimum I am going to also change the large rifle bullet plate. With the small plate I am not sure it matters.

    I really can't wait to get you guys trying all these different possible combinations. To be honest, I have printed out so many plates I am going to need a second job to pay for the plastic. lol

  11. #2211
    Boolit Master lablover's Avatar
    Join Date
    Aug 2015
    Location
    Macomb Michigan
    Posts
    749
    Quote Originally Posted by TylerR View Post
    So I'm not going to lie, this new design has me rethinking these collator plates in general. At a minimum I am going to also change the large rifle bullet plate. With the small plate I am not sure it matters.
    How are you able to sleep? Does that mind ever turn off?

  12. #2212
    Boolit Master TylerR's Avatar
    Join Date
    Dec 2008
    Posts
    1,997
    Quote Originally Posted by lablover View Post
    How are you able to sleep? Does that mind ever turn off?
    Haha, sometimes it aint easy. That's why they invented beer.
    I can't lie, 3d cad in general is a bit of a passion, and as a programmer for 20 years messing with OpenScad is a whole nother world. The programming part is easy for me, its all the damn math I struggle with. lol

  13. #2213
    Boolit Master TylerR's Avatar
    Join Date
    Dec 2008
    Posts
    1,997
    So I kept the original large rifle bullet plate, but added two other long bullet plates. Rifle_Bullet_Collator_Plate_Long_1_#4 and Rifle_Bullet_Collator_Plate_Long_2_#4.

  14. #2214
    Boolit Man
    Join Date
    Nov 2018
    Posts
    84
    Quote Originally Posted by TylerR View Post
    Haha, sometimes it aint easy. That's why they invented beer.
    Oh man! Isn't that the truth! Mmmm beer!

    Quote Originally Posted by TylerR View Post
    So I kept the original large rifle bullet plate, but added two other long bullet plates. Rifle_Bullet_Collator_Plate_Long_1_#4 and Rifle_Bullet_Collator_Plate_Long_2_#4.
    I can't wait to try that out! Got the long plate #4 going. So funny bit apparently I added a new new CR10v2 to the mix and it slightly over on the x and y so the 300bo brass plate is a bit snug so will need to clean it up and calibrate.

  15. #2215
    Boolit Master GWS's Avatar
    Join Date
    May 2019
    Location
    New Mexico
    Posts
    1,355
    I use a CR-10v2.....love it, but the bed and frame did not come square and Z was not level. It wasn't hard to remedy that, but it has to be done. A level and a square is your friend. Just a word to the wise

  16. #2216
    Boolit Bub
    Join Date
    Jul 2020
    Posts
    72
    Of course my print failed 9 hours in with a print bed temp failure. Time to check out the thermistor.

  17. #2217
    Boolit Master TylerR's Avatar
    Join Date
    Dec 2008
    Posts
    1,997
    Quote Originally Posted by noacess View Post
    Of course my print failed 9 hours in with a print bed temp failure. Time to check out the thermistor.
    Man I really hate when stuff like that happens. I had a base fail after like 15 hours and its just such a waste. I also put my printer on a ups backup to handle any power outages during these long prints.

  18. #2218
    Boolit Master TylerR's Avatar
    Join Date
    Dec 2008
    Posts
    1,997
    No having great success with my long bullet slide. I am redesigning it right now to see if I can get it working.

  19. #2219
    Boolit Master GWS's Avatar
    Join Date
    May 2019
    Location
    New Mexico
    Posts
    1,355
    TylerR: That's the only weakness in 3d printing for prototyping....harder to tinker with. I'd be grinding off what didn't work and forming 5 minute epoxy putty in another shape to try...for the prototype only. Prototypes don't have to be pretty.

    Speaking of pretty, my base finished ...... 39 hours was a bad guess on IdeaMaker's part. 44 hours. Probably due to the "adaptive" thicknesses maybe? They've been pretty close for normal prints. Best looking print I've done. Pictures later today.

    Was it perfect.....it is BEAUTIFUL! So mostly yes, except for the two sharp corners either side of the slider.....they both raised off the base again, but I desided the fix was easy since layers above the groove were perfect, and the rise was maybe 1/8". Don't know why, the rest of the base was a bit hard to break loose, even. I don't get it. Time to get out a file and shape that groove the last 1/2" inch.

    Speaking of "adaptive"? IdeaMaker also has "adaptive infill". That's interesting. With it turned on the software decides on infill density, and towards the top of a print density gets denser so that the top solid layers are smoother.

    I can relate to that. This latest print's only negative is that the surface the collator wheel rides on isn't as smooth as I'd prefer due to the 18% infill. I thought 4 layers over it would smooth it out more than 2 layers, but I didn't see any difference.

    Oh! BTW! the Dayton motors fit absolutely perfect! So add them to the list for the EZ-ZGMP38 base.
    Last edited by GWS; 11-12-2020 at 12:22 PM.

  20. #2220
    Boolit Mold
    Join Date
    Nov 2020
    Location
    Idaho
    Posts
    1
    Printed last week
    Hopefully get it put together later this month
    Thanks for the work fellas!

    Click image for larger version. 

Name:	collator.jpg 
Views:	38 
Size:	41.4 KB 
ID:	271231

Page 111 of 360 FirstFirst ... 1161101102103104105106107108109110111112113114115116117118119120121161211 ... LastLast

Posting Permissions

  • You may not post new threads
  • You may not post replies
  • You may not post attachments
  • You may not edit your posts
  •  
Abbreviations used in Reloading

BP Bronze Point IMR Improved Military Rifle PTD Pointed
BR Bench Rest M Magnum RN Round Nose
BT Boat Tail PL Power-Lokt SP Soft Point
C Compressed Charge PR Primer SPCL Soft Point "Core-Lokt"
HP Hollow Point PSPCL Pointed Soft Point "Core Lokt" C.O.L. Cartridge Overall Length
PSP Pointed Soft Point Spz Spitzer Point SBT Spitzer Boat Tail
LRN Lead Round Nose LWC Lead Wad Cutter LSWC Lead Semi Wad Cutter
GC Gas Check